
Recent Changes July 2015
Projects - Importing
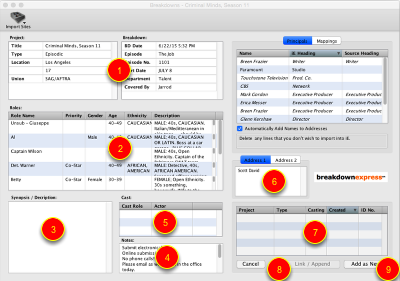
The Projects Import window has been redesigned allowing you to clean up or modify information prior to import.
1. Main project information including Tittle, Type, Episodic Information, and more. Right click on any of the fields to edit the data prior to importing it into your inEntertainment database.
2. Role information - Right click to edit or remove data prior to import.
3. Description or Synopsis can be edited prior to import.
4. The Notes section allows you to edit the Notes prior to import.
5. Cast information - Right click to edit or remove data prior to import.
6. Address information can be edited prior to import.
7. Already presents Projects or breakdowns from your database that could be a match to the currently displayed breakdown are shown in this list.
8. Link the currently displayed breakdown to a previously imported project by selecting the project from the list. This is recommended when an earlier breakdown for the same project was previously imported.
9. Add as a new Project/Breakdown to your database.
Principals and Mappings
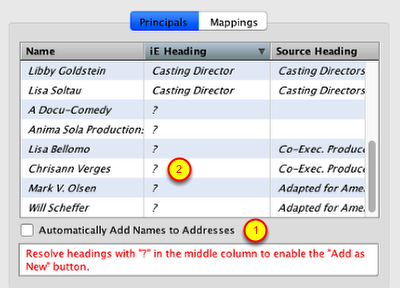
1. When the "Automatically Add Names to Addresses" button is checked, new address records will automatically be created for names in italics. Only the name is added, so you may wish to add category, phone, email or address information to those records after the import.
2. Headings from the breakdown that do not match any preexisting Principal headings will display as question marks. You will need to resolve these before you can add the breakdown to your database.
To resolve question marks:
Right click on a question mark and choose "Skip", "Remove" or "Edit List", or one of the existing headings from the popup menu.
Skip: This will skip this entry when importing, but leave it in the list. Doing so will mean that in the example above a heading with "Skip" under the iE headings column will be added to the "Mappings" and if encountered again will automatically be skipped over in future imports.
Remove: Will do just that, remove it from the list but if encountered again will re-appear.
Edit List: Will allow you to add a new heading in order to create a match for the source heading.
When choosing a heading, that heading will be entered as a match under the mappings for future imports.
Once you have resolved all the unknown matches then the "Link / Append" and "New" buttons will become clickable.
Mappings
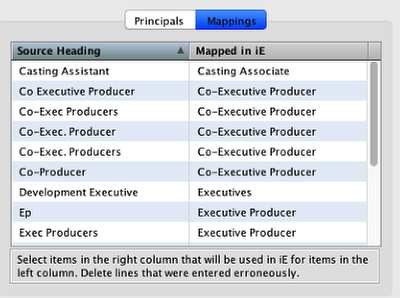
Review or alter any items previously skipped or that may have been assigned incorrectly.
Note: Theses changes are global and affect all users of this database.
Refresh Import
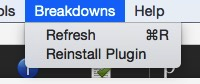
While editing any of details for the Project/Breakdown and you wish to start over, select the "Refresh" option in the Breakdowns menu to revert back to the original project data.
installing or Re-installing Browser Plugins
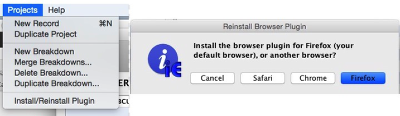
To use these new import features detailed above, you will need to install or reinstall the iE Browser Plug-in. You will need to have Version 4 of the plug-in for the browser you use. You will find the option to "Install/Reinstall Plugin" in the Projects menu when in the Projects Module. Please contact the iE office if you are unsure how to do this or run in to difficulty.
Addresses - Vitals
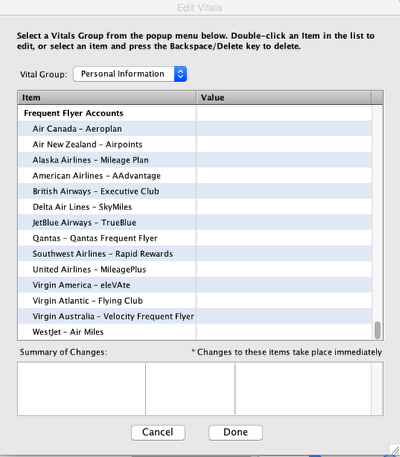
There is now a new section in addresses vitals tab to enter a contact's Frequent Flyer Number(s).
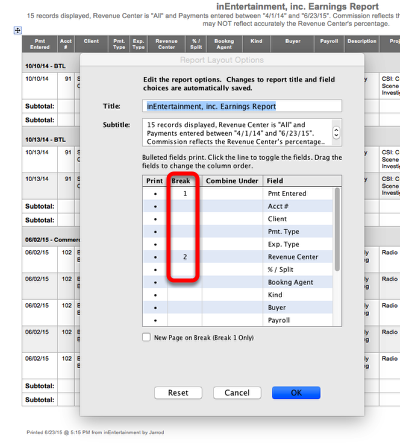
Calendar - List View Printing
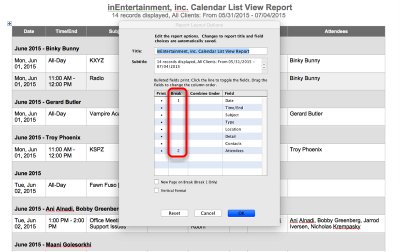
When printing out the iE calendar list view, you can now set 2 breaks for the report. To achieve this, you will need to sort your data correctly. You should sort your report first by the 2nd break and then the 1st in the previous window before selecting print. Follow the example below to sort as shown above.
EXAMPLE - In the picture we have assigned the results to first Break by Date (Month) and then by Attendee. So before you print, you must sort the report first by attendee and then the date to achieve the result show in the example.
Calendar - List View Export Feature
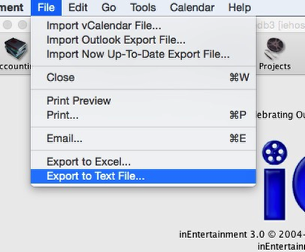
Calendar List View can now be exported as a MS Excel document or a Text File. The export feature is located under the File menu.
Accounting - Abeyance Step 1
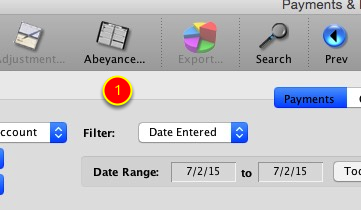
In the Payments and Distributions section of the Accounting module in the Payment tab, there is now a button for adding an Abeyance. You should use this to record received monies into the trust account when unsure what client and/or project are to receive the funds. This will allow you to balance the deposit for the day.
1. Click the Abeyance button at the top of the payments window.
Accounting - Abeyance Step 2
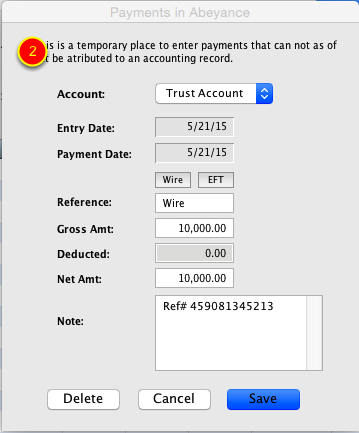
2. Enter the information for the monies received. Include as much information as possible to make searching for this payment at a later date easier.
Accounting - Abeyance Step 3
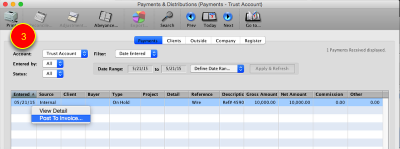
3. To assign a payment recorded under the Abeyance section, view the date that you entered the Abeyance from the payments window. R-Click on the line and choose "Post to Invoice".
Accounting - Abeyance Step 4
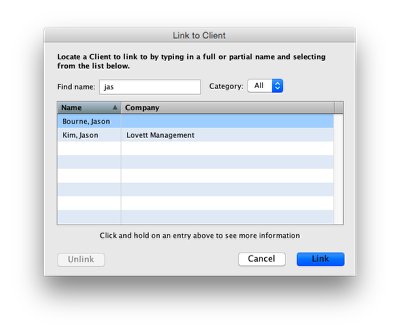
Choose which client the money is for and then click "Link".
Accounting - Abeyance Step 4
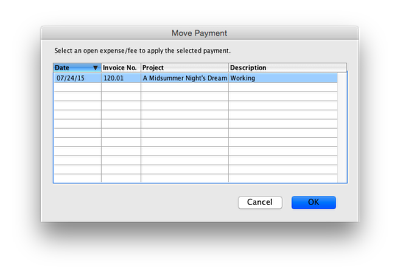
The search will only return expenses that match the amount in abeyance exactly. Select the line that corresponds to the payment and click "OK"
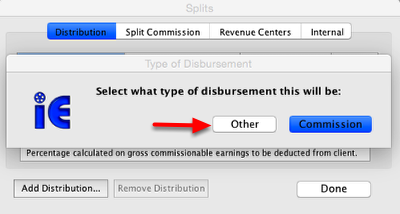
Accounting - Outside Distribution Split
When adding a third party distribution split on a client's address record, to an existing accounting record, or from the payment entry window; choose "Other" when you wish to not have the distribution considered a commission.
Accounting - Admin
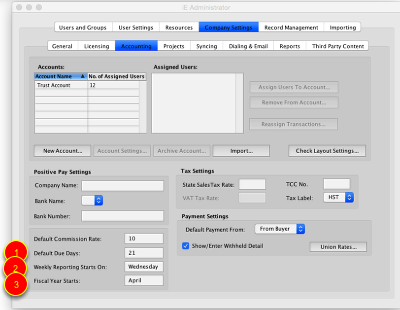
1. Default Due Date - This allows you to set the default date calculation for the due date on expenses entered in Bookings or Accounting.
2. Weekly Reporting - When creating accounting reports using "This Week" or "Last Week" this will determine what day of the week you report starts on.
3. Yearly Reporting - Enter the starting month for your fiscal year accounting. Any accounting report or year to date calculations will be based on this starting month.
Admin - Invoice Settings
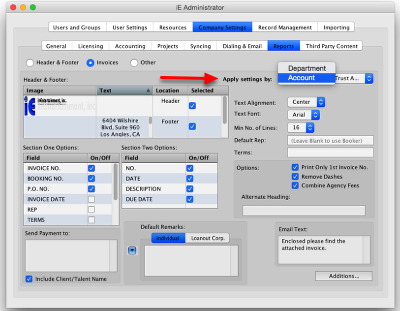
Invoice settings can now be set to link either to your Trust Account or a Department.
Invoicing - Invoice Numbers

Invoice numbering has been changed and will no longer default to either the Booking or Accounting number. By default new entries are not assigned a unique invoice number unless the "Recurring" button under "Invoicing" is checked. To assign an invoice number:
1. Select a line, (or multiple lines) from the Fees and Expenses tab.
2. R-Click on the fee line and follow the prompts to assign invoice numbers.
The same invoice number will be assigned to all lines selected.
If you add additional fee lines after assigning the first invoice number you will have the option to assign them to the same number or add a new invoice number.
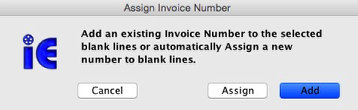
After selecting "Assign Invoice Number" this dialog will open.
"Add" will present you with a list of previously used Invoice Numbers, already assigned to this Booking or Accounting record, and let you choose a number to link to the selected lines.
"Assign" will let you assign the next available invoice number to the selected lines.
Note: Invoice numbers will not appear sequential if they have already been assigned to another record. If you wish to have a starting number of your invoice numbers contact inEntertainment to set this up.

Once you have assigned the invoice numbers you can R-Click on the fee lines and assign a date for each to be printed or set the Job Date as the date to be printed.
Printing an Invoice
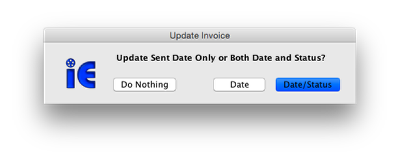
After printing of an Invoice, a prompt will appear requesting an action.
"Date": Will update the "Inv. Date Printed" for the invoice that was printed or sent.
"Date/Status" : Will update the "Inv. Date Printed" and enter into the "Inv. Status", "Billed/Commission" or "Billed/"Total" as to which type of invoice was printed.
Invoice Status
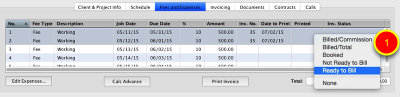
Assign the status of an Invoice by right clicking under "Inv. Status" from the Bookings or Accounting windows.
*NOTE - This column is only visible for Booking Records when an Accounting record has not been created.
Accounting - Accounts Receivable
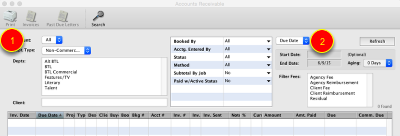
There have been a few additional features to the accounts receivable window.
1. Accounts receivable reports can be filtered by a specific Trust Account or All, and/or by a specific Department Type or All.
2. Select by Due Date, Invoice Date, Invoice Sent Date or Job Date.
*NOTE - In order to send Invoices and Past Due Letters from the accounts receivable report, you will need to use either the Invoice Date or Invoice Sent Date options.
Accounting Search - Export to MS Excel
Accounting Search Results can now be exported as a MS Excel file.
1. Once you have performed your search, click the Export to Excel button at the top of the window.
2. Just as when printing before, you'll be presented with options for which columns you want and what order you want the results in.
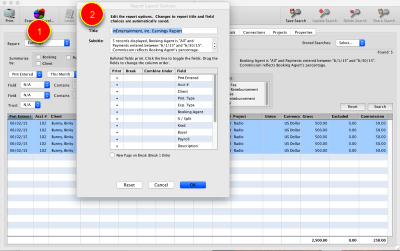
Accounting Search - 2 Page Break
When printing accounting reports, you can now break the report by using two presorted columns as described above in Calendar - List View Printing. Select the column you wish to use for the 2nd break, then the column heading for the 1st break .
Example - Earnings report by revenue center that breaks by payment entered date and then by revenue center so the report shows the total amount received for each revenue center and subtotaled for each day.
Accounting/Bookings - "Look For" field
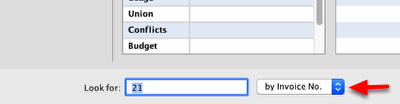
In both the Accounting and Bookings window you can look up bookings or accounting records by the Invoice number using the "Look For" field at the bottom of the window. Use the drop down menu to the right of the entry field to select the criteria you need.
Accounting/Bookings - "Look Up" feature
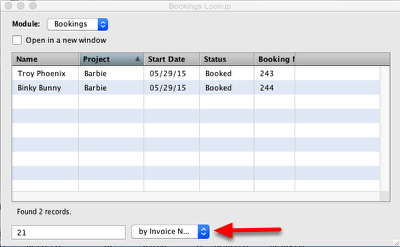
You can search using "Invoice Number" within the "Look Up" window found under the tools menu.
Accounting - Display Totals
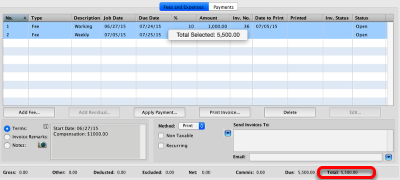
From an accounting window, selecting multiple lines and right clicking will give you a grand total of those lines.
At the bottom of both the Bookings and Accountings window is a new field showing the total for the job.
Bookings Search - invoices
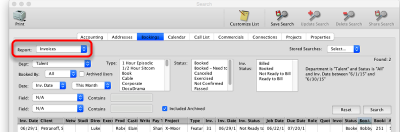
The Bookings Search now contains a report by Invoices.
Accounting - Recalculate Payments
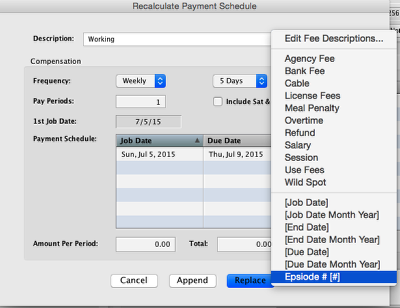
New under "Recalculate Payment Schedule" is an option for "Episode # [#]" When selected and after clicking on Append or Replace you'll be prompted to enter in a starting number. The bracketed item, "[#]", will be replaced by a series of numbers based on the starting number you entered. You can substitute the words "Episode #" with any text of your chossing.
Accounting - Reorder by Job Date...
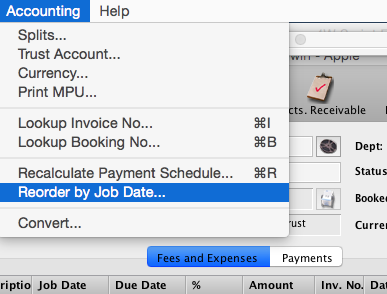
This will reorder the fees and expenses in job date order.
Admin - Reporting/Statements/Remittance Advices Settings
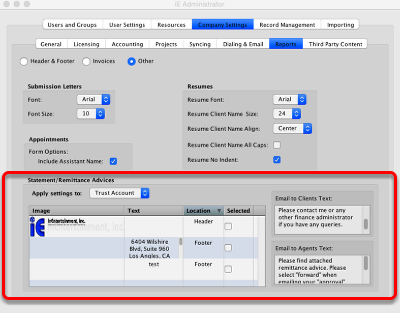
You can assign different elements to appear on Statements/ Remittance Advices based on each trust account.
Open into List View
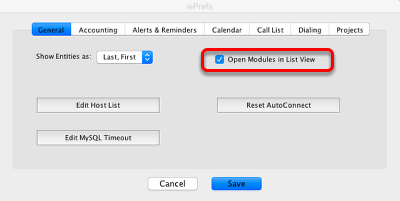
There is a new preference for each user to allow you to have the main modules in IE open with List View. To access this preference select "Preferences" either under the "Edit" or "inEntertainment" menu.
January 2015
November 2014
October 2014
July 2014
May 2014
March 2014
October 2013
May 2013
October 2012
June 2012