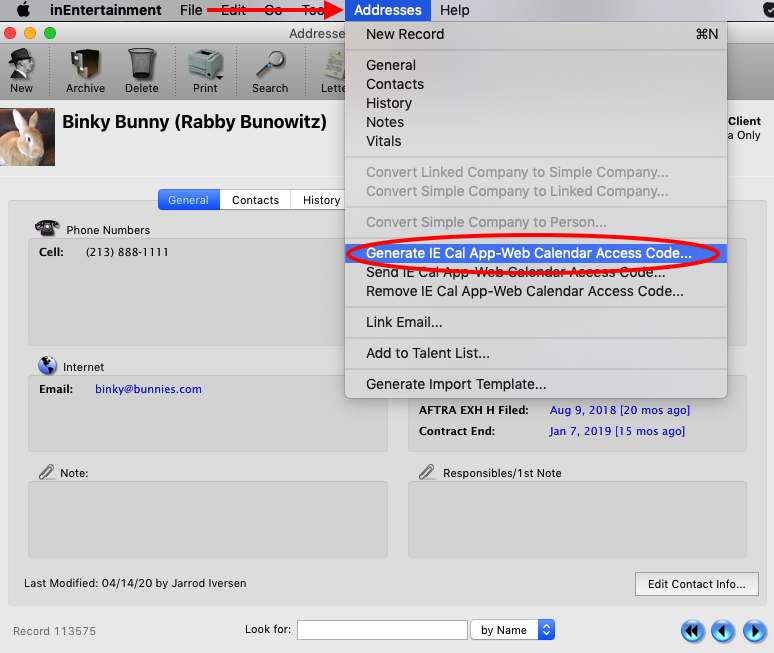
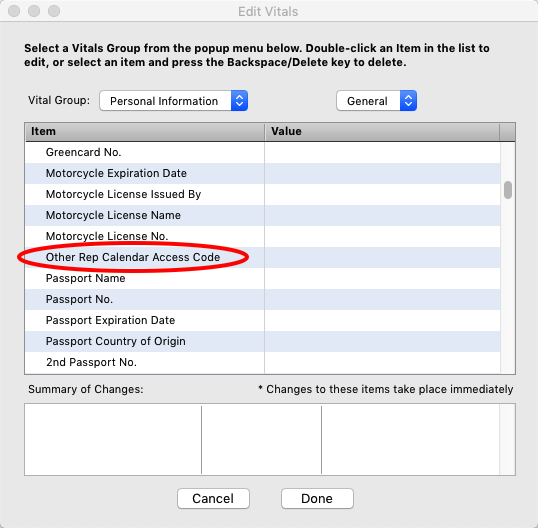
iE Support
Need support with inEntertainment software? Please fill out the form below. We usually respond within the hour.
...or call us at 323.456.1580
Frequently Asked Questions
Accounting
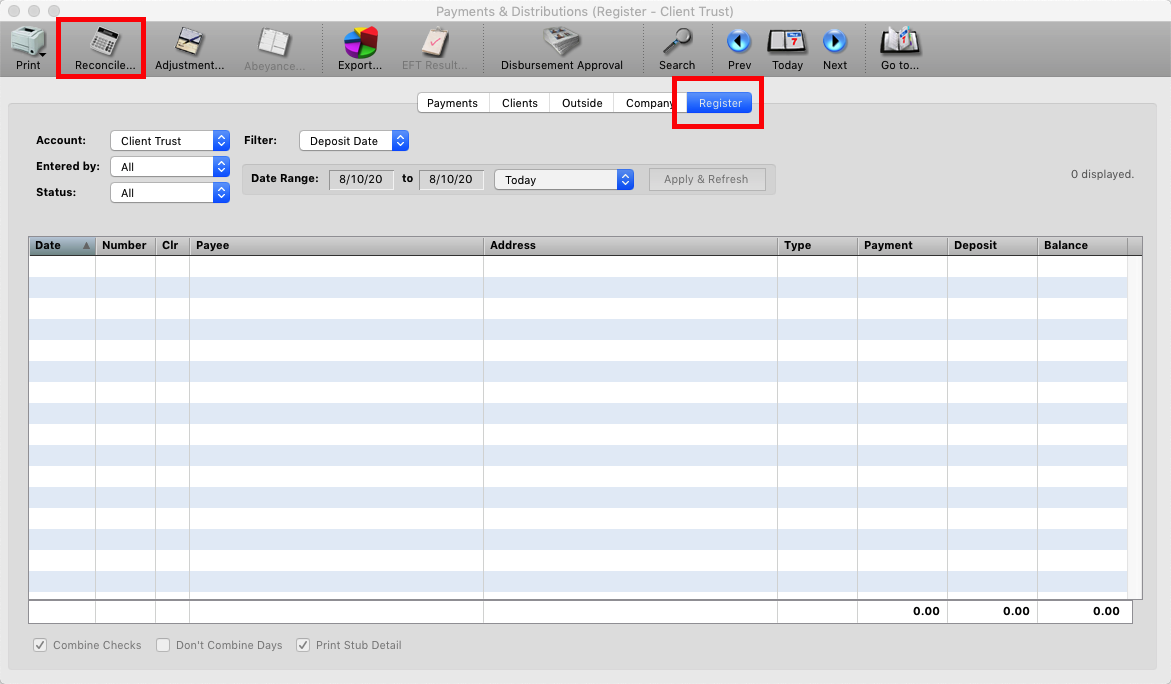
Step 1
In the Payments and Distributions go to the Register and Click Reconcile at the top left.
Step 2
The Statement Info box will open. Enter the Beginning Balance and Date as well as the Ending Balance and Date and click Continue.
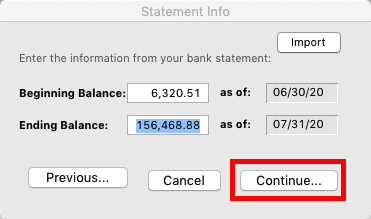
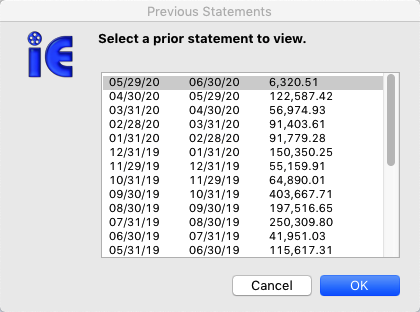
*Note – Clicking the Previous button will display the previously entered reconciles for the account.
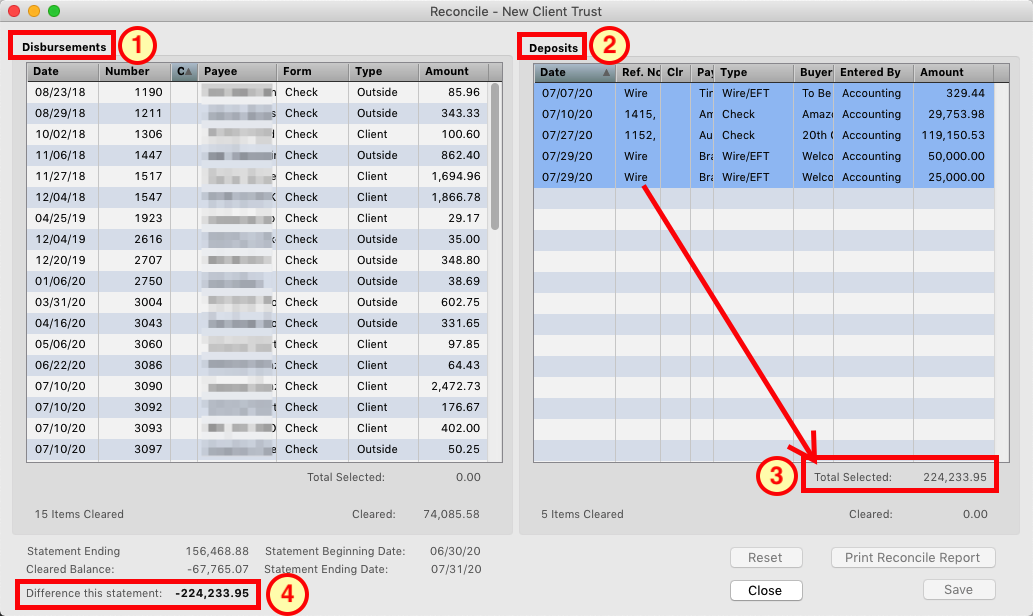
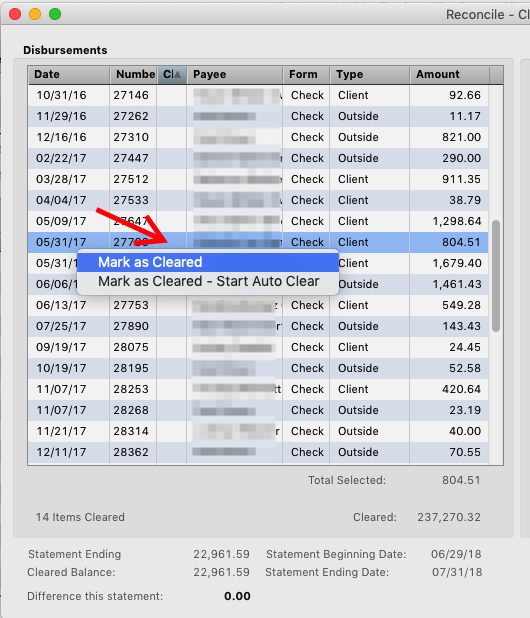
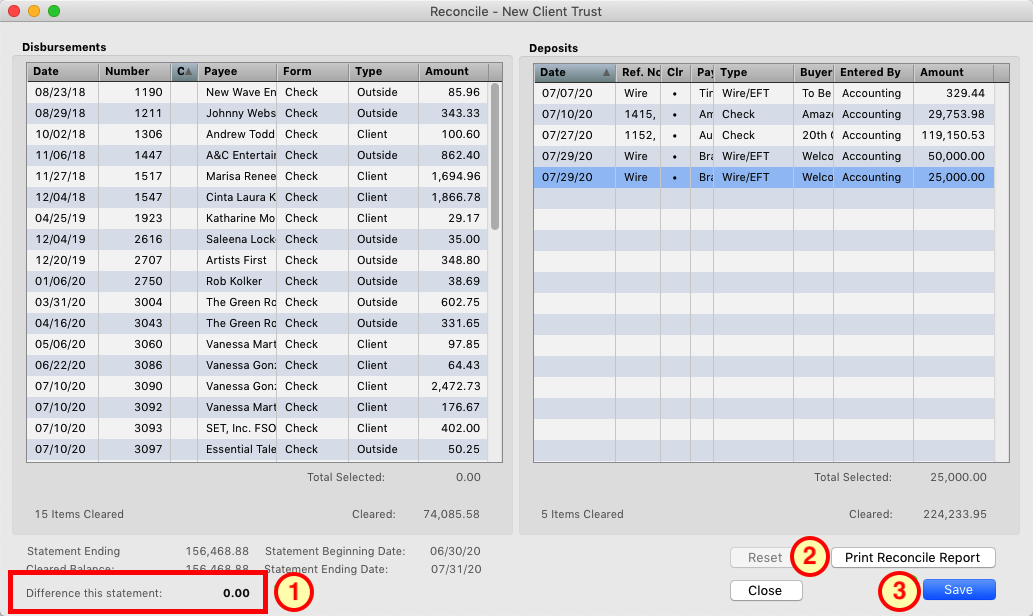
Step 3
Disbursements, (Outgoing Checks and Direct Deposits(1)) are listed on the left hand side and Deposits (2) you have made are on the right. If you select multiple items on either side at the bottom of the window iE will display the total amount of the items selected (3). In the bottom left corner of the window is “Difference in Statement” amount (4). This number will change as you clear your disbursements and deposits.
Step 4
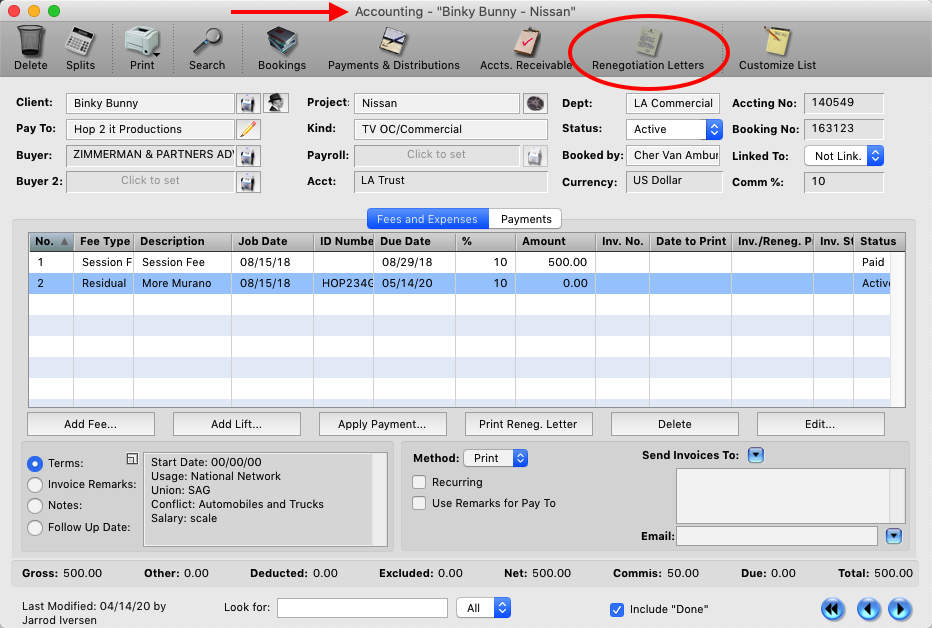
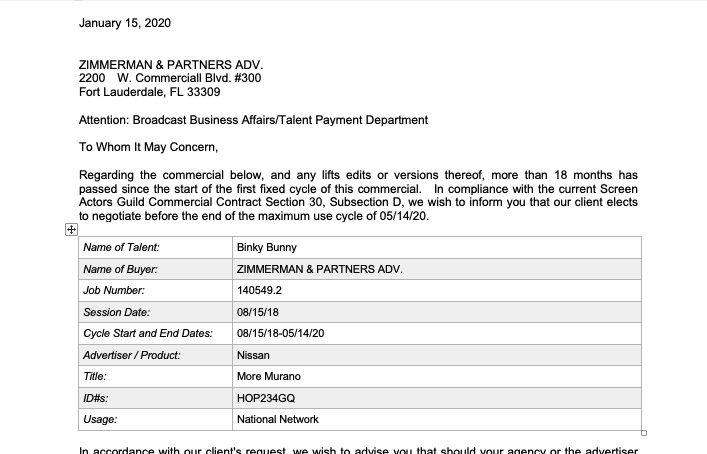
This FAQ will guid you through the process of printing the three different letters for commercial renegotiations.
Step 1
For Union commercial, letters are generated based on the settings you have entered for the residual line on a commercial accounting record. Each residual line you create can have their own dates for renegotiation.
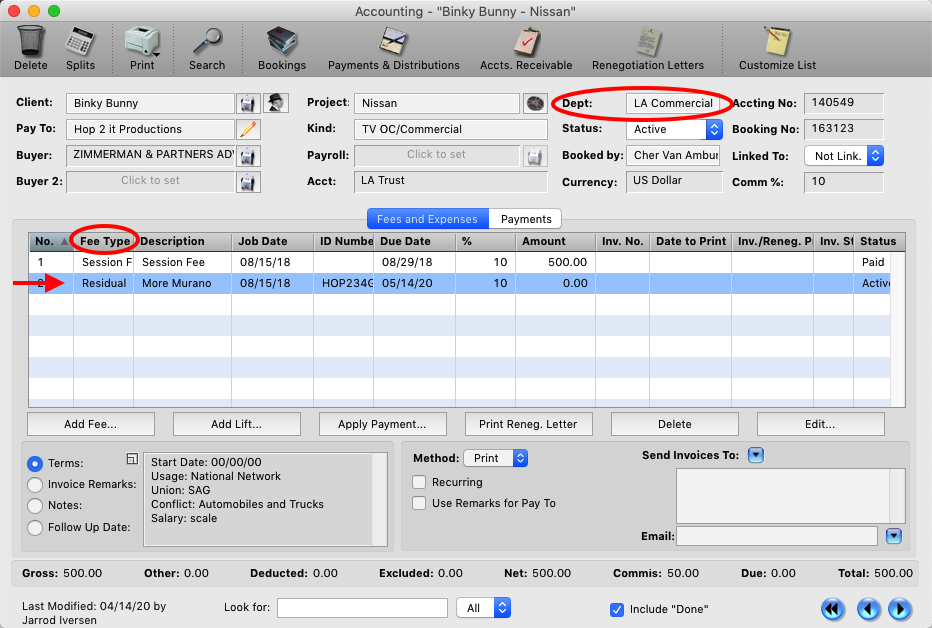
Step 2
Double clicking on the Residual Fee line will open the information in a window. Depending on the Cycle Begin date (1) and which option you have selected for the Cycle Format (2) the Renegotiation Date will be automatically set, (based on Union standard). You can override the date by manually clicking on the date.

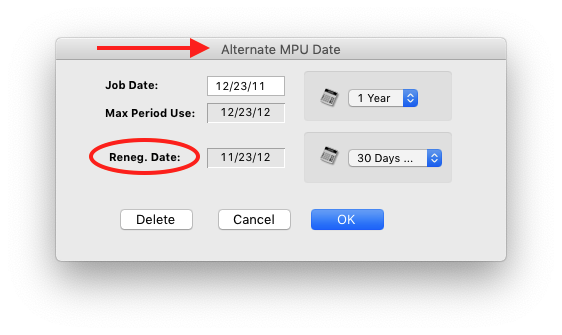
Step 3
For Print and Non-union commercials you won’t have a residual line. Use the “Alternate MPU…” choice from the accounting menu. There the MPU/ Renegotiation settings can be set or reviewed.

Step 4
With that window you can set the MPU and how far in advance the Reneg. Letter should be sent.
Step 5
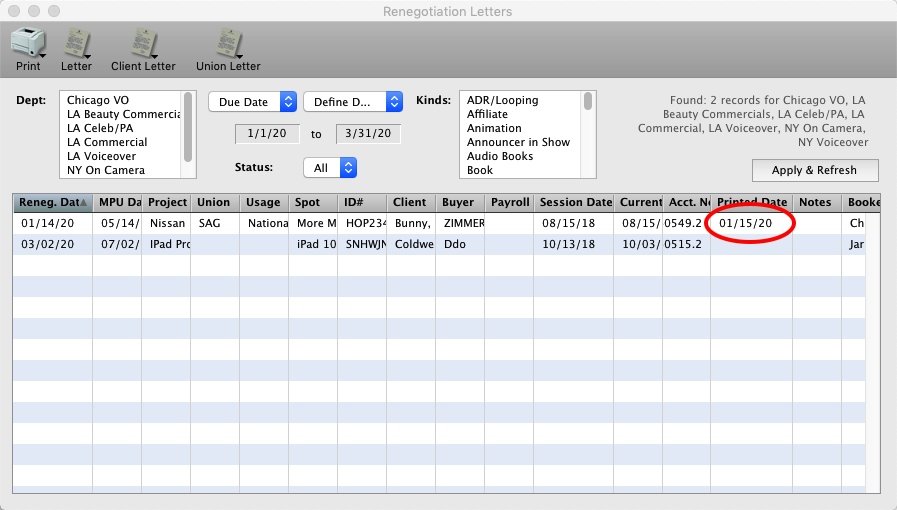
To generate the letters go to any accounting record and click the Renegotiation Letters button at the top of the window.
Step 6
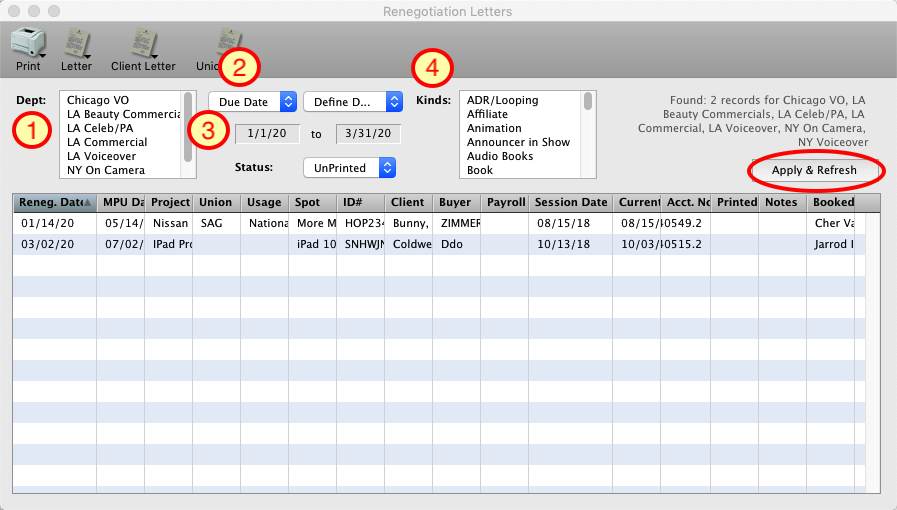
The Renegotiation Window will open. The options to running the report are:
1. Dept: This allows you to pull up a list of commercials to be renegotiated by department(s).
2. Due Date: You can choose to run the report by the Due Date, MPU Date or Printed Date, (date the letters were printed).
3. Date Selection: Set the date rangeofthe letters you want to print or send.
4. Kinds: Allows you to narrow the list based on what kind of job it’s for.
Click Apply and Refresh after you have entered your options. Each residual line that meets the options you selected will be displayed in the results.
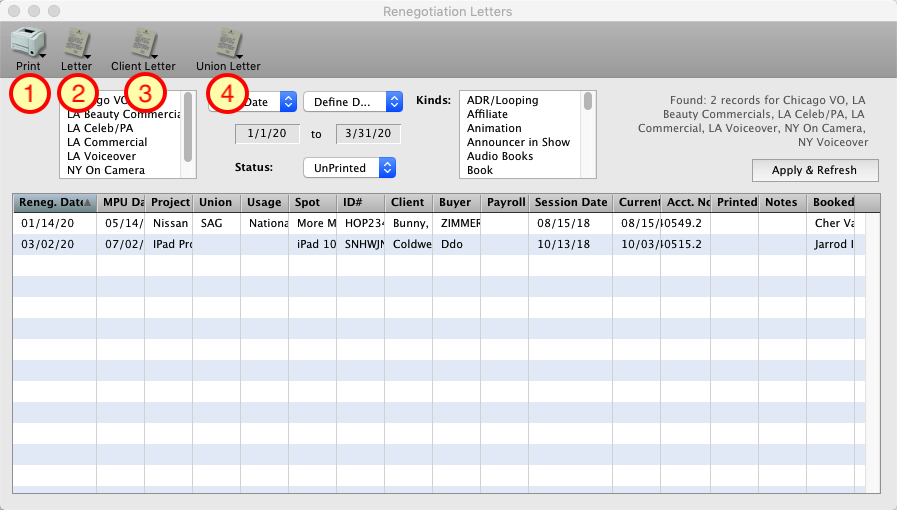
Step 7
Once you have your results the options for printing are across the top of the window. (Click and hold on the icon to get the pop-up menu for each option.)
1. Print: This will print out a report of all the results currently in view.
2. Letter: This prints out the Letter to the buyer indicated on the accounting record.
3. Client Letter: Prints out a letter and authorization form to the client giving you permission to renegotiate the job.
4. Union Letter: Prints out a letter to the Union stating that you are the rep on file for this jobs renegotiation. (You will be able to Choose between LA, NY and Chicago SAG/Aftra offices addresses for the letter.)
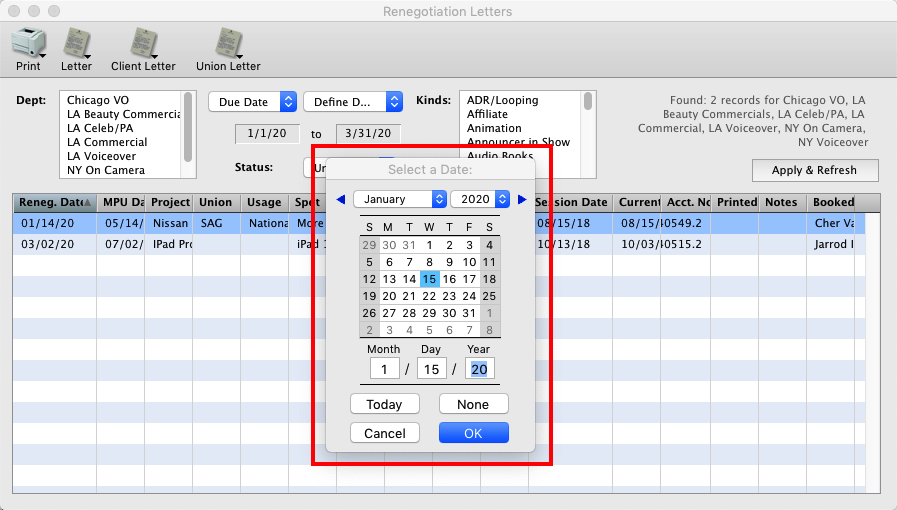
Step 8
You will be prompted to choose a date for the letters you are printing.
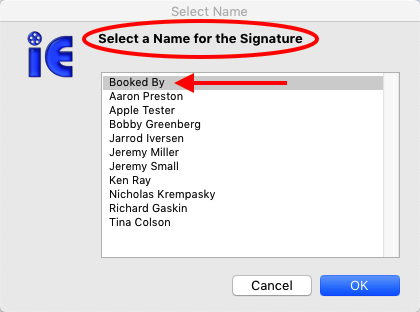
Step 9
Then you will be asked for a user name for the signature on the letter. (Pick Booked by to have each letter’s signature be the agent that booked it.)
Step 10
The Letter(s) will open up in Microsoft Word for you to print out.
Step 11
inEntertainment will prompt you if all the letters you selected printed correctly.

Step 12
Choosing ‘YES’ will set the letter date you selected in step 8 as the printed date for Renegotiation Letter.
Step 13
You can also print out a renegotiation letter from the Accounting record by selecting the residual line and the select the “Print Reneg. Letter” button.
Step 14
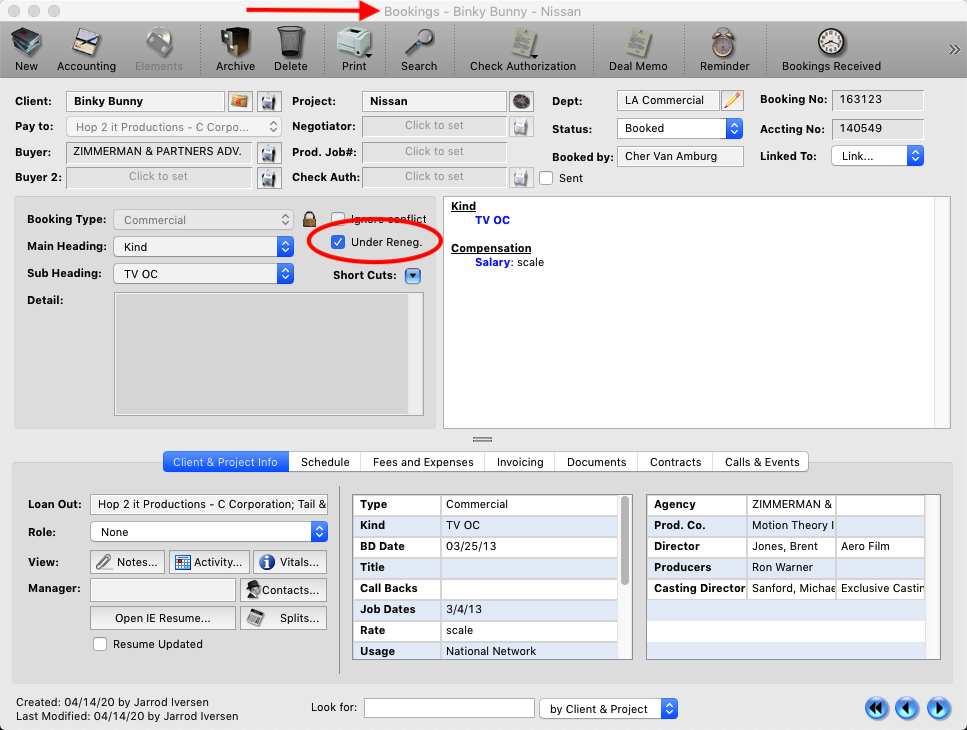
If a job is taking an extended amount of time to negotiate and you don’t want it to fall off the commercials conflict list after the MPU has passed. Click the “Under Renegotiation” button on the Booking record and it will remain on the list indefinitely.
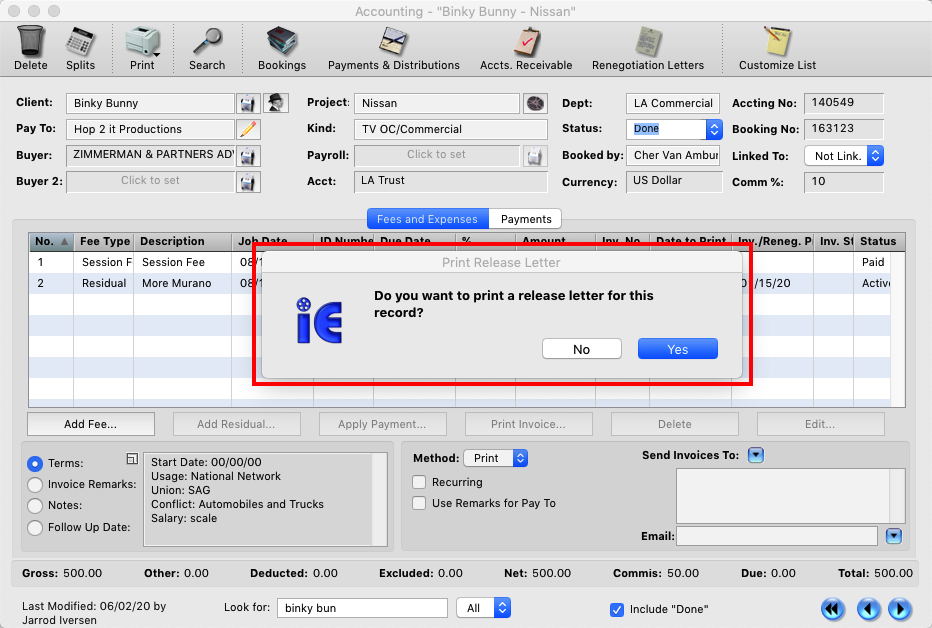
Step 15
When a commercial is over, change the status on the account record to Done. When you do this you will prompted to print a release letter to the client informing them the commercial is over and they are no longer being held for that particular conflict.
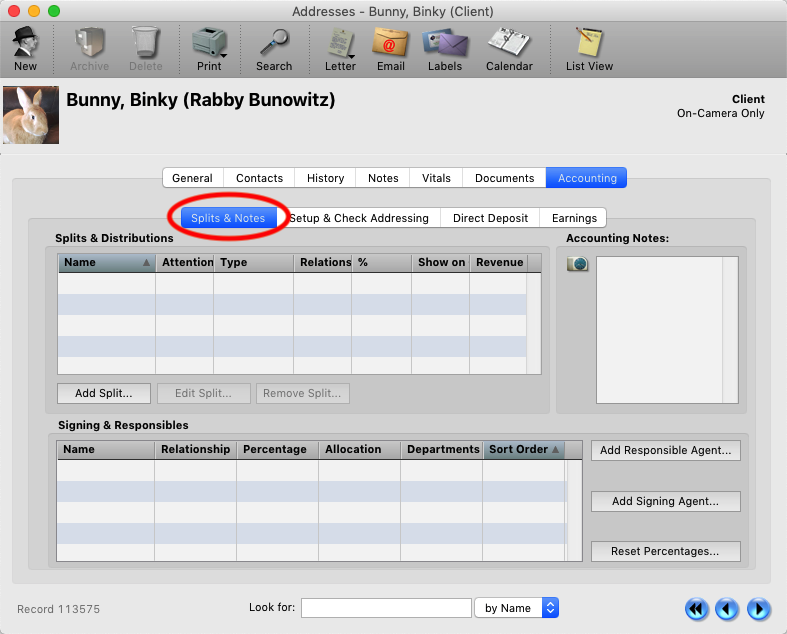
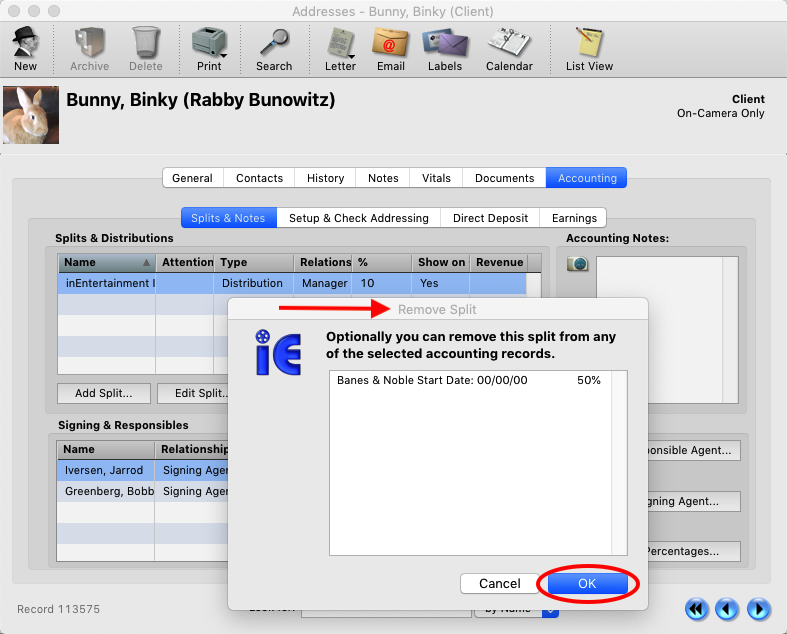
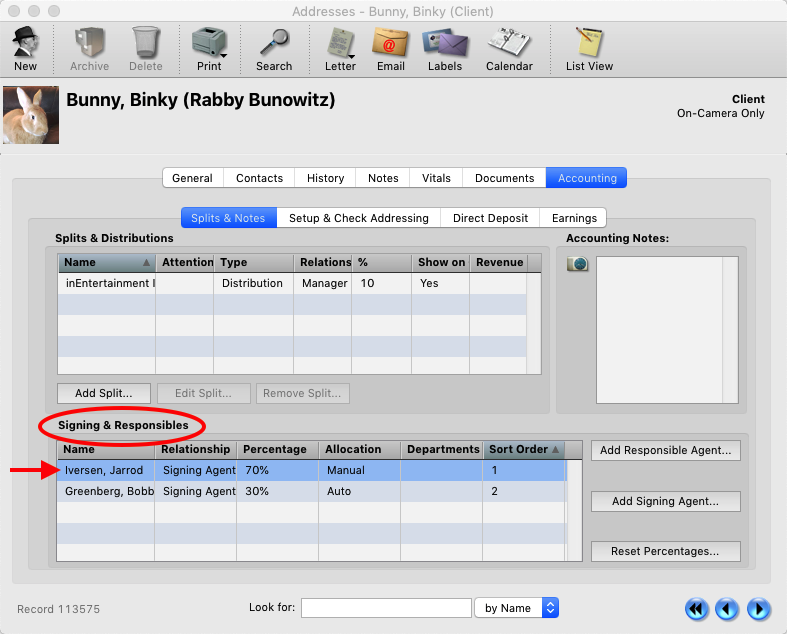
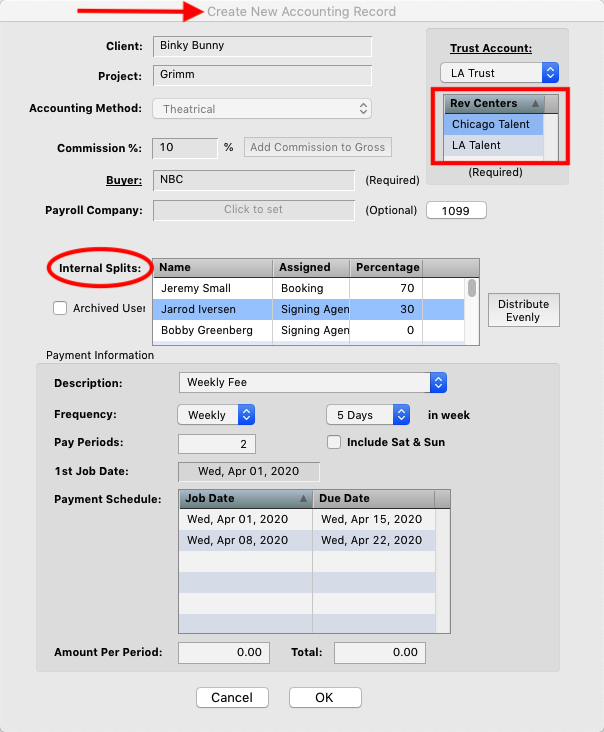
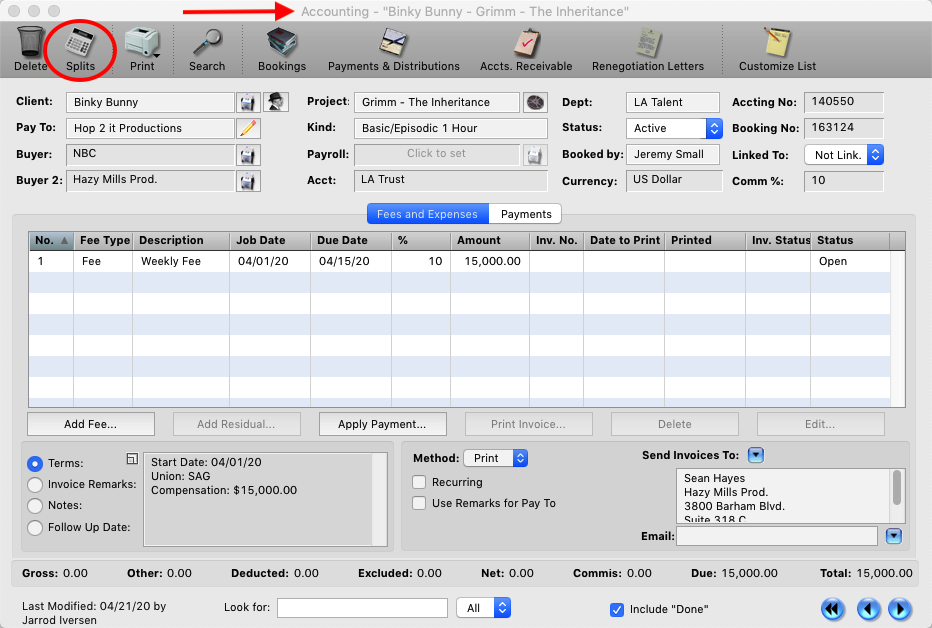
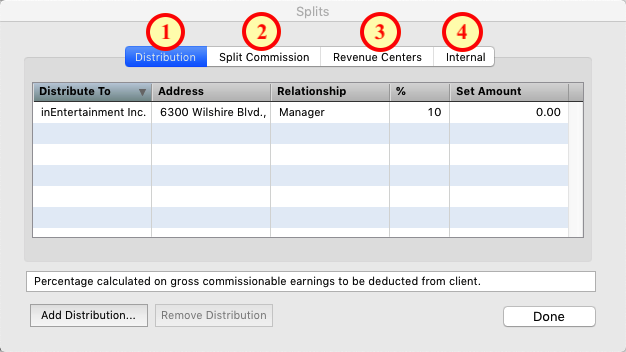
This FAQ will guide you through setting up split commissions to third parties and internal splits within your company as well as third party disbursements on a client’s behalf.
Split Commissions and Disbursements to third parties can be setup on on the clients address record. Internal splits between users and revenue centers are setup on each accounting record.
*Note You shouldn’t setup a distribution to a third party until you have a check autho from the client legally instructing you to do so.
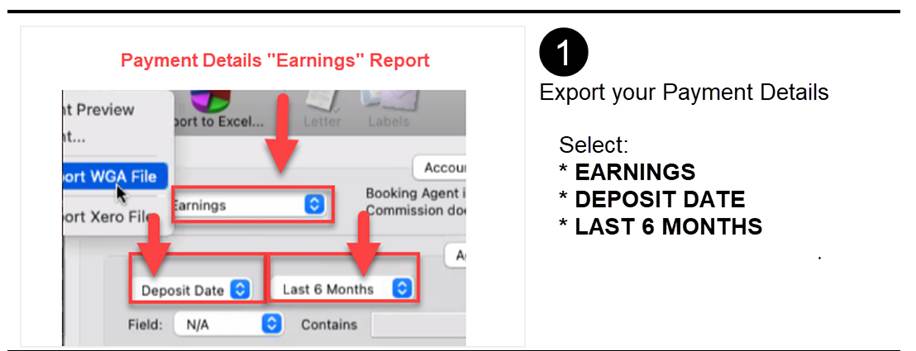
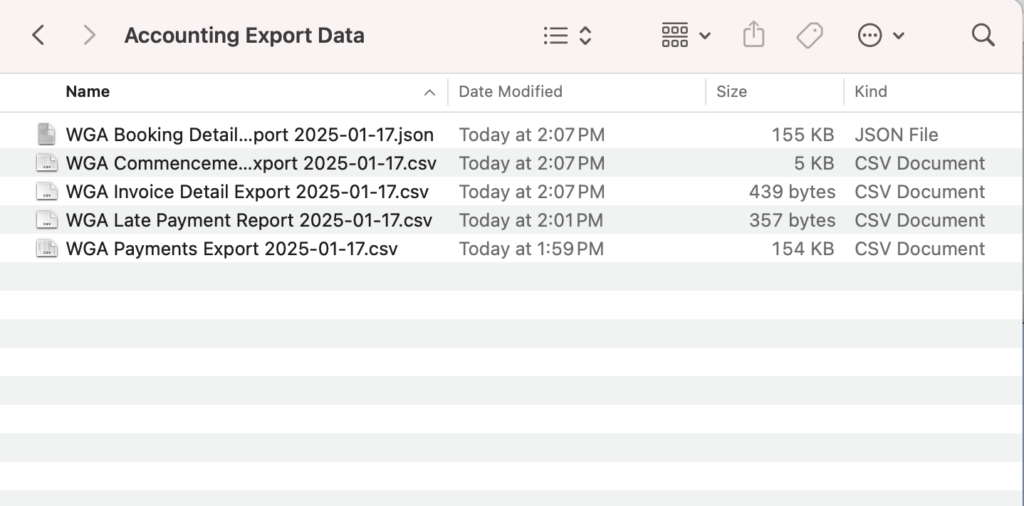
This FAQ will guide you through exporting the reporting files to the WGA.
*Note Only clients who are registered with the WGA on their Address card, YES as a member > Vitals section will be included in these reports and projects need to be marked under union as WGA.
There are three places you will need to export files from.
Step 1
Accounting > Search > Report: Earnings – Create an earnings report with the 6-month date range, after seeing the results click and hold the “Print” button to export the file.
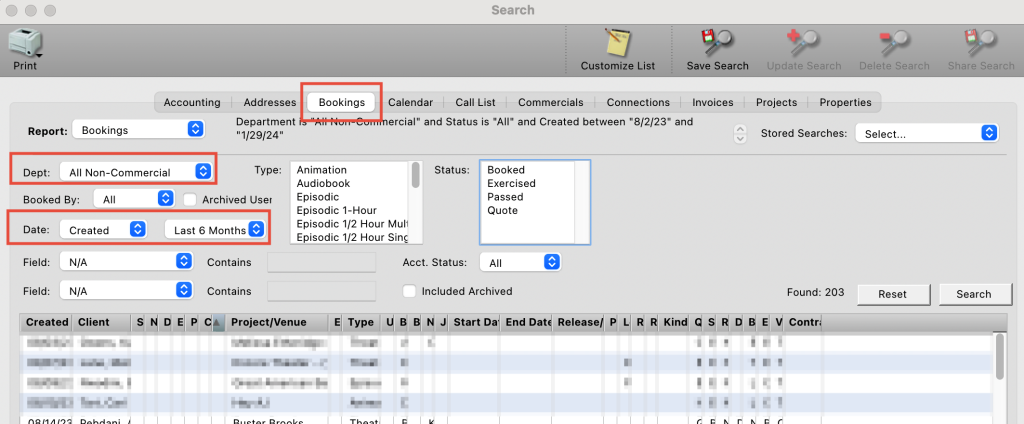
Step 2
Accounting > Search > Report: Grosses – Create a Grosses report with the 6-month date range after seeing the results click and hold the “Print” button to export the files.

Step 3
Create a Bookings report with the Department set to All Non-Commercial and the Created Date set to Last 6-month date range after seeing the results click and hold the “Print” button to export the files.
Step 4
There will be 6 files for upload which will be in your user > My Documents > InEntertainment > Accounting Upload file. Upload these to the WGA.
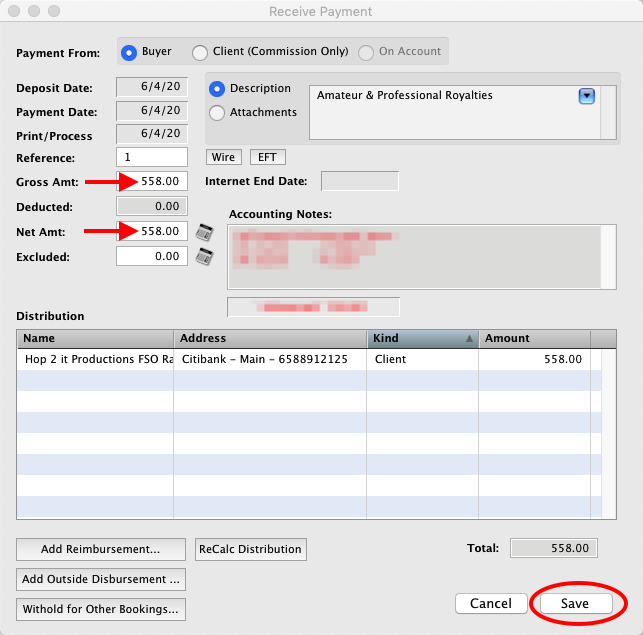
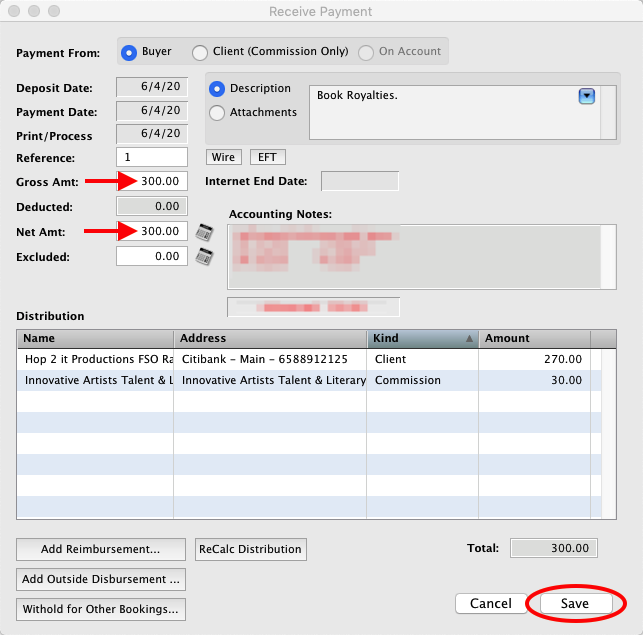
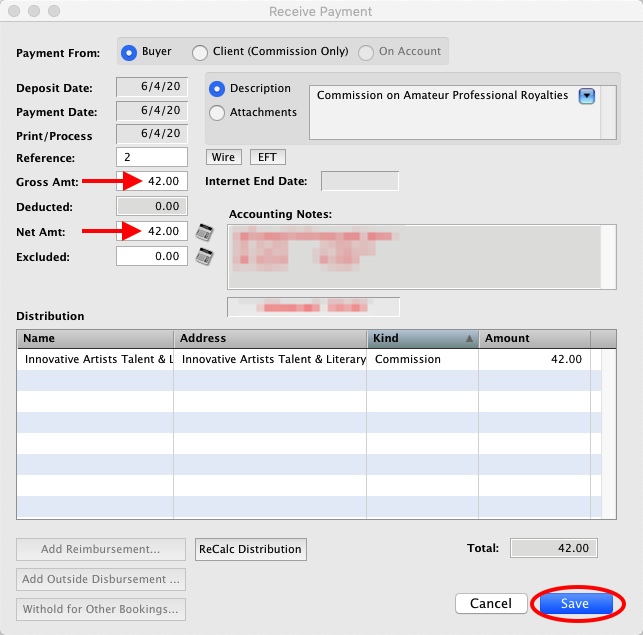
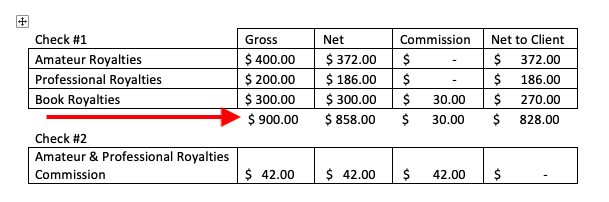
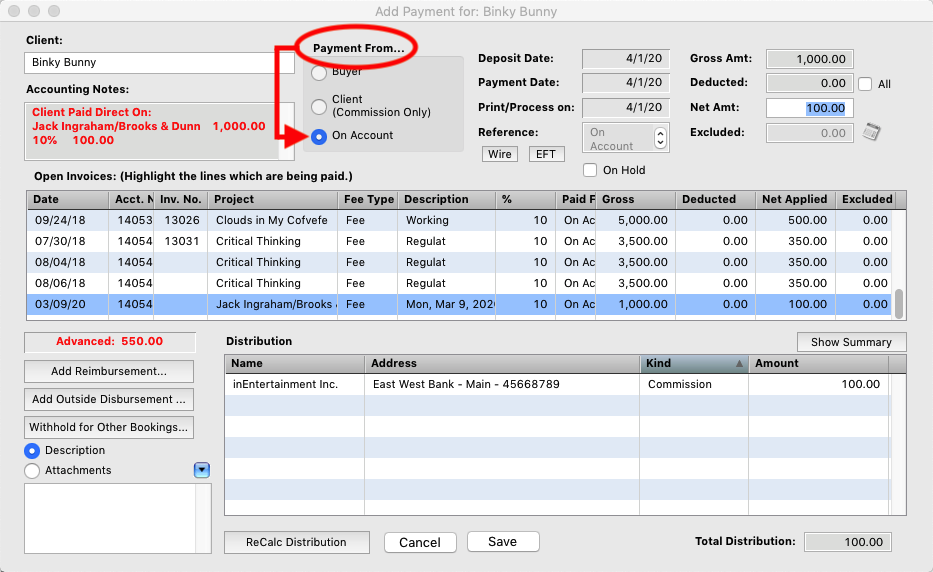
Step 1
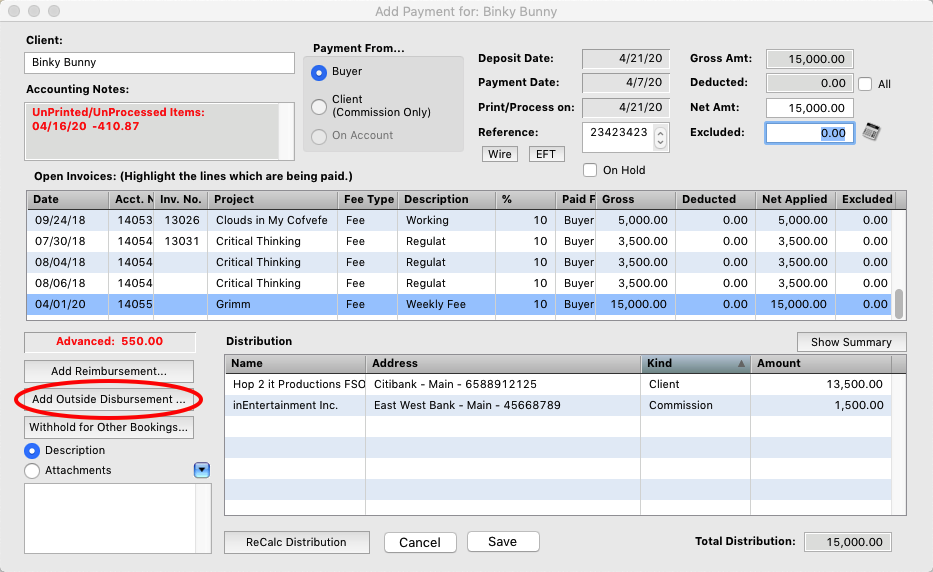
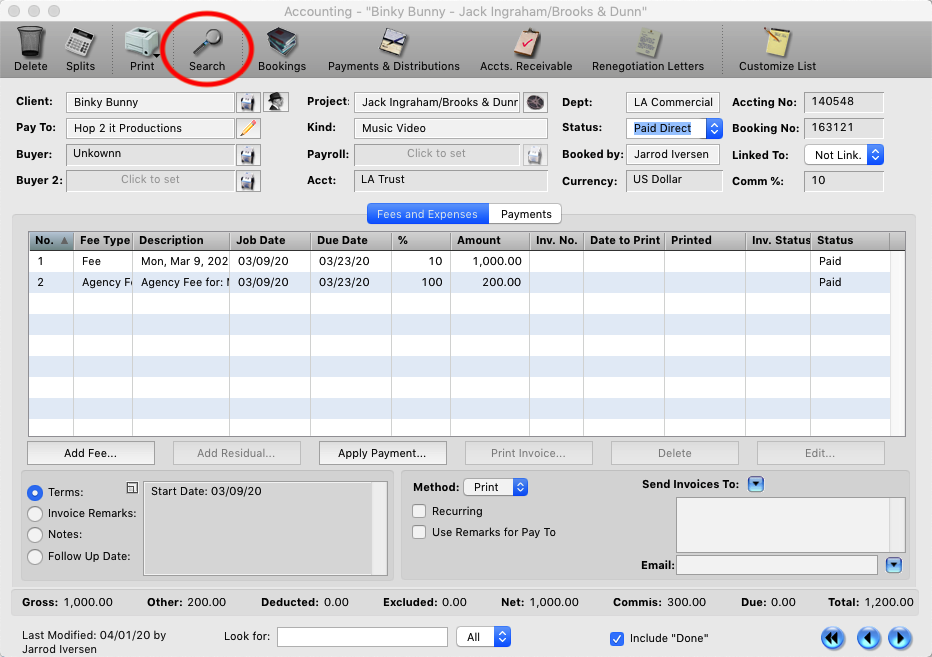
When you are informed that a client received payment for a job directly, go to the accounting record and change the status of the accounting record to “Paid Direct”.
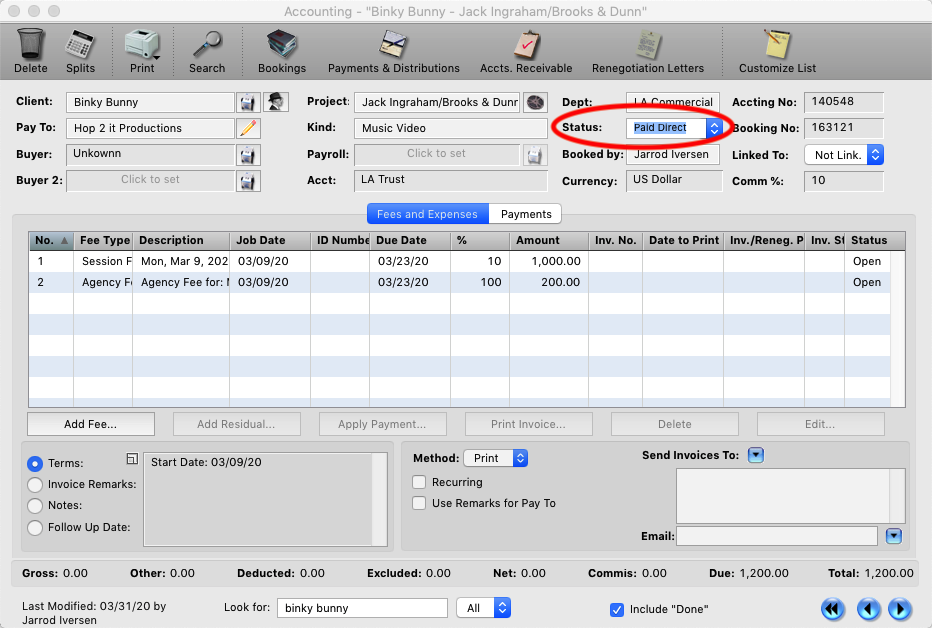
Step 2
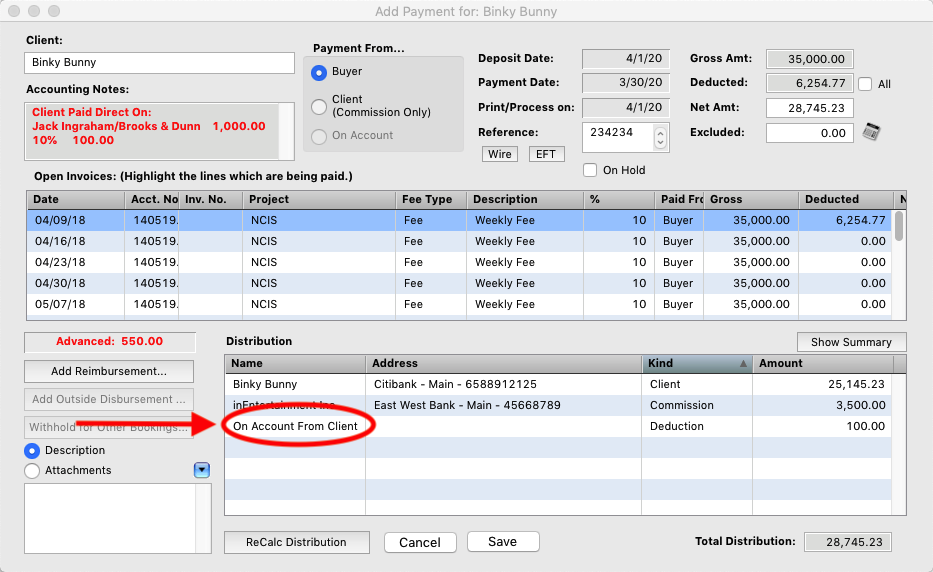
When you apply a payment for a client, any jobs that are marked as paid direct will be displayed in the upper left in Red, with the amount of commission owed.
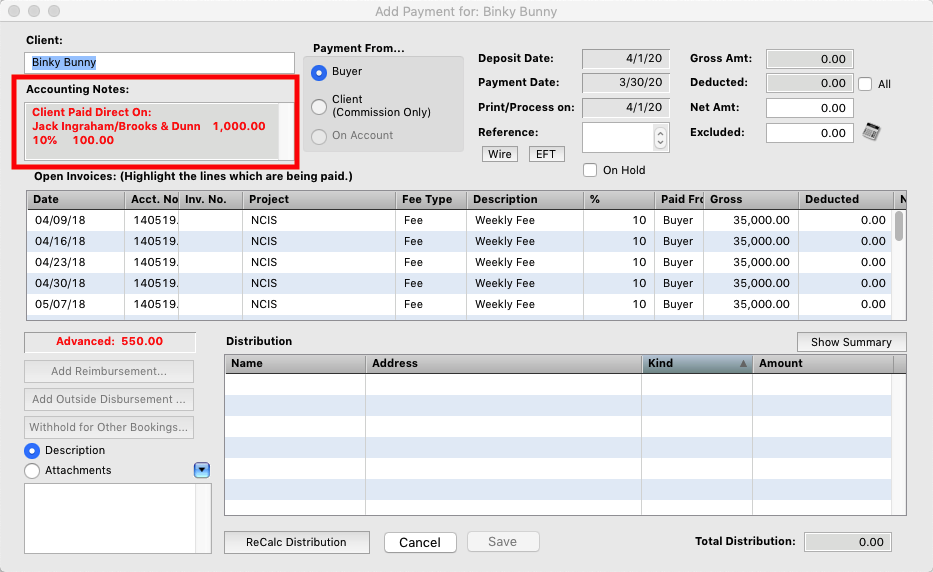
Step 3
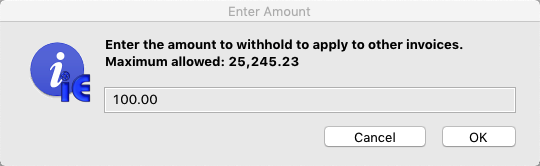
When you receive a payment for a client with commissions owed, enter the payment you have received as normal, then click the “Withhold for Other Bookings Button”.
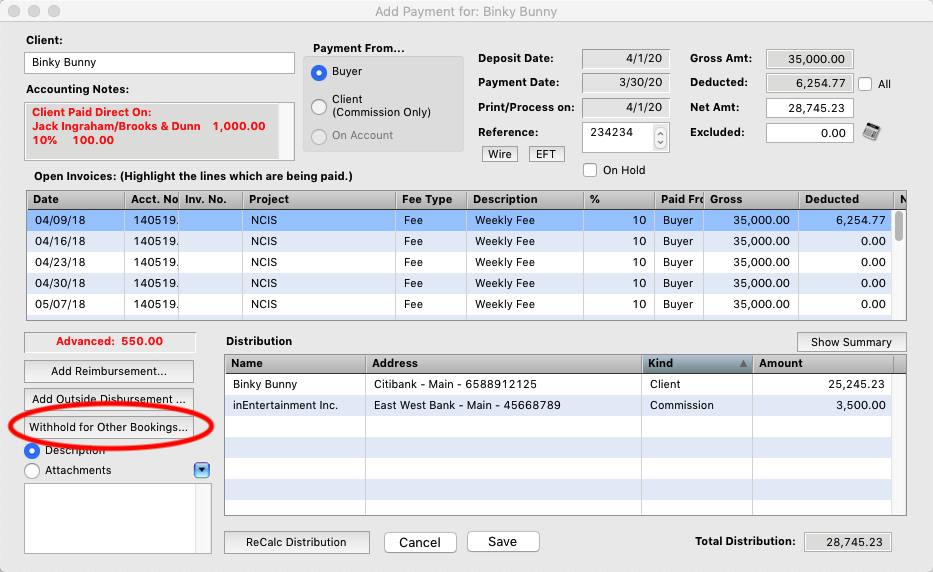
Step 4
You will be prompted to enter the amount for the owed commissions.
Step 5
You will then see an “On Account” distribution for the amount you are withholding from the current payment you are entering. Click Save and Close.
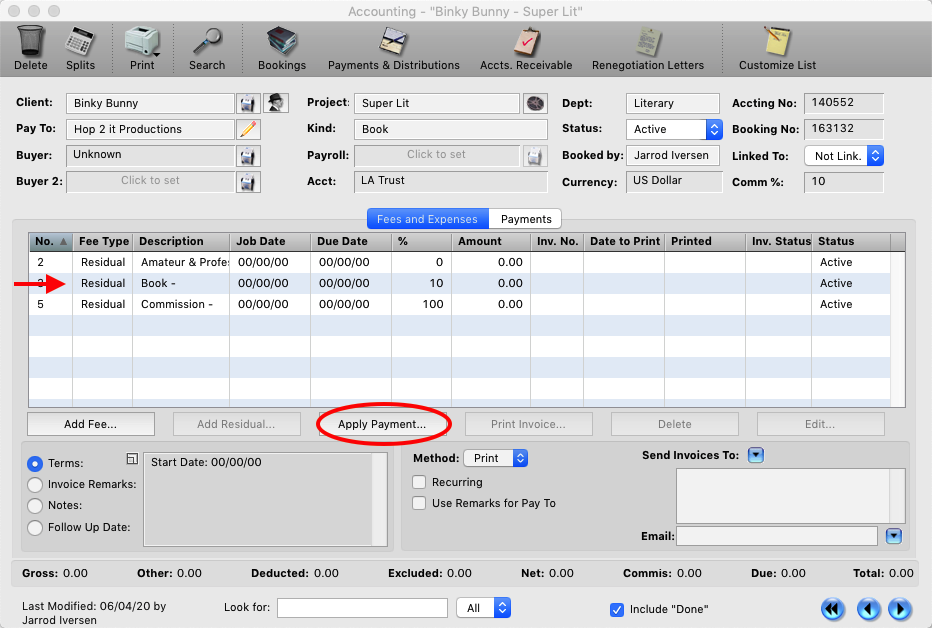
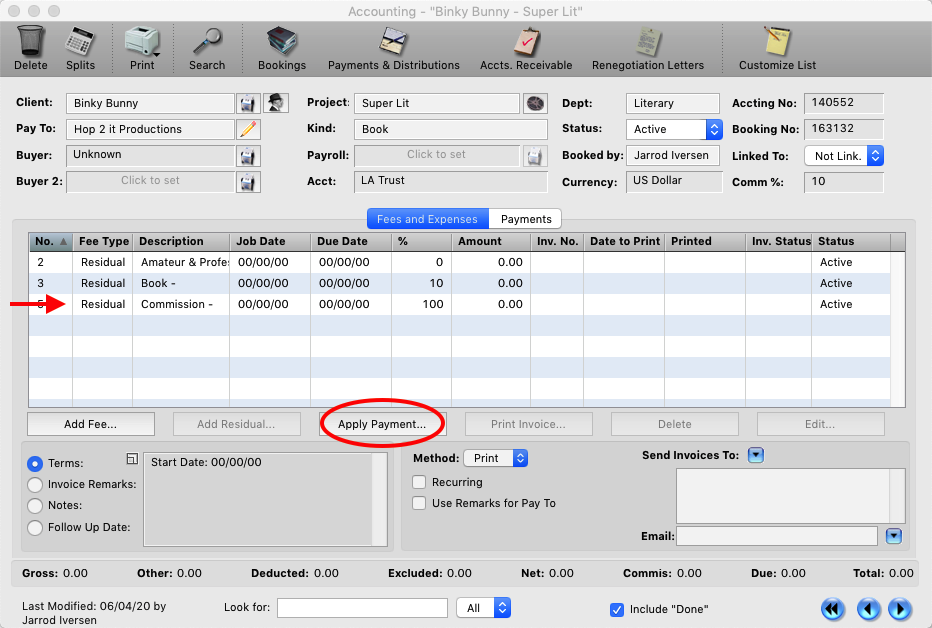
Step 6
Go to the accounting record where the commissions are owed. Click “Apply Payment”.
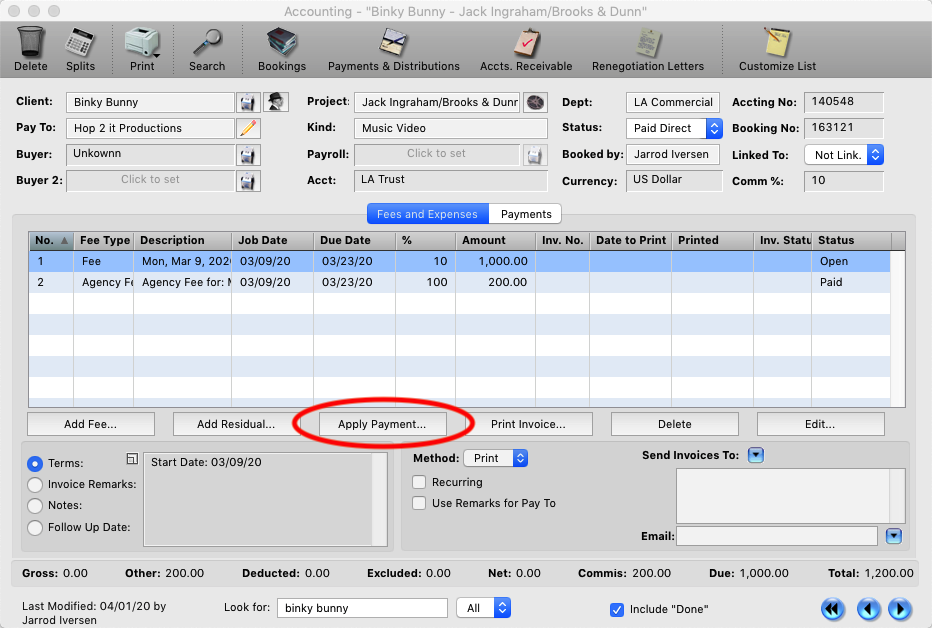
Step 7
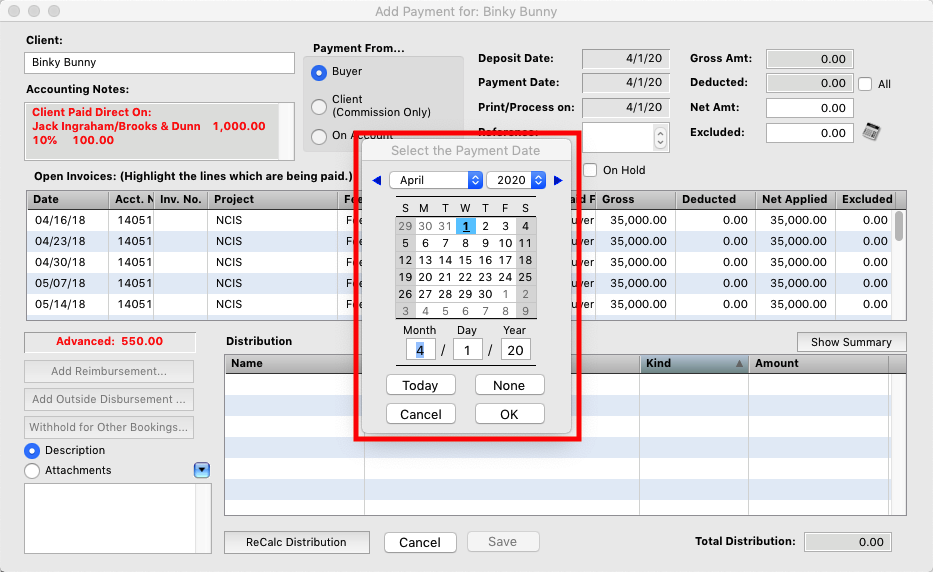
Select Today and OK for the payment date.
Step 8
Select the fee line and change the Payment From to “On Account”. The Reference and Net Amt. will auto filled in with commission owed for the job. Save the Payment and you are done.
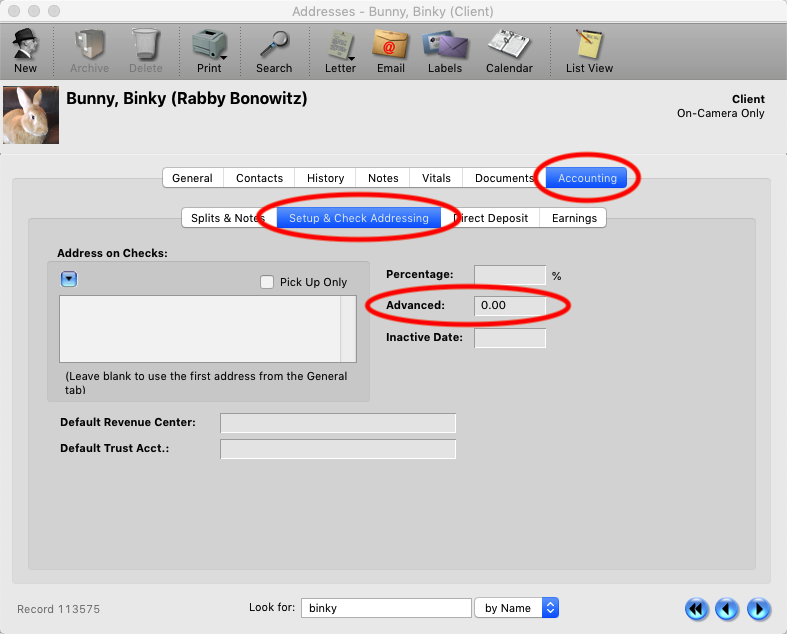
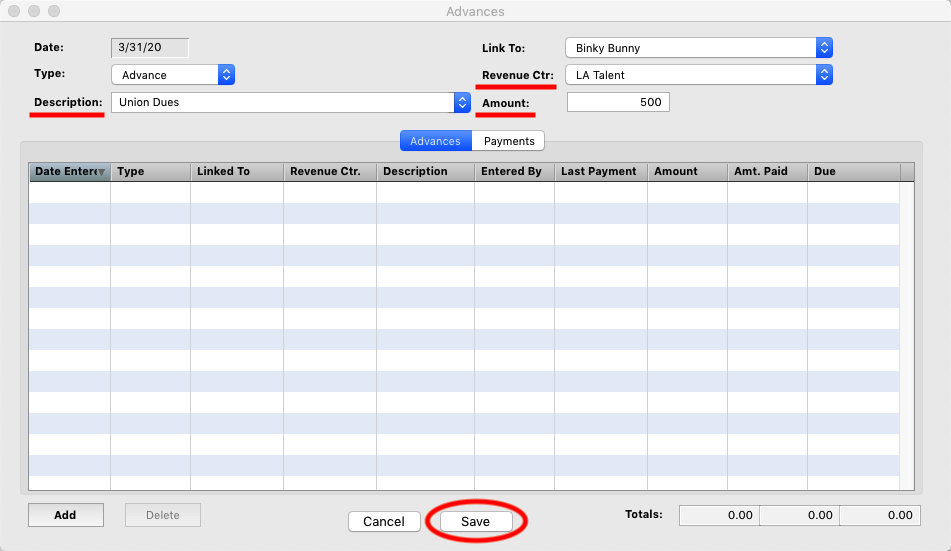
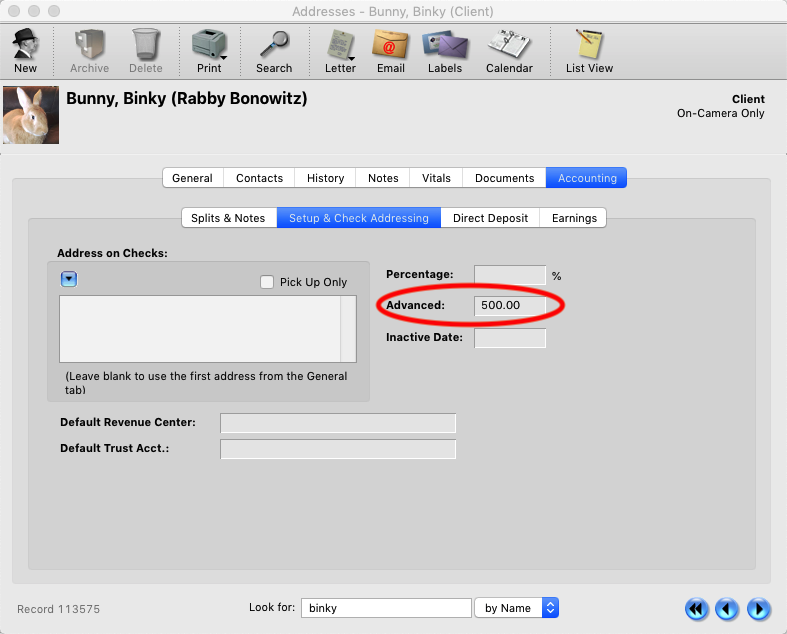
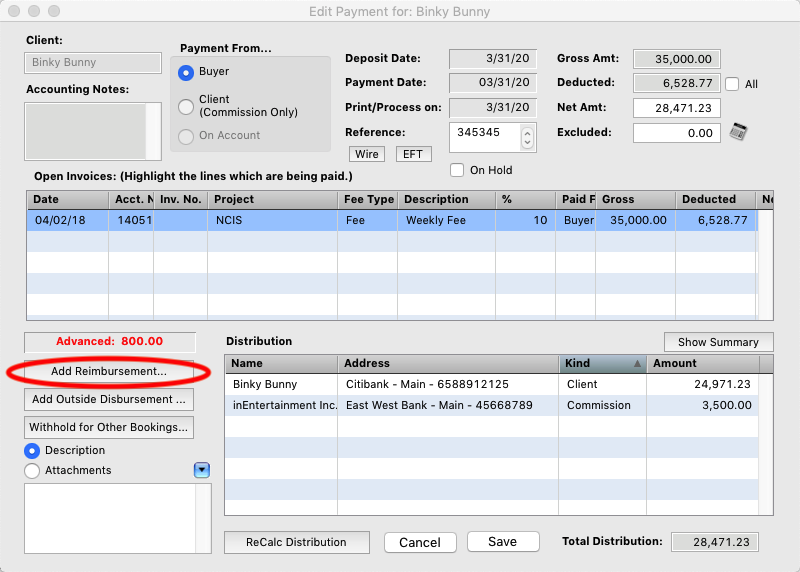
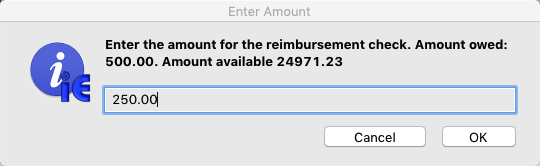
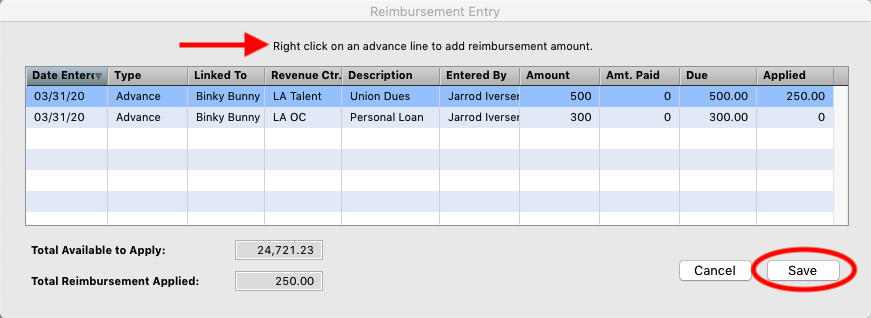
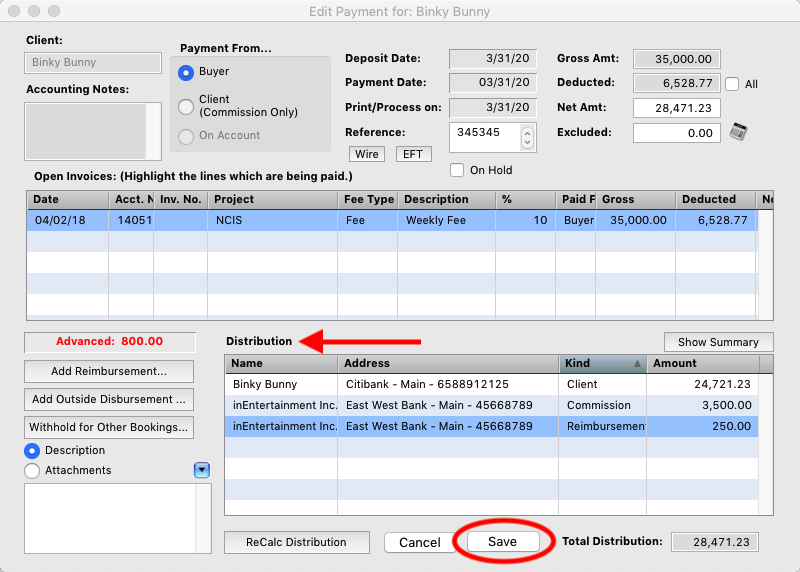
An Advance is a personal loan your company makes to your client.
Step 1
This FAQ will briefly go through the different accounting reports and their options available to you. For further assistance with specific reports please contact us at info@inentertainment.com
*NOTE There must be an accounting record for the booking to show in the results of the majority of accounting searches.
Step 1
From Any Accounting record click the Search button at the top of the window.
Earnings.
The report the search opens to is the Earnings report. This report is used for actual monies you have processed through the program.
- Agent/ Manager or Revenue Center: this allows you to run a report with by an iE user revenue center.
- Date Type and Range: This allows you to choose which date type to pull the report by. Deposit Date, Payment Date, Commission Date. And set the date range to include.
- User Type: You can run the report by Booking, Signing or Responsible Agent. (This field switches to Revenue center selection list if you are doing it by that.)
- Filed (1): This options allow you to run the report by a Specific Client, Buyer or Outside contact.
- Field (2): this option allows you to drill down even further to get reports for a specific project, or by a specific Casting Director, Address Category, etc.
- Archived Users: Check this box if you need to include former employees that have been archived.
- Trust – If you have multiple trust accounts you can pick which account you want to see.
- Summarize By: When set to None the report will show you each individual payment you entered. Use the Summarize by to combine all the payments into a single line by Client, Booking or Agent.
- Breakout Splits:If you have Internal, (between multiple users) or Revenue Splits setup on the accounting record. Check this box to breakout the monies to the appropriate percentages.
- Fee Types: Allows you to select and get a report on only specific fee types.

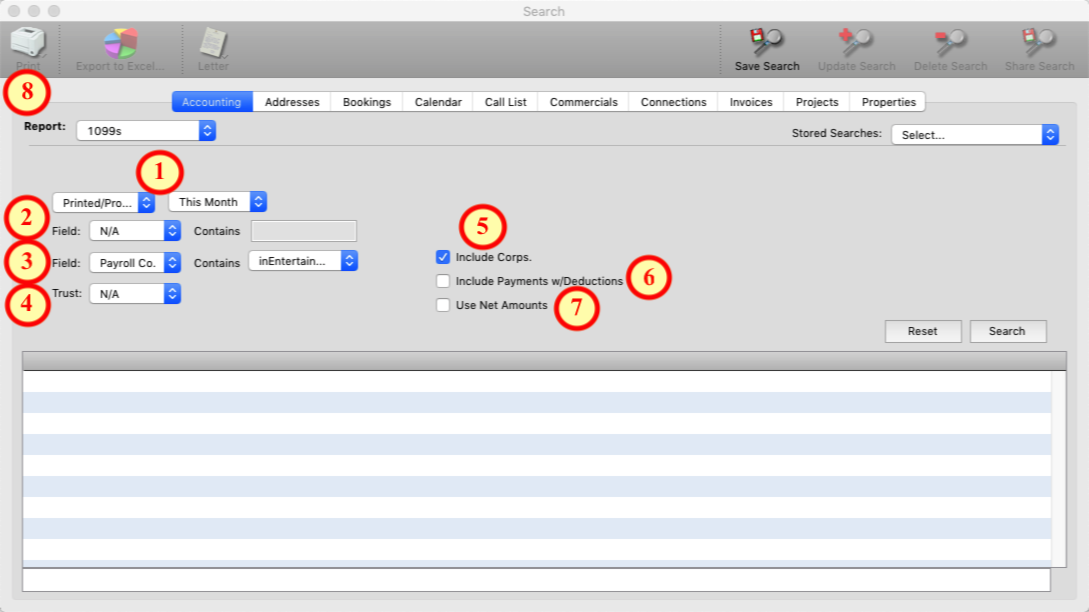
1099’s
The 1099 report allows you to print out 1099 tax forms for clients and export 1099 file for IRS upload.
- Printed/Processed: Select the date range for your 1099 report/forms.
- Field (1): Allows you to run the report for a specific client.
- Field (2) Payroll Co.: Choose your company from the pop-up list. Your company MUST be set as the payroll company ignorer to do 1099s. (If you have multiple companies those will be available in the pop-up list.)
- Trust: Choose which trust account to include in the report.
- Include Corps.: Include clients that were paid as their corporations.
- Include Payment w/ Deductions: Include payments where there were deductions.
- Use Net Amounts: Use the Net amount paid to the client, (the amount after your commission was taken).
- Print icon: Click and hold on the print icon to choose the different 1099 forms available or print the presort.
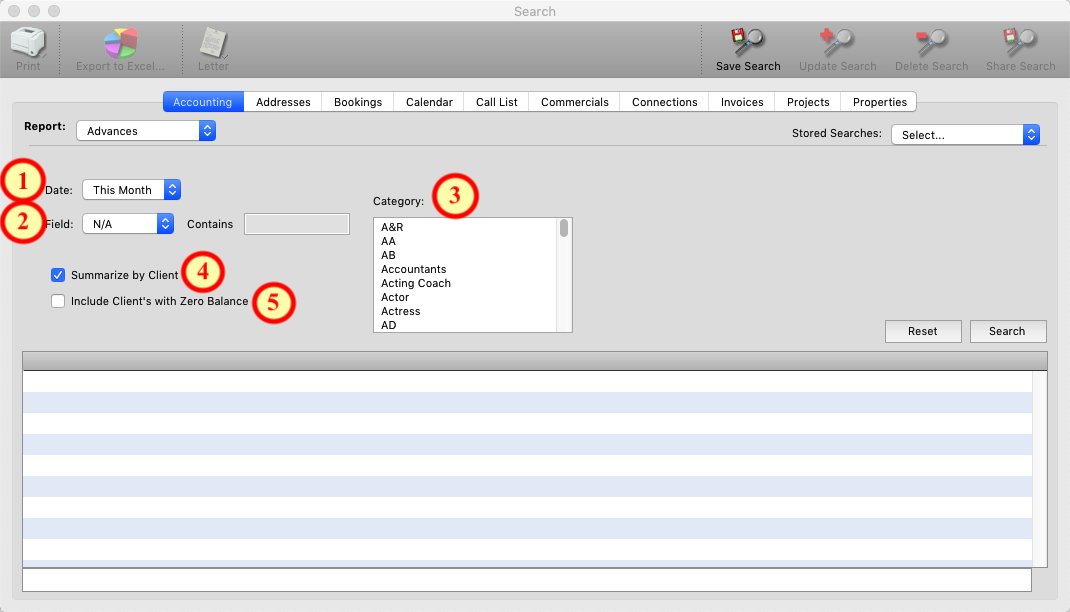
Advances
This report shows you all advances, (personal loans) that are in the program and reimbursements you have collected. For further information on how to handle advances to clients in the program click here: How to Issue and Advance
- Date: Choose the date range to include in the report.
- Field: Choose a specific client to run the report for.
- Category: run the report by specific addresses category.
- Summarize by Client: gives you a total by each client instead of the individual advances and reimbursements.
- Include Client’s with Zero Balance: Includes clients with no outstanding advances.
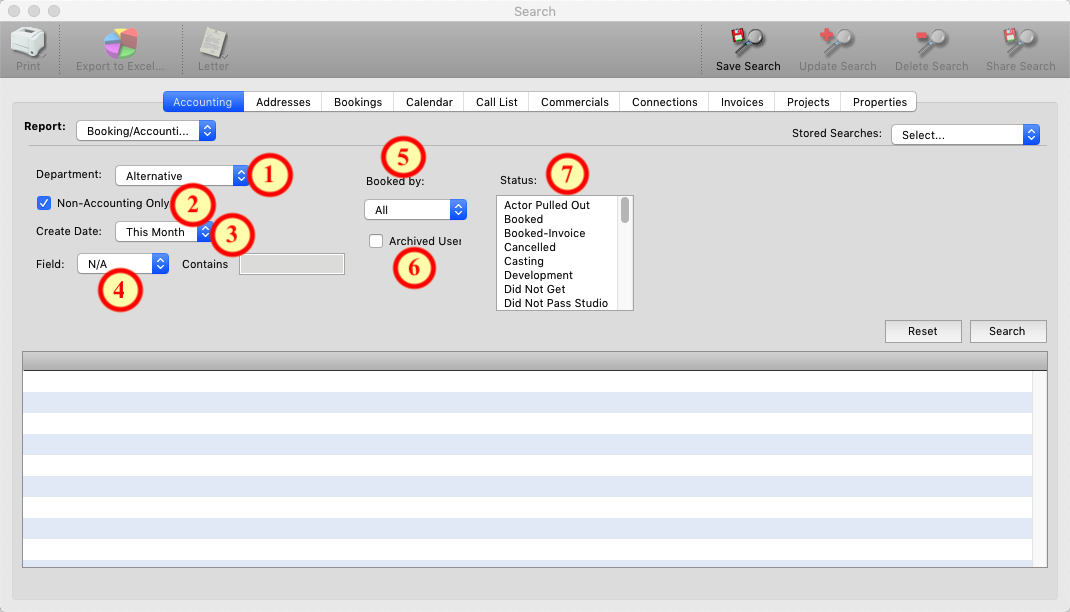
Booking/Accounting
This report is used to find Bookings that do not yet have an accounting record attached to them.
- Department: Search for a specific department’s bookings.
- Non-Accounting Only: Check this box to see ONLY bookings that do NOT have an accounting record attached to them.
- Create Date: Set a date range for the report.
- Field: Choose a specific client to run the repot for.
- Booked by: Run the report for a specific users bookings.
- Archived User: Choose users that have been archived from the program.
- Status: Choose bookings with a specific status to be included in the results.
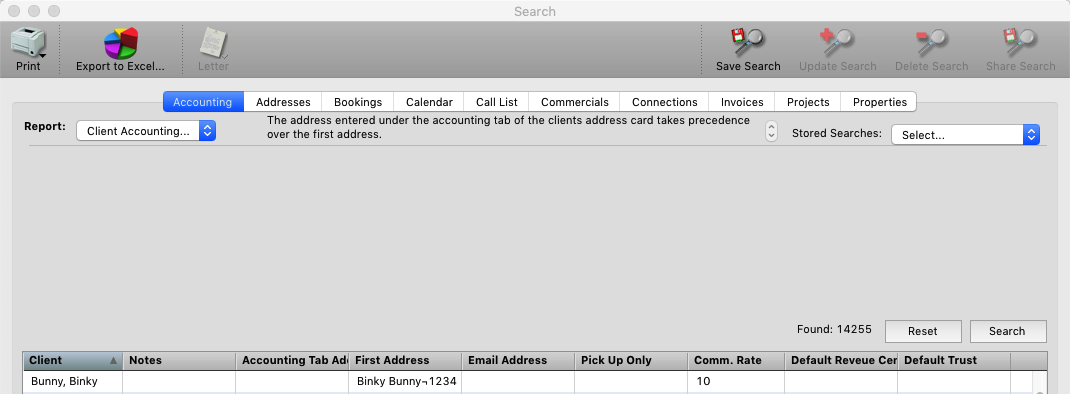
Client Accounting Info
This report has no options it is used to show you all the clients and what options have been setup on their address records under the Accounting tab.
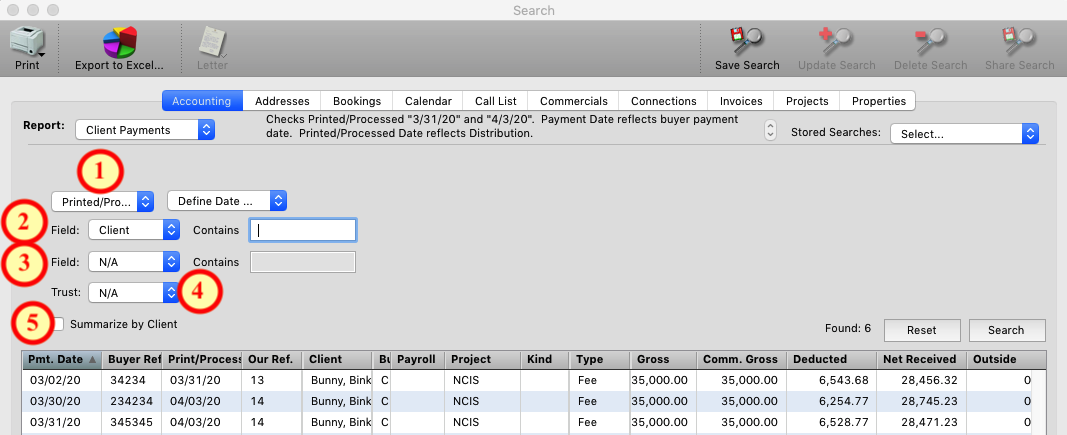
Client Payments
This report allows you to see all the completed payments you have sent to a client and shows you the check/ statement number used along with other specific details.
- Printed/Processed: Choose the date range for report.
- Field (1): Choose a specific client.
- Field (2): Choose payments by a specific payroll Co.
- Trust: Run the report for monies processed by a specific trust account.
- Summarize by Client: You will see one line per client but with just the monetary totals.
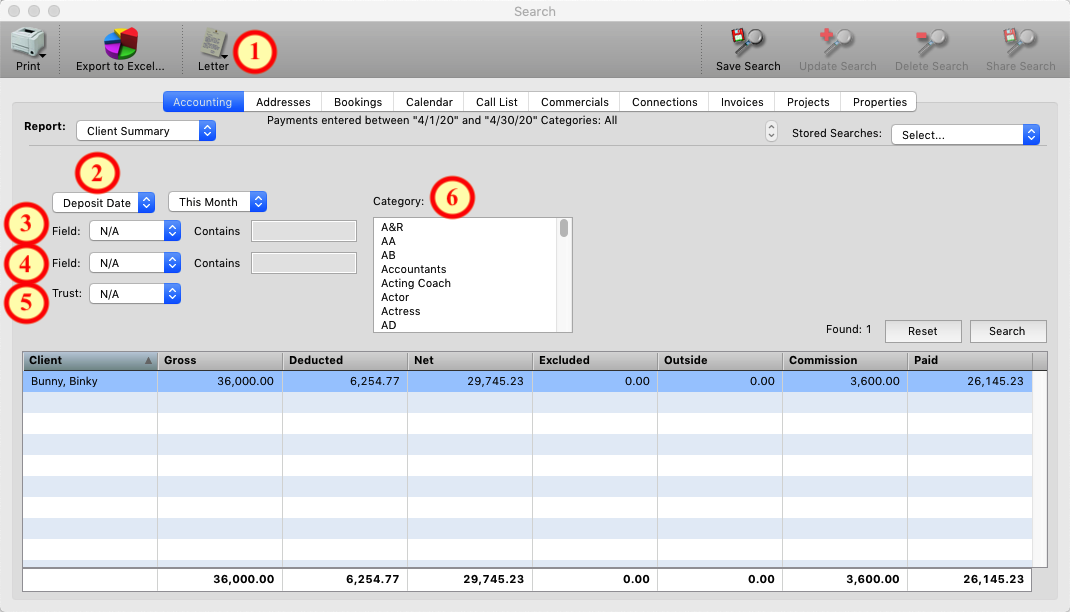
Client Summary
This report is a summary of monies processed by your company for a client. If a client wants a report for tax purposes this is the report you should send them.
- Letter: This report has a built in form letter to send to the client for their records.
- Deposit Date:Run the report by either the date you deposited the money into your trust OR by the Payment Date, (date on the check you received).
- Field (1): Choose a specific client to run the report for.
- Field (2): No options here at this time.
- Trust: Choose a which trust account to include monies from.
- Category: Choose categories from the addresses module to run the report for.
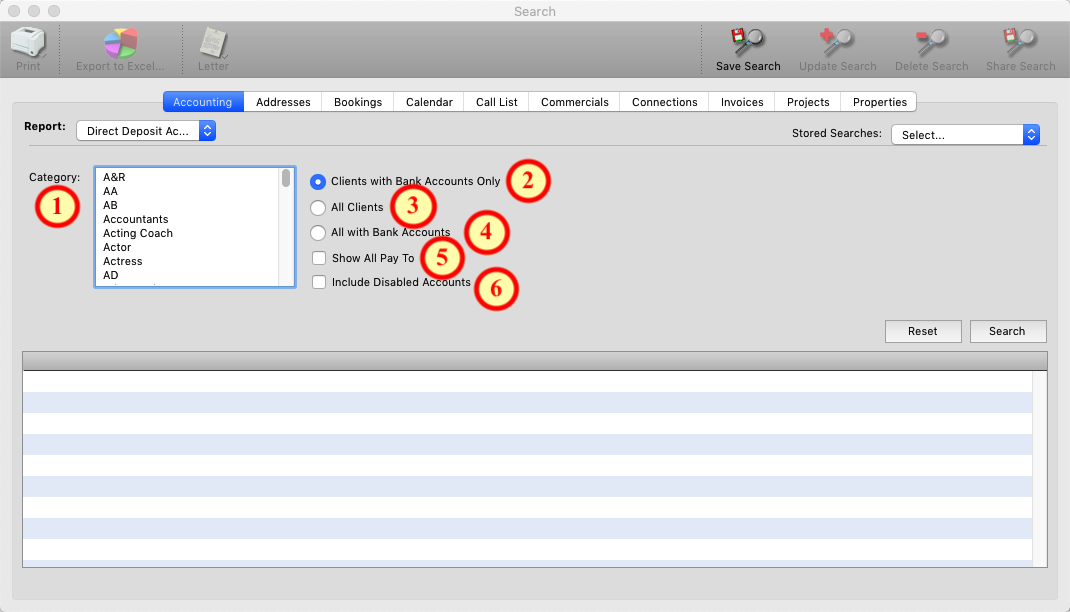
Direct Deposit Accounts
This report shows you a list of clients and contacts who are or are NOT setup with a direct Deposit account.
- Category: Choose to run the repot by specific categories from the addresses module.
- Clients with Bank Accounts Only: Displays those clients who are setup with direct deposit bank accounts on their address records.
- All Clients: Displays all clients if they have a direct deposit account or not.
- All with Bank Accounts: Displays ALL contacts who are setup with a direct deposit bank account.
- Show All Pay To: Shows you all the options for a client as to how they are paid, (Corps, Legal Names etc.)
- Include Disabled Accounts: Includes those direct Deposit accounts that have been marked as disabled.
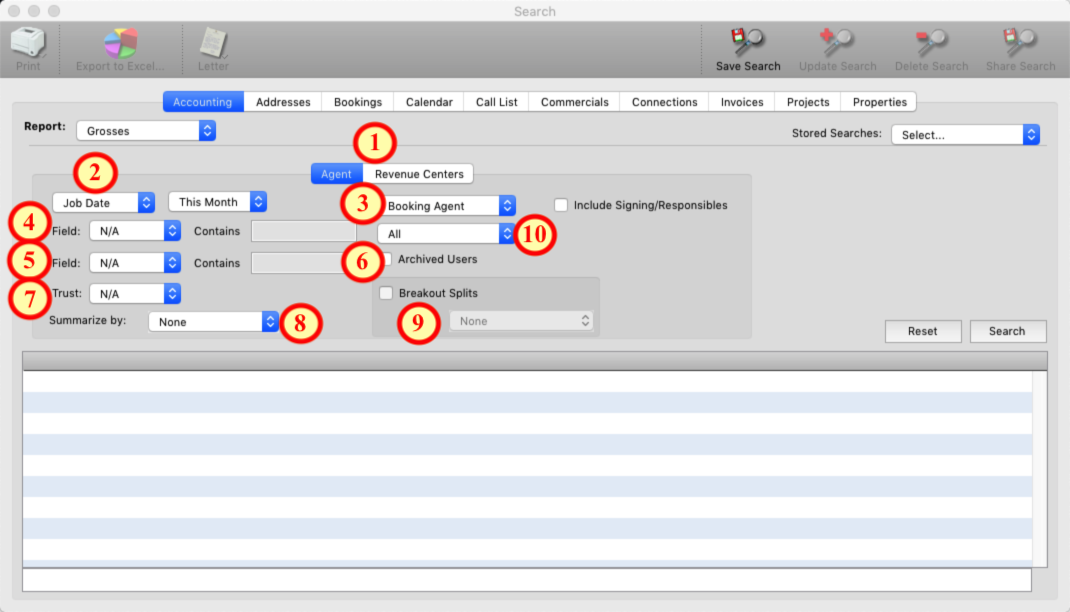
Grosses
The Grosses report is used a predictive tool to estimate how much money will be coming in during a future time period. this report is NOT intended to be used as an accounts receivable report. Please see the FAQ for accounts receivable here: How to Navigate Accounts Receivable
- Agent/ Manager or Revenue Center: this allows you to run a report with by an iE user revenue center.
- Date Type and Range: This allows you to choose which date type to pull the report by. Job Date, Due Date, Invoice Date, etc. And set the date range to include.
- User Type: You can run the report by Booking, Signing or Responsible Agent. (This field switches to Revenue center selection list if you are doing it by that.)
- Filed (1): This options allow you to run the report by a Specific Client, Buyer or Outside contact.
- Field (2): this option allows you to drill down even further to get reports for a specific project, or by a specific Casting Director, Address Category, etc.
- Archived Users:Check this box if you need to include former employees that have been archived.
- Trust: If you have multiple trust accounts you can pick which account you want to see.
- Summarize By: When set to None the report will show you each individual payment you entered. Use the Summarize by to combine all the payments into a single line by Client, Booking or Agent.
- Breakout Splits: If you have Internal, (between multiple users) or Revenue Splits setup on the accounting record. Check this box to breakout the monies to the appropriate percentages.
- Fee Types: Allows you to select and get a report on only specific fee types.
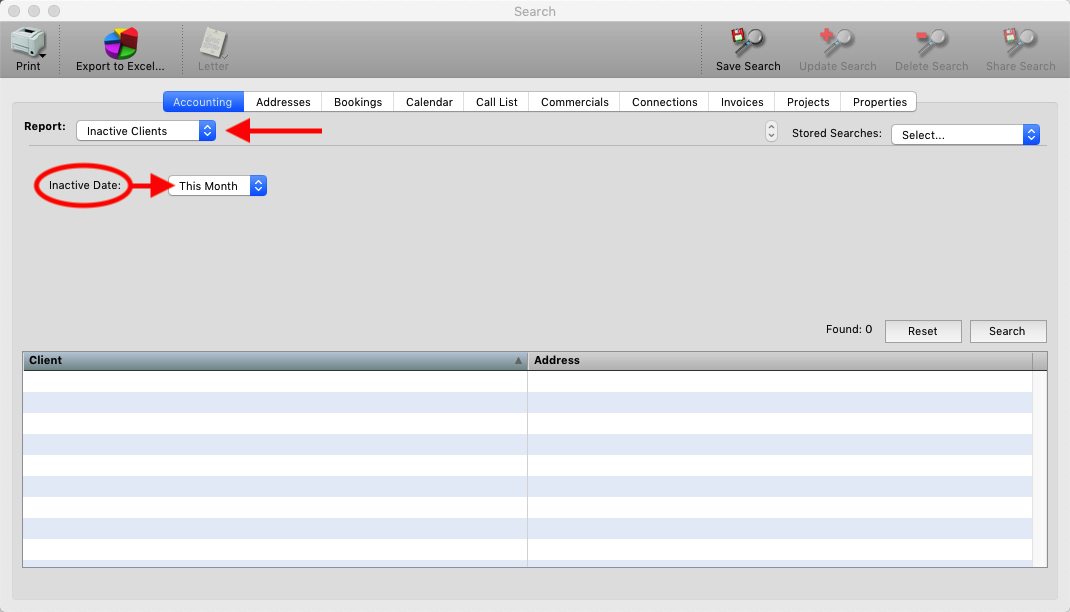
Inactive Date
This report allows you to see all the clients who have been marked as “Inactive” on their address record > accounting tab in a given time period.
Inactive Date – Choose the date range for clients to be included.
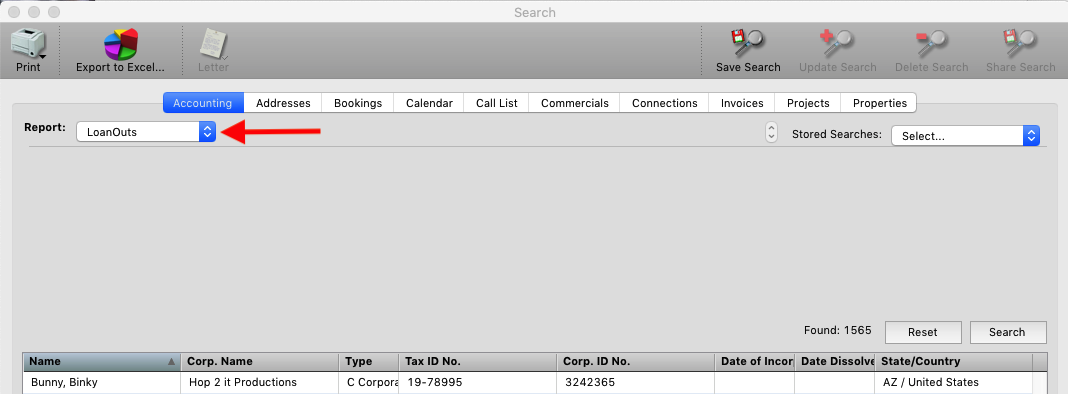
LoanOuts
This report has no options. It just pulls a report of all clients who are incorporated and the details.
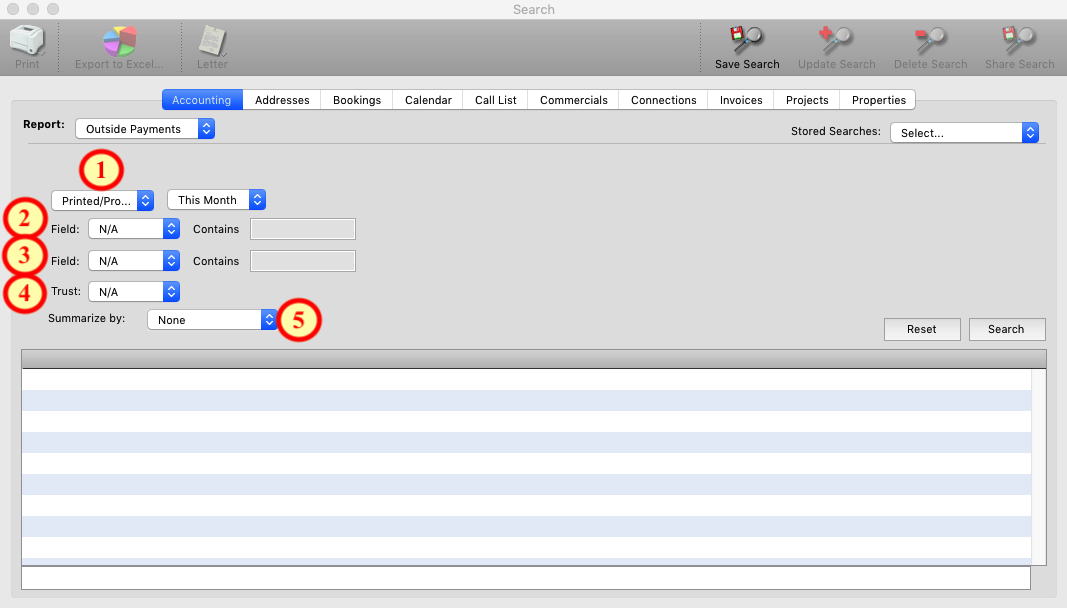
Outside Payments
This is a report for all monies processed in the “Outside” queue.
- Printed/Processed: Choose a date range for the report.
- Field (1): Choose a client for whom you have paid an outside company on behalf of.
- Field (2): Choose which Outride party you have paid.
- Trust: Which trust account the monies wen through.
- Summarize by: Summarize by the Client, Payee etc. to get a single line showing just totals.
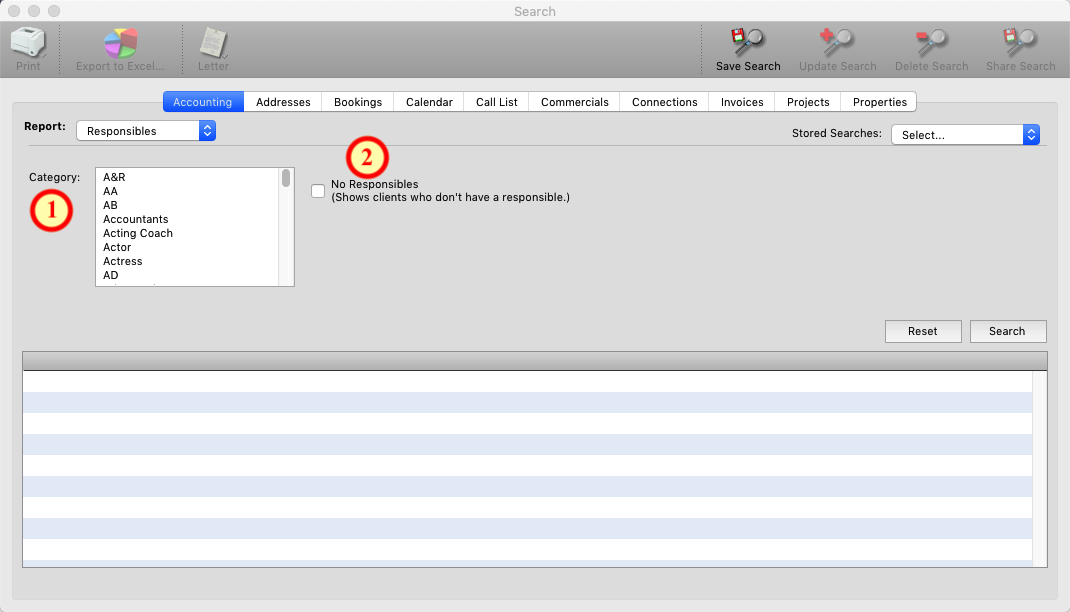
Responsibles
This report pulls a list of clients who have a responsible Agent/Manager setup on their address record and the percentages for them.
- Category: Pull the list for a specific address category.
- No Responsibles: Shows clients who do NOT have a responsible agent or manager setup on their address record.
Signing
This report pulls a list of clients who have a signing Agent/Manager setup on their address record and the percentages for them.
- Category: Pull the list for a specific address category.
- No Signing: Shows clients who do NOT have a signing agent or manager setup on their address record.

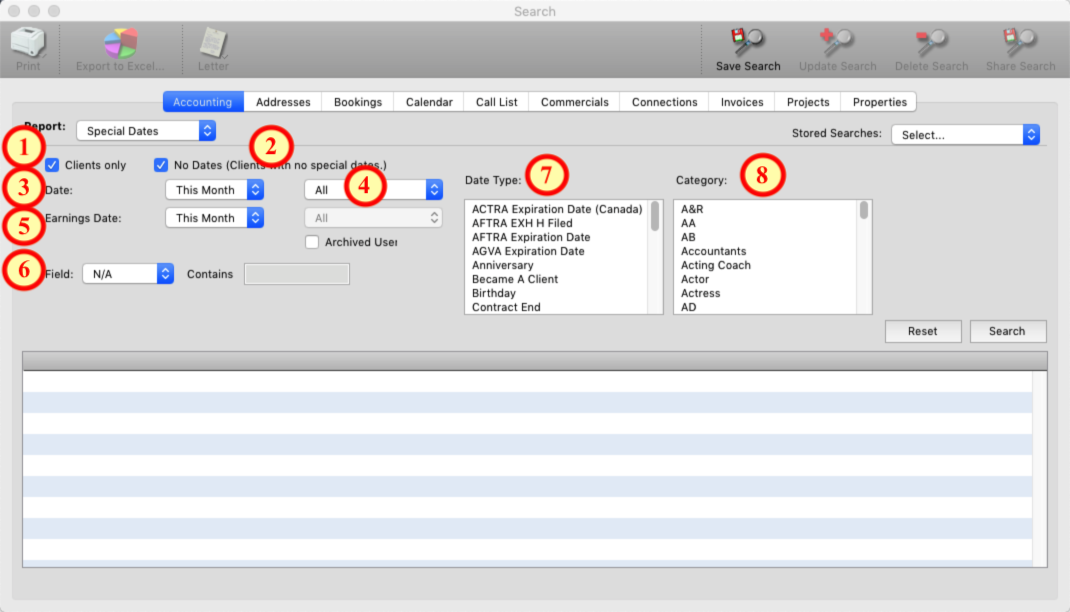
Special Dates
This report allows you to pull a list of contacts who have “Special dates” setup own their address record.
- Clients Only: Show ONLY contact marked as clients in the results of the search.
- No Dates: Show clients who do NOT have an entry for special dates.
- Date: Choose the date range for the search.
- All: Allows you to pull the report by a specific Signing or Responsible agent.
- Earnings Date: Choose a date range for the earnings column of the results.
- Field: Run the report for a specific clients special dates.
- Date type: Choose which special date type you are looking for.
- Category: run the report for a specific address category.
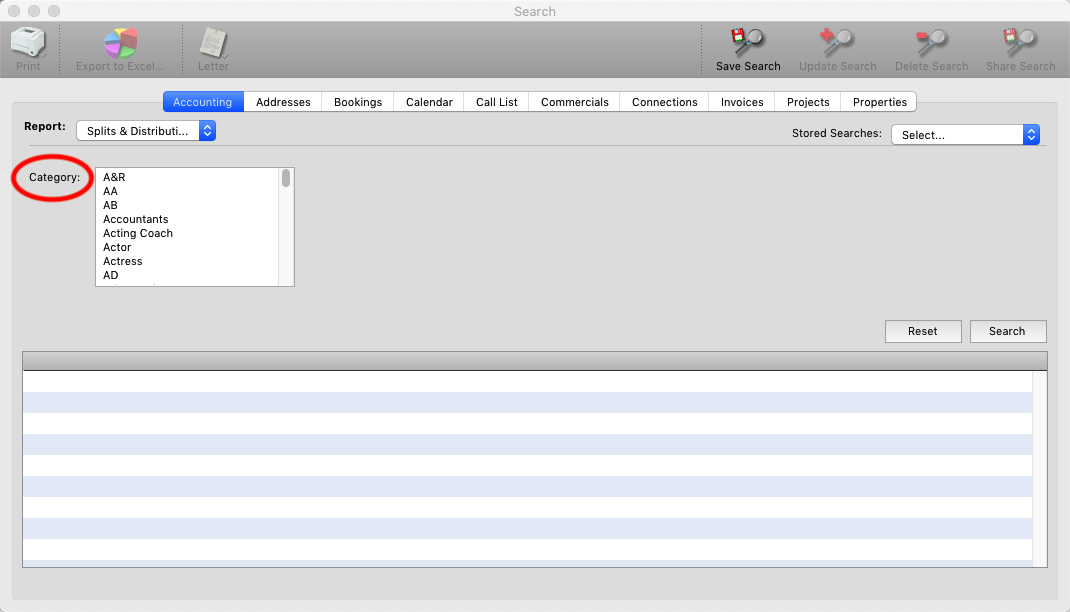
Splits & Distributions
This report shows you all clients who you have setup to pay an outside third party and whether that payment is a Split of your commission or a Distribution of the client’s monies.
Category: Choose a category from the addresses to run the report by.
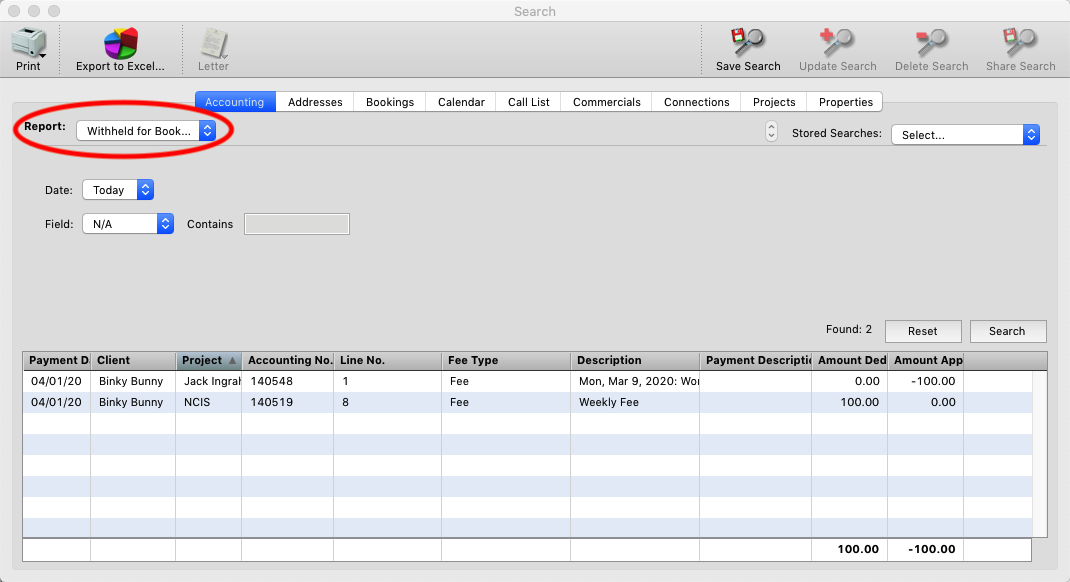
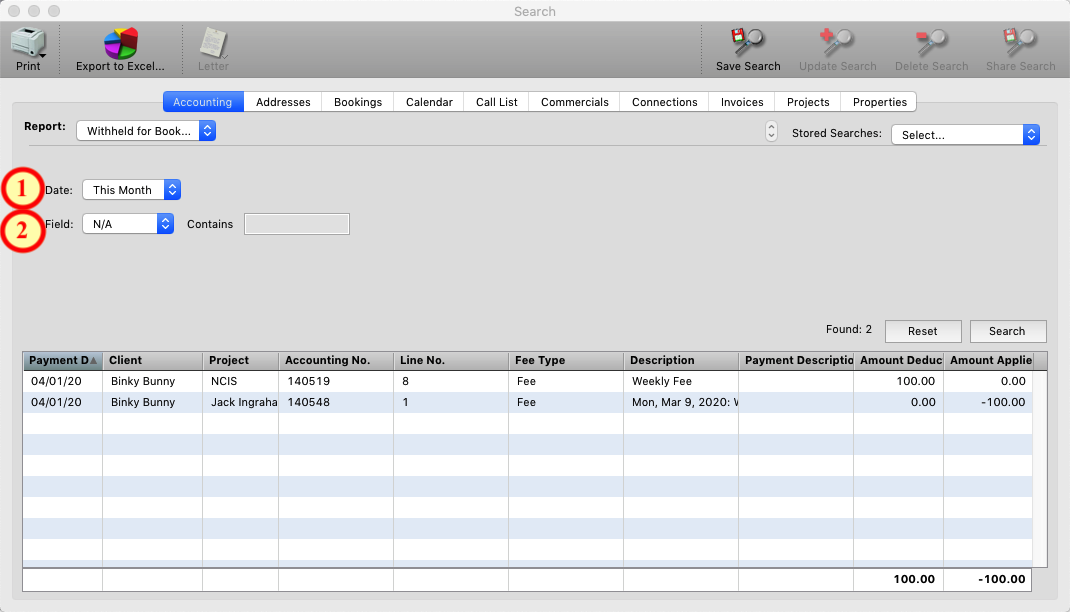
Withhold for Other Bookings
This report shows you all the monies you have deducted (withheld) from payments you received and applied to jobs where the client was paid direct and owes you commission. Further details on this process can be found here: How to Withhold for Other Bookings
- Date: Choose a date range for the report.
- Field: Choose a client to run the report for.
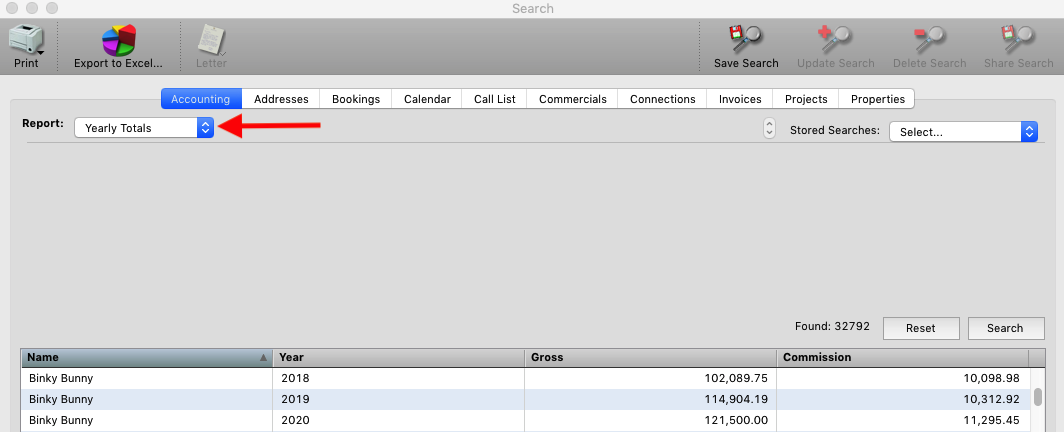
Yearly Totals
This report allows you to see the same information that is on the clients address record > accounting tab > earnings sub tab, but allows you to see ALL clients at once.
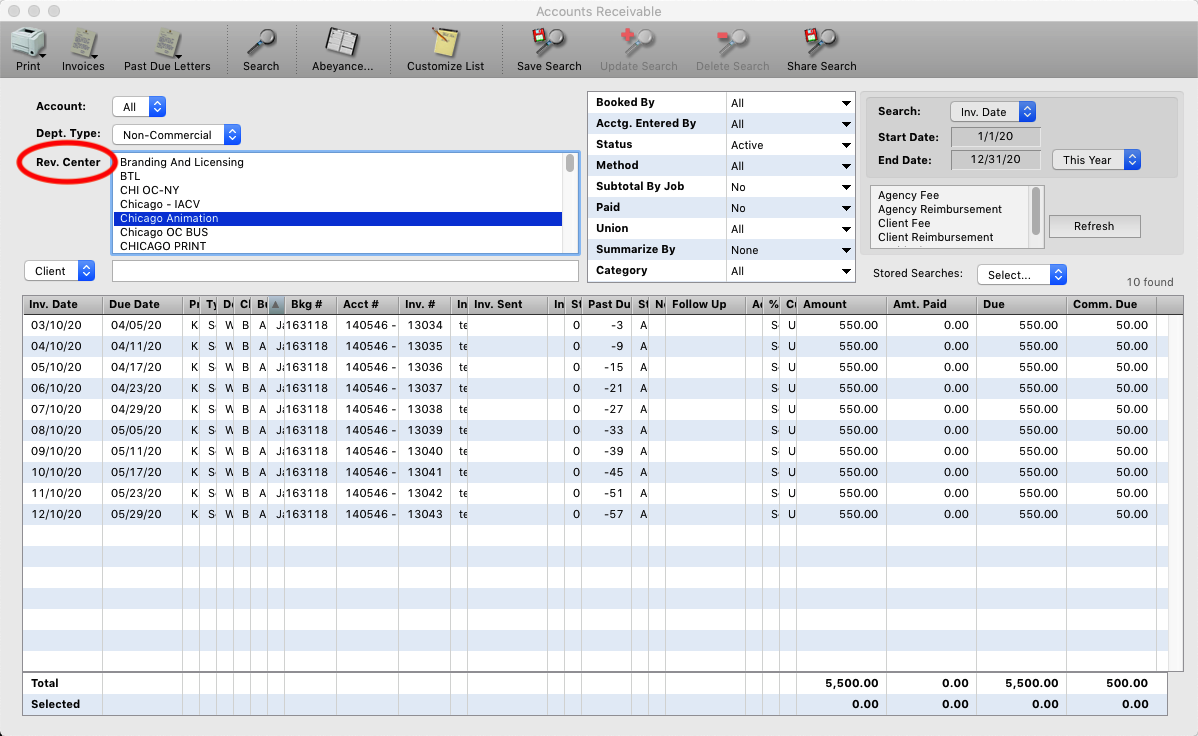
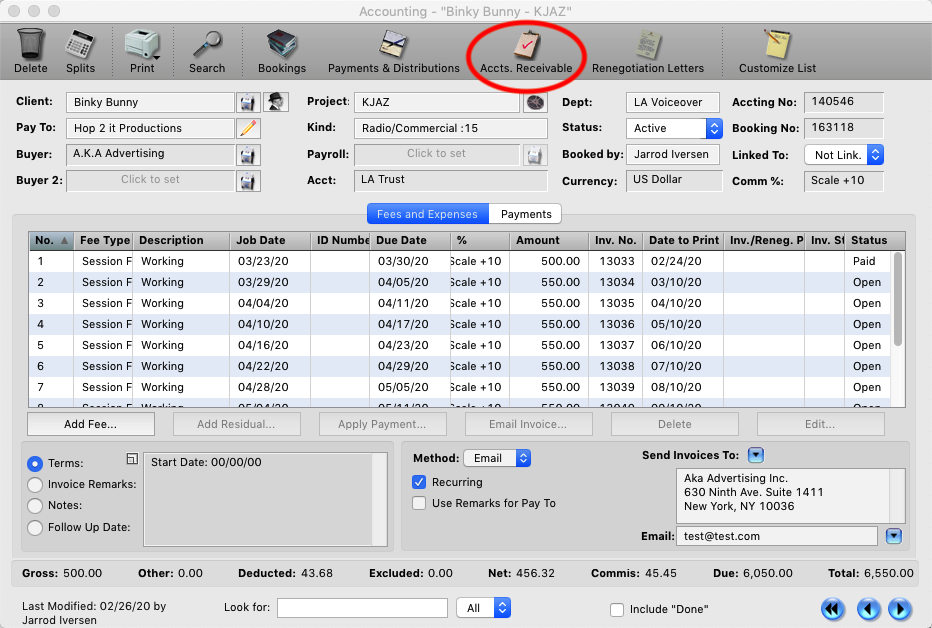
This FAQ will explain all the options available to you in the Accounts Receivable window. If you need further assistance running an AR report please contact us at info@inentertainment.com
Step 1
From any accounting record, click the “Accts. Receivable” button.
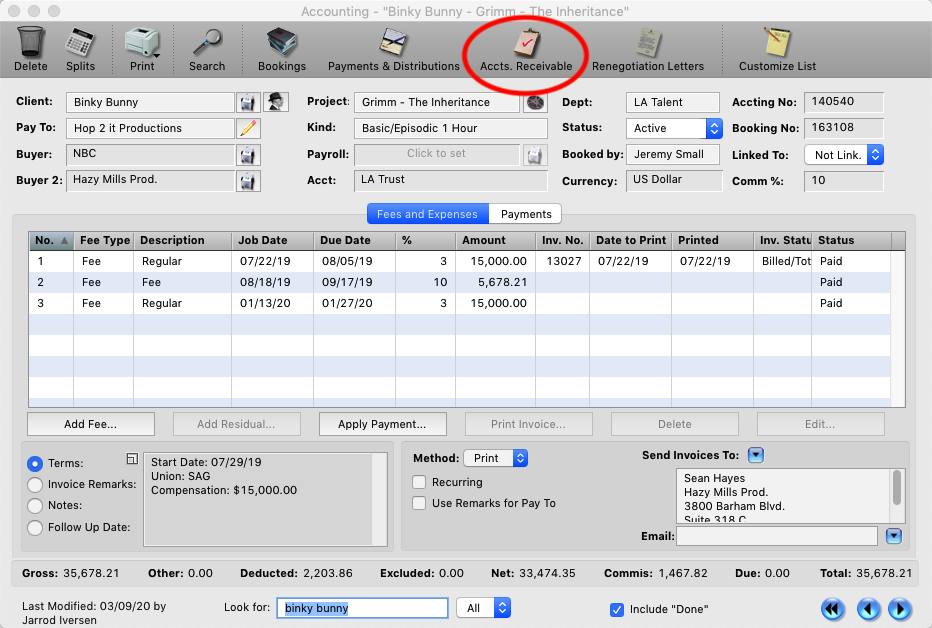
OR… Some users can access it from the Bookings module for only their bookings. (This is a feature we can turn on in the iE admin as requested.)
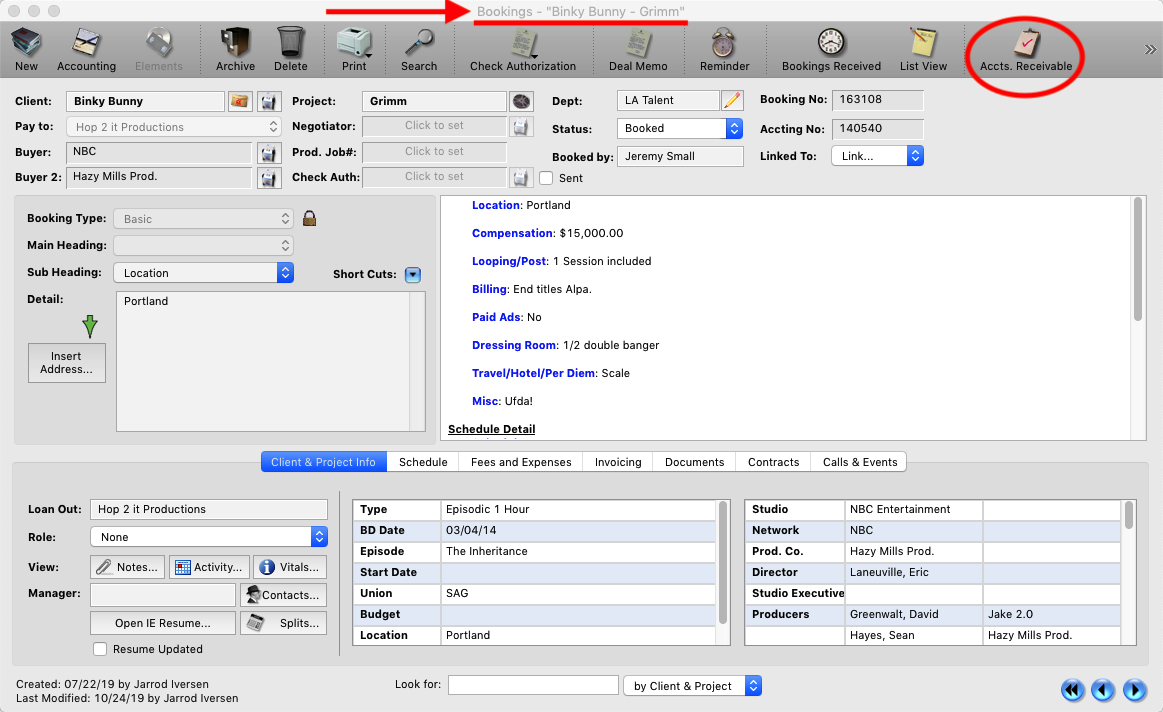
There are many options to get the specific information you need.
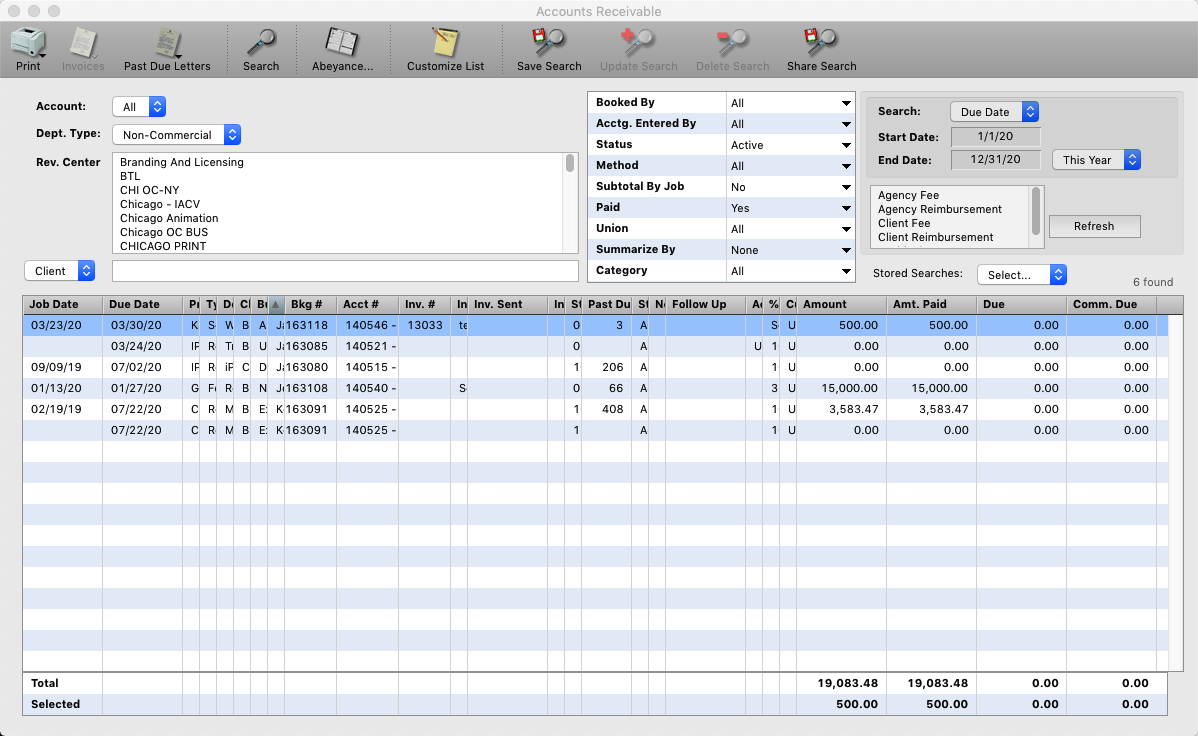
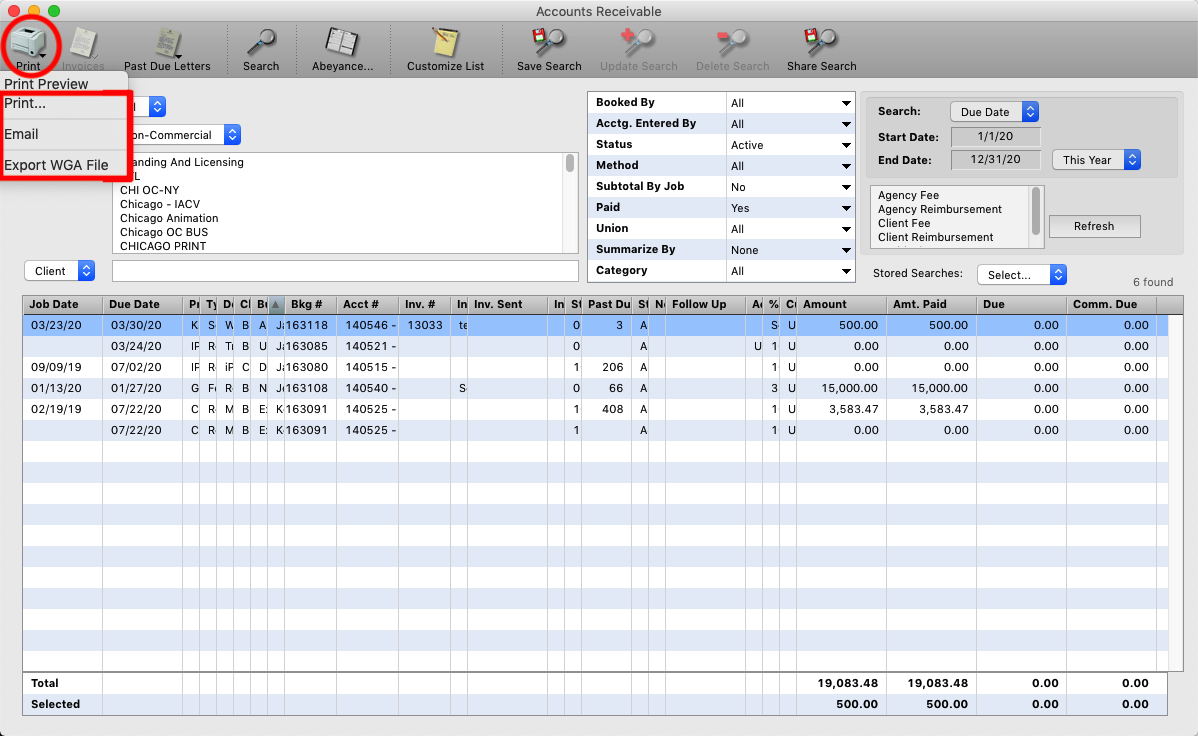
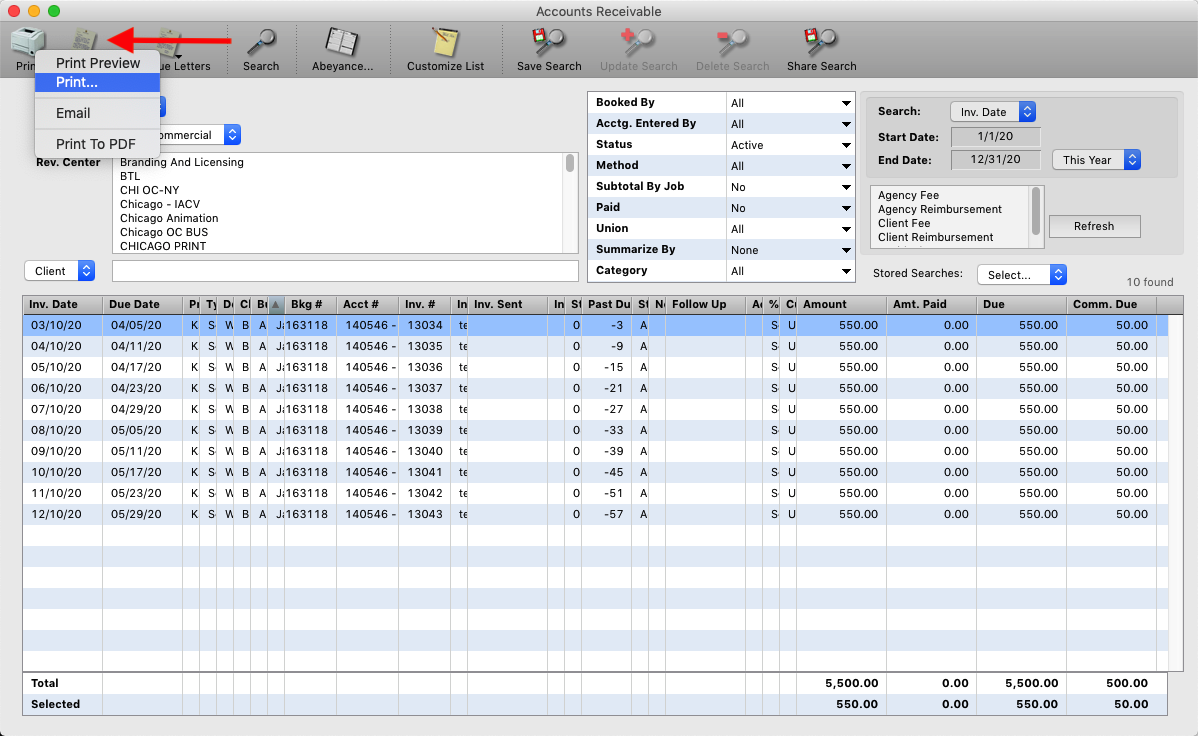
Step 2
“Print” button allows you to print or email a pdf of the report. There is also an export file for the WGA per their rules.
Step 3
“Invoices” button allows print or email invoices, when you are doing the search, (option on the right) by one of the Invoice date options.
Step 4
“Past Due” button prints/emails past due statement letters to buyers or clients for owed monies.
Step 5
“Abeyance” button opens a list of all abeyances, (deposits that are not applied to jobs), in the program.

Step 6
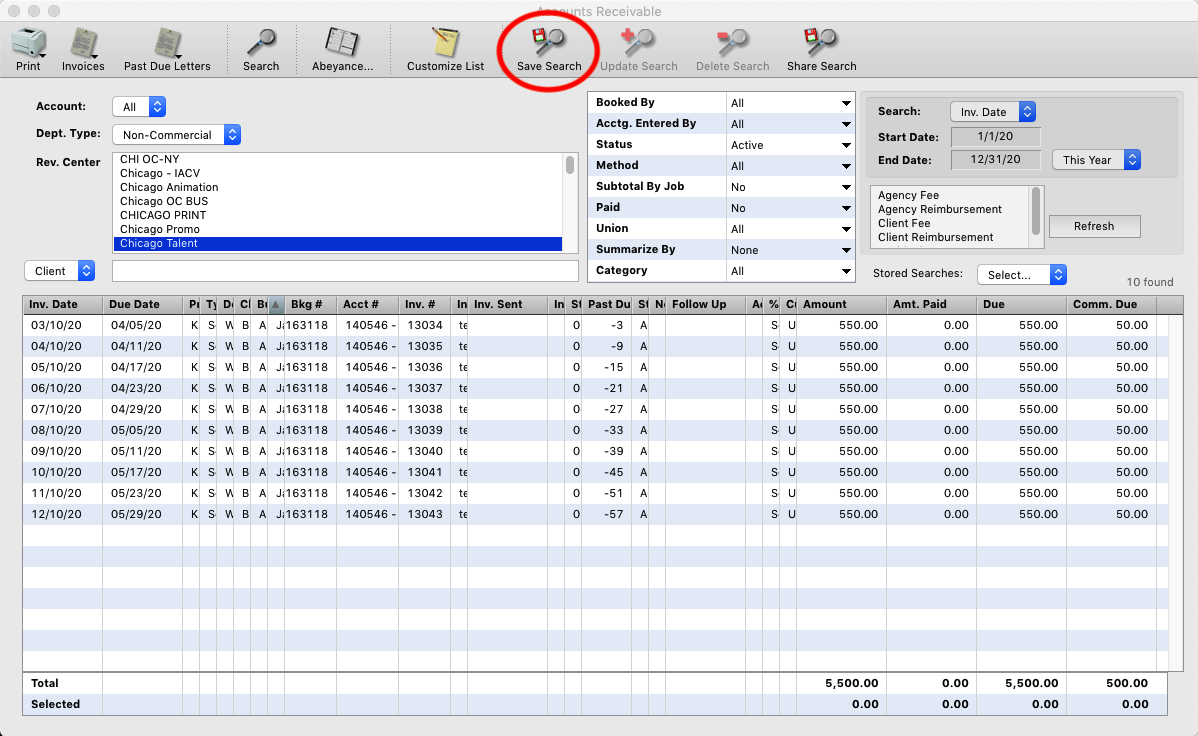
“Customize List” button allows you to hide columns in the results section of information that you may not find necessary for your needs.
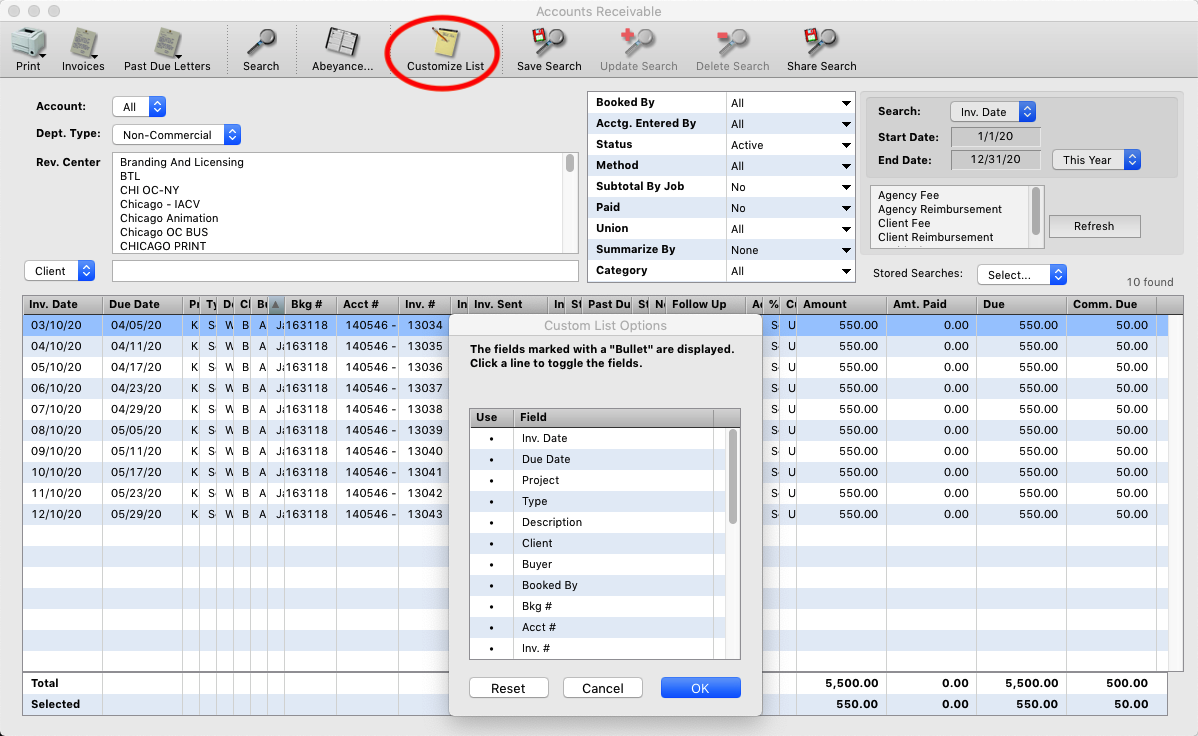
Step 7
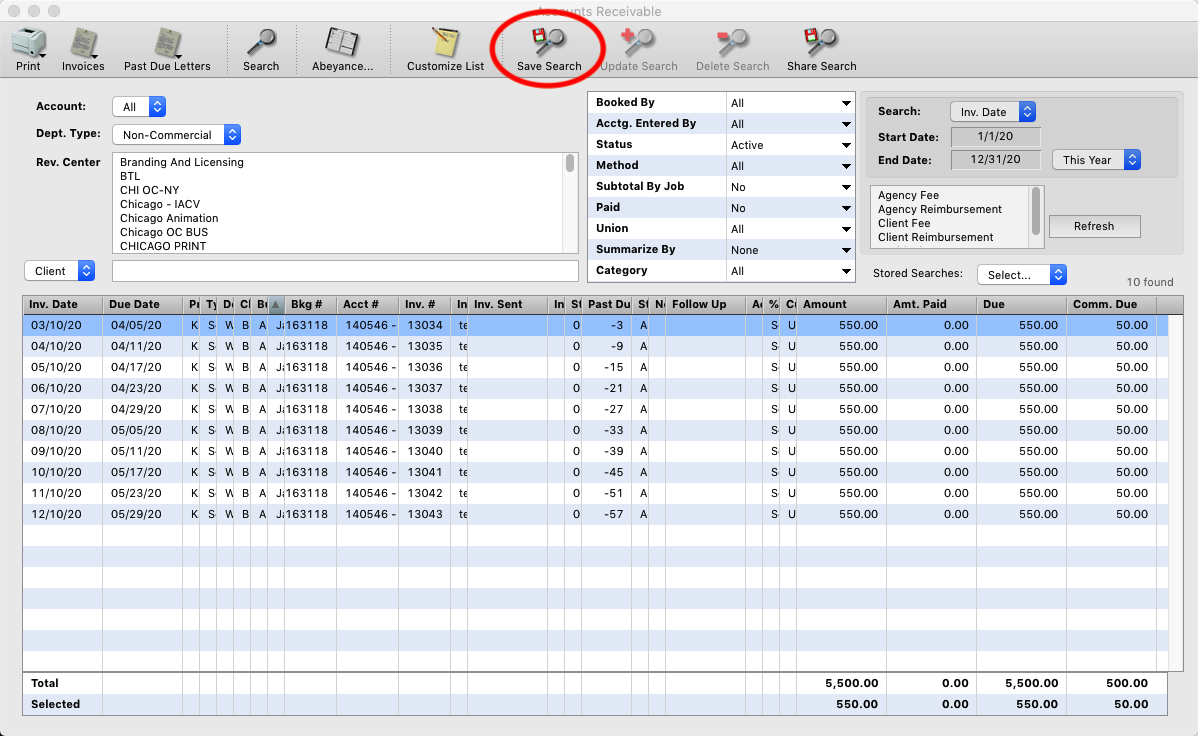
If there are reports you do periodically you can save the options you have selected and give the search a name, so you don’t have to spend time choosing those options every time you need to do the report. You can also share that saved search with other users.
Step 8
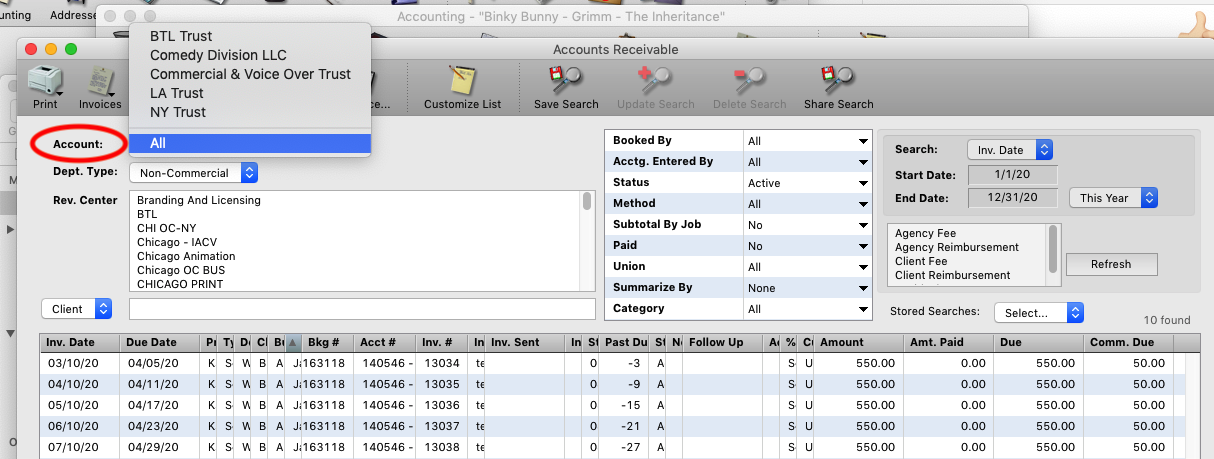
“Account” allows you to run the AR report for a specific trust account if you have multiple trust accounts for accounting.
Step 9
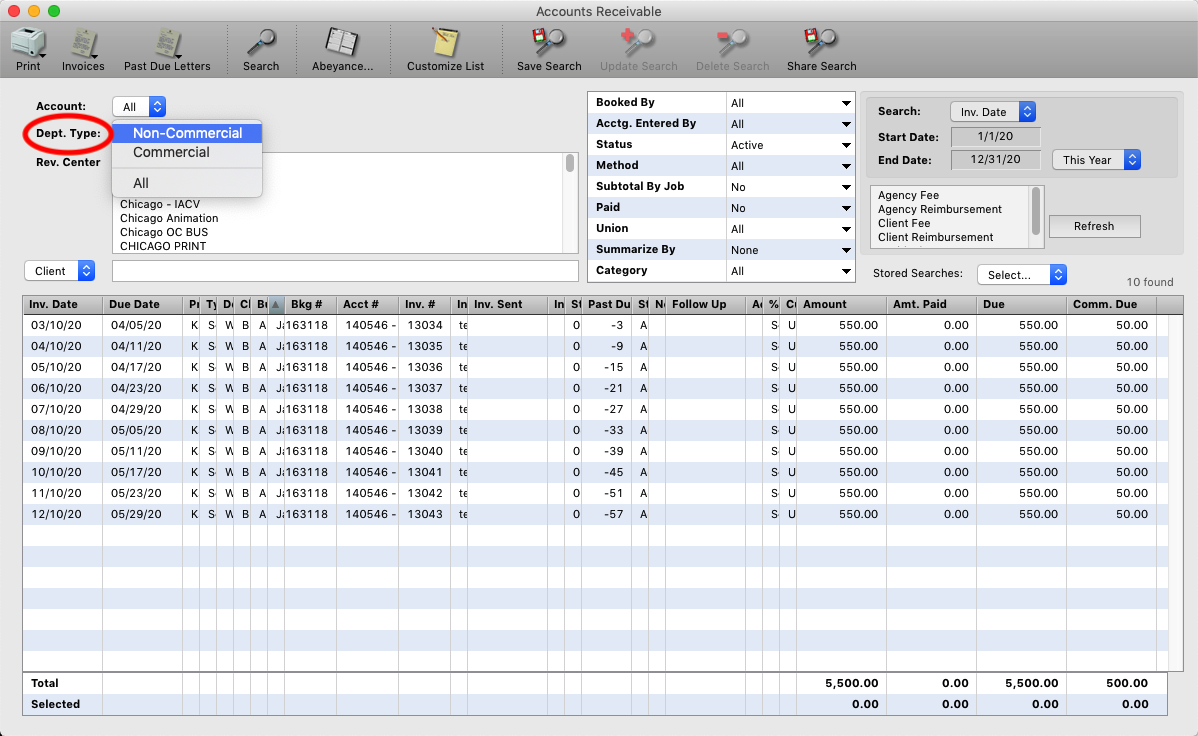
“Dept. Type:” allows you to runt the report for Commercial or Non- Commercial type accounting records.
Step 10
“Rev Center” allows you to choose specific revenue centers for the Department type you have selected.
*NOTE You need to have chosen a Department Type in order to have access to this option.
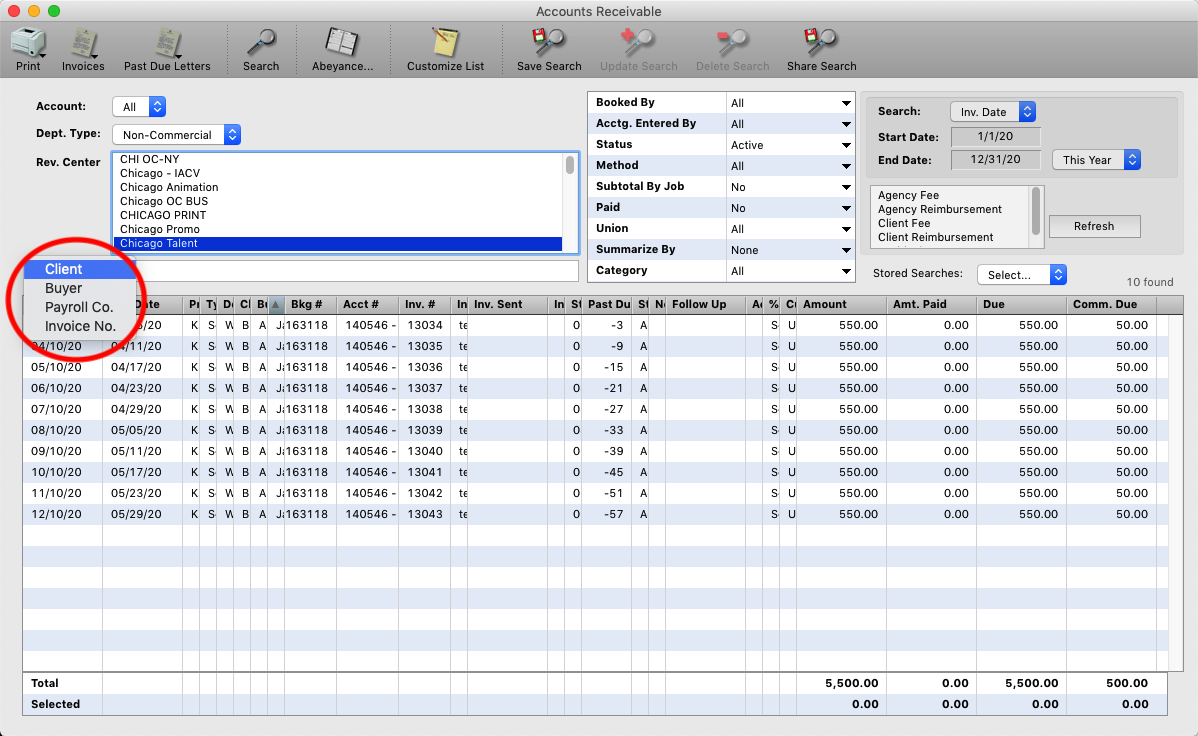
Step 11
You can also run the AR report by a specific Client, Buyer, Payroll Company, or Invoice number.
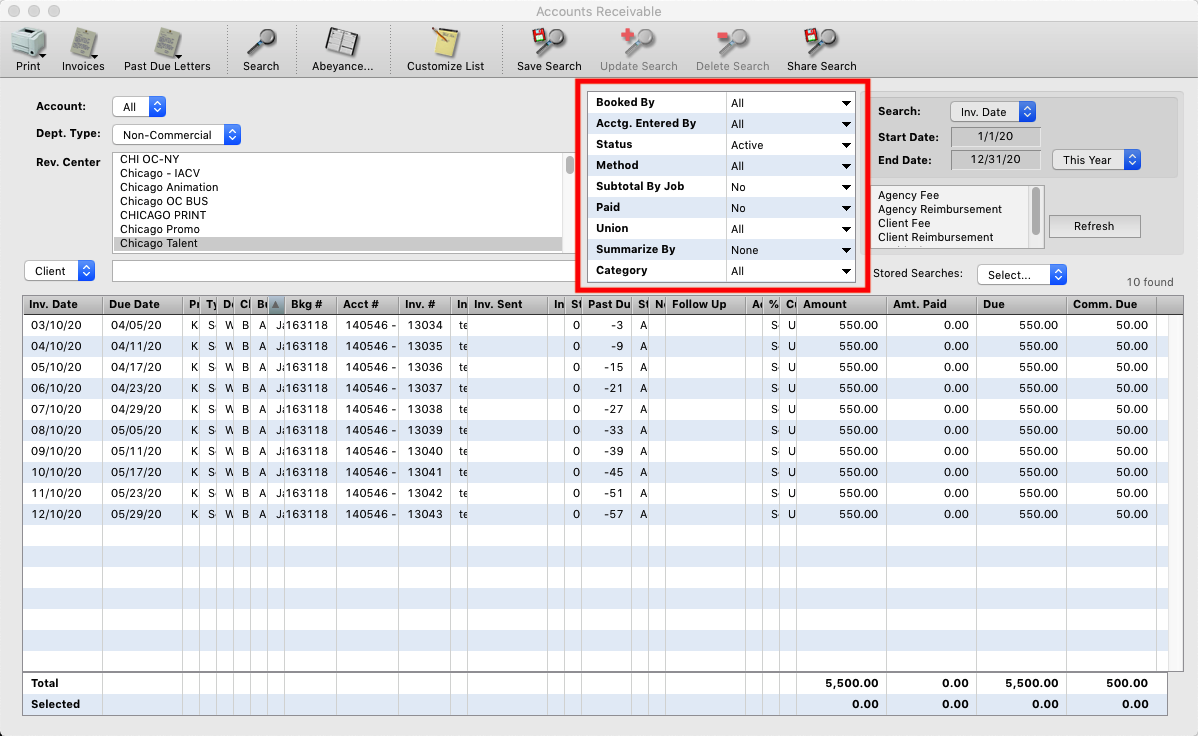
Step 12
In the center you have the following options…
Booked By: Choose a specific iE user’s bookings.
Accounting Entered By: The accounting was entered by a specific user.
Status: Choose records with a specific accounting status.
Method: When running an Invoice AR, you can choose to see only invoices you emailed or printed.
Subtotal by Job: If an accounting record has multiple open fee lines, you can subtotal it so you only have one line in the results.
Paid: Includes jobs that are paid.
Union: Allows you to choose Union or Non-Union Jobs.
Summarize By: Allows you to get just a single line total by Client, Booked By or Buyer.
Category: Choose a specific category form the Address module to run the report by.
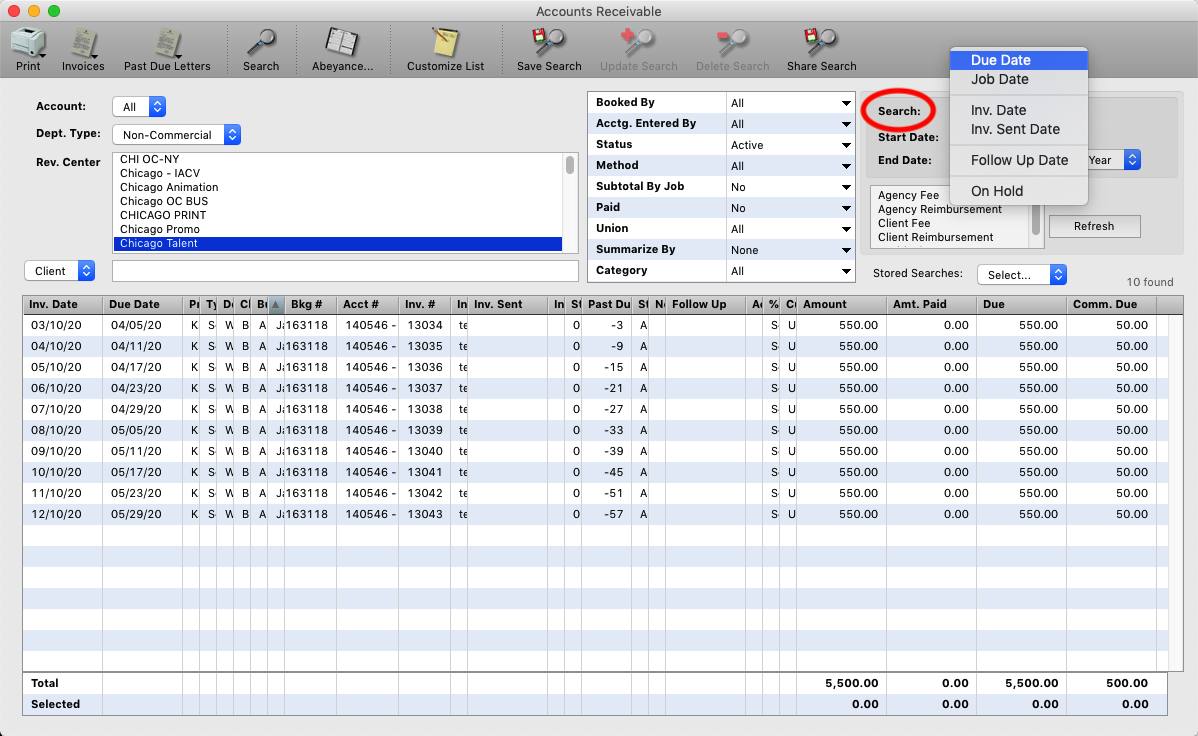
Step 13
“Search” pop-up allows you to run the report by different types of dates, it also allows you to pull of list of all payments you have entered that are “On Hold”, (escrow payments).
Step 14
In the box below the date options you choose to run the report for specific fee types. Just client fees, just your Agency fees or just past due residuals if you are doing it by Commercial Dept. Type.
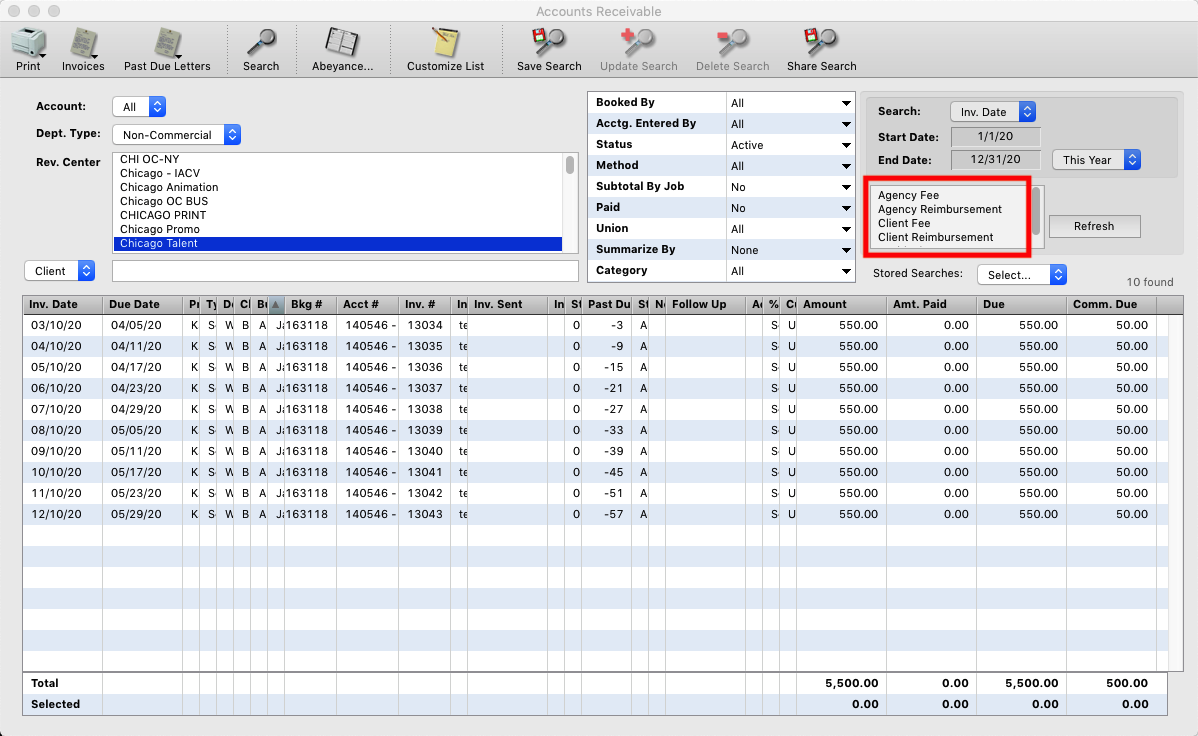
Step 15
The last pop-up is to choose your Saved Searches, (from Step 7).
Step 1
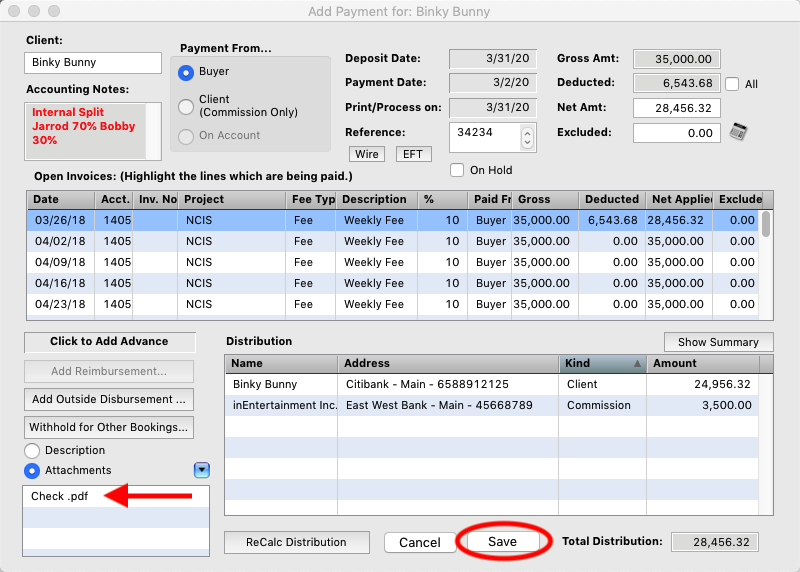
Enter the details of the payment as usual. Click the Attachments button in the lower left corner.
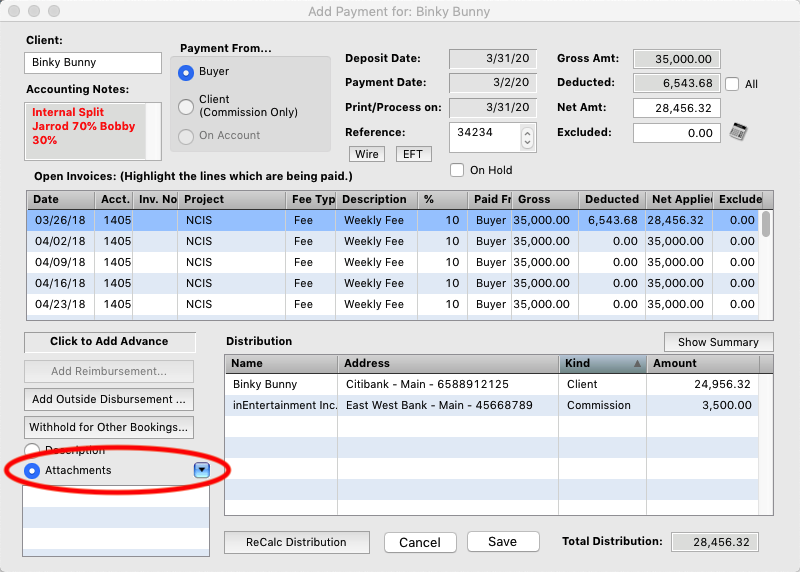
Step 2
Click and hold on the blue triangle button and select Add Attachments form the pop-up menu.
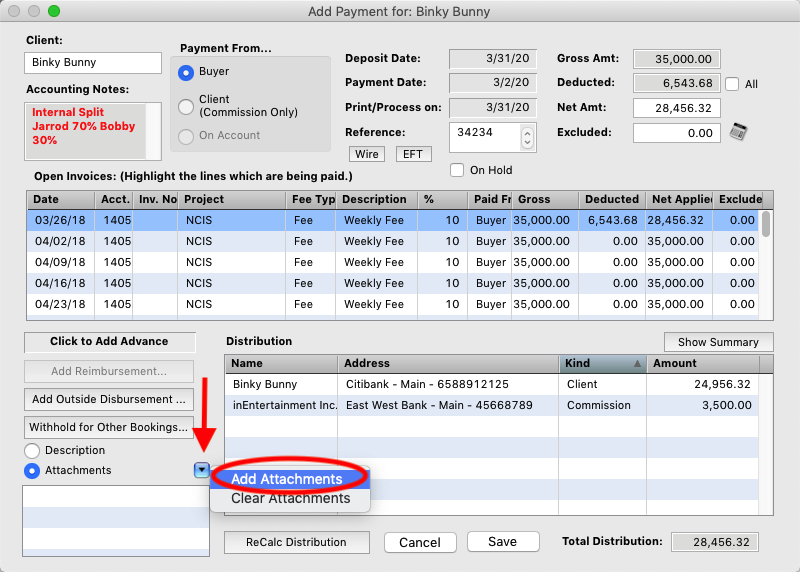
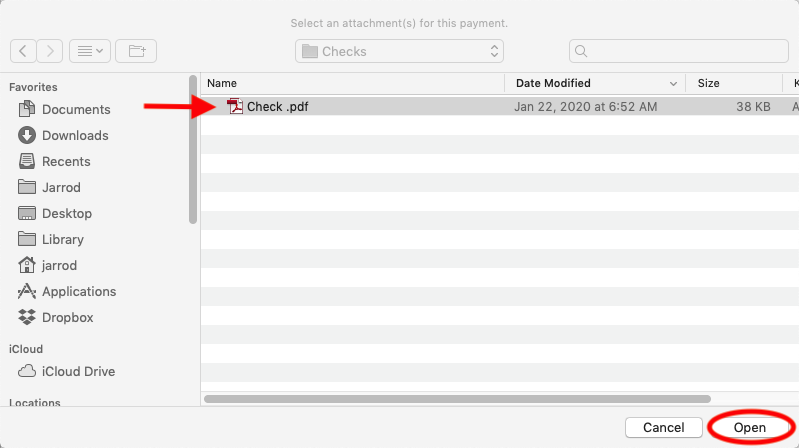
Step 3
Navigate to the folder where you have stored the PDF copies of the checks. Select the copy for the payment you are entering and click the “Open” button.
Step 4
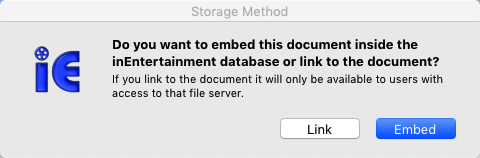
You will then be asked if you want to Link this copy or Embed it.
*NOTE Embedding it uploads it to the database. Linking it creates a path link to where it is stored currently, so if a different user wants to view that check copy and they do not have the same path, they will NOT be able to open it.
Step 5
You will see the file you have attached to the payment. Save the payment as normal.
Step 6
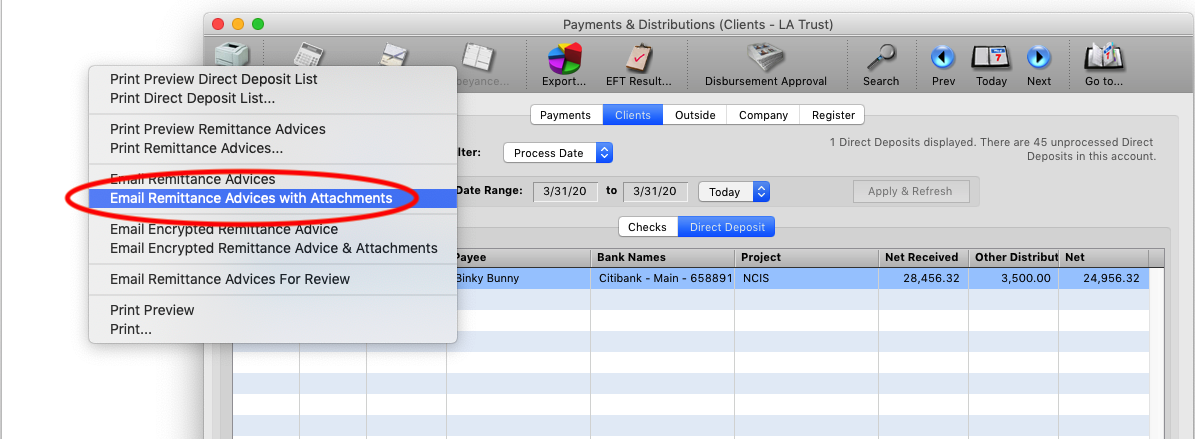
After you have uploaded the Direct Deposit file and assigned the statement numbers, click and hold on the printer icon and select Email Remittance Advices with Attachments. And email with the payment statement and a copy of the check will open in your email program.
Step 1
From any Accounting record click the Accounts Receivable button.
Step 2
In the AR window,
1. Choose the Department type and Revenue Center.
2. Set the Status option to Active and the Paid Status to Yes
3. Then set your date range to last year, (or an older year if you haven’t done this in a while)
4. Click the Refresh button
Step 3
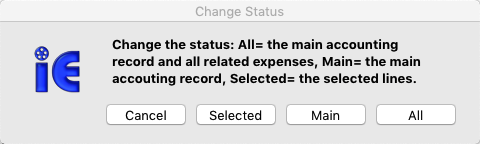
1. Sort your results by the Due or Commission Due Column. Lines that have a $0.00 dues are paid and no money is owed on the fee line. Select a line and R-Click on the line.
2. Choose Change Accounting Status form the pop-up menu.
*Note You can select multiple lines if you choose but the more lines you select the longer the process will take and you can always change an accounting record’s status back to active if you make a mistake.
Step 4
Choose “Done” from the list of options and OK.
Step 5
Choose which status you want to change for this accounting record. (The descriptions one the options are located in the pop-up message.)
US Direct Deposit Setup
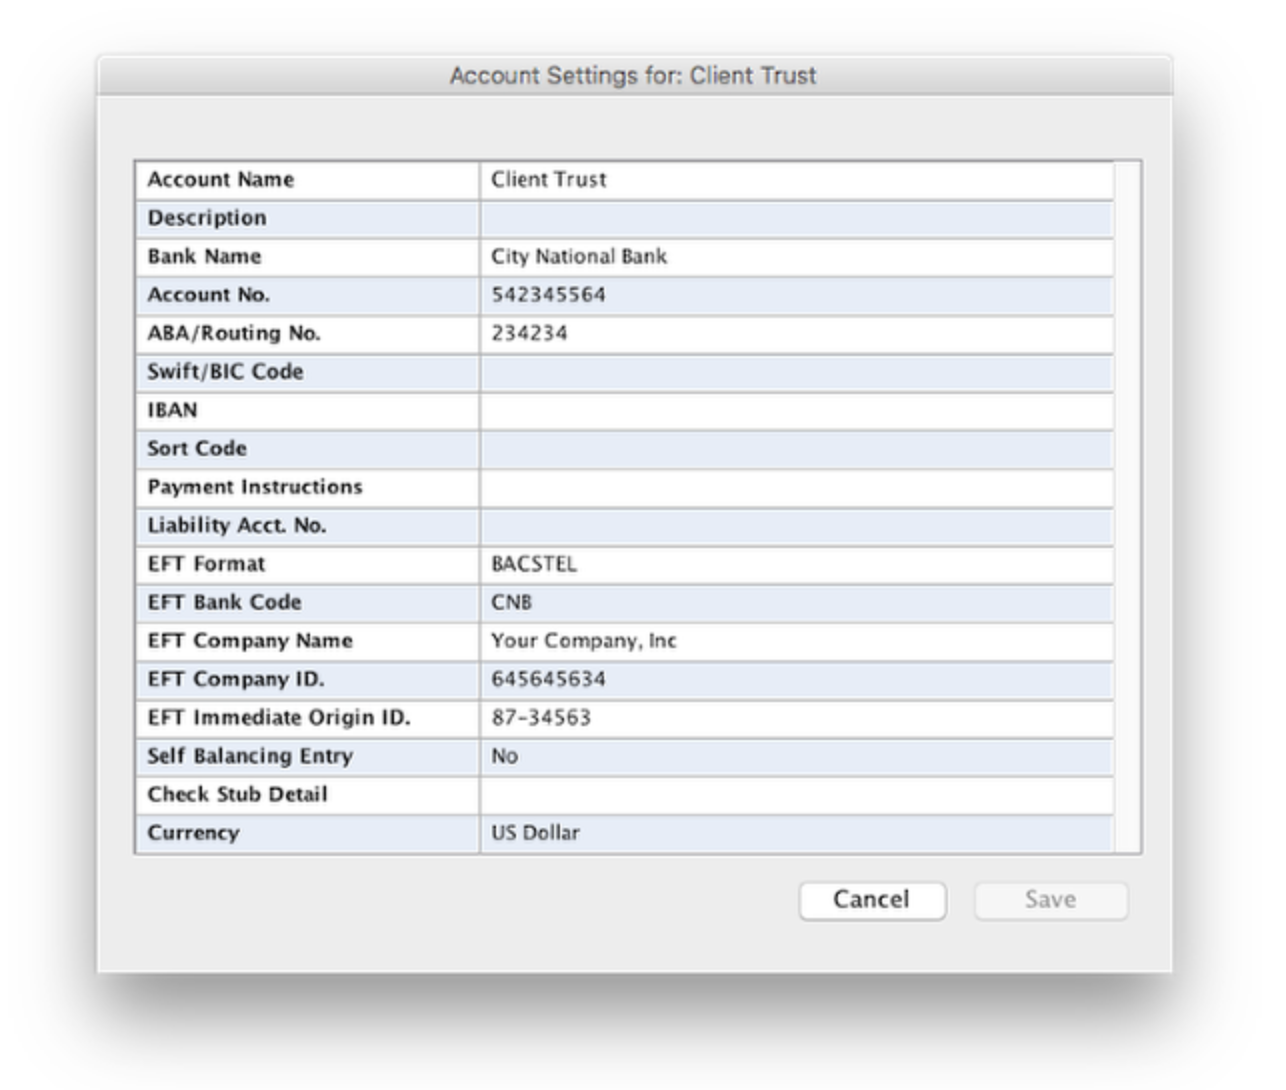
Bank Name
Account Number
ABA/Routing Number
EFT Format – Set to NACHA
EFT Bank Code
EFT Company Name – This is the name listed on the account with your bank.
EFT Company ID. – CNB uses a 5 followed by your account number.
EFT Immediate Origin ID. – Use your Tax ID if one was NOT issued by your bank.
Australian Direct Deposit Setup
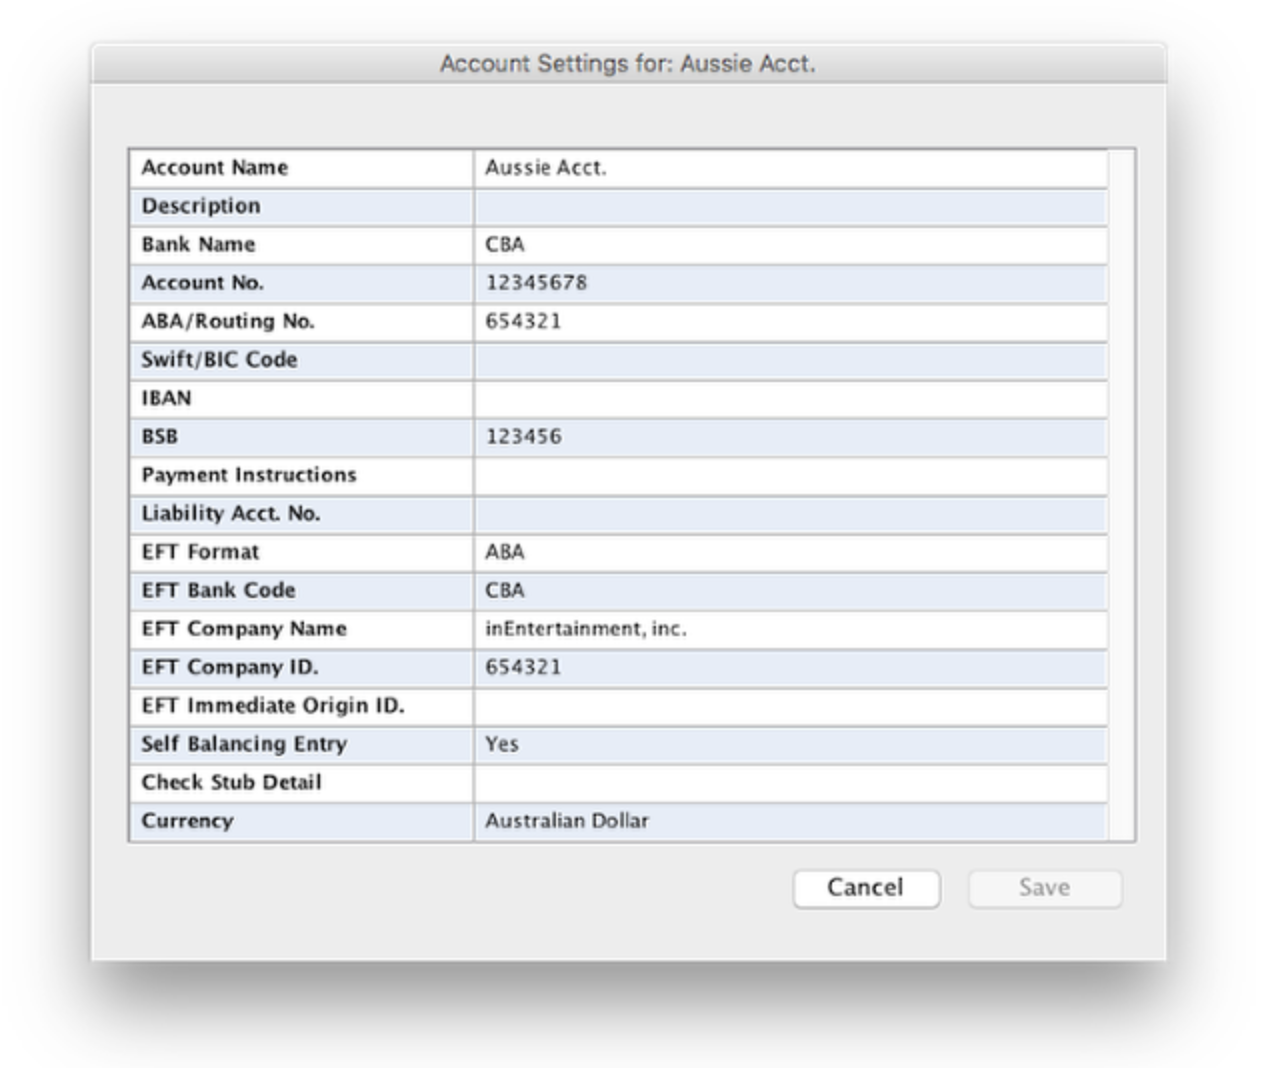
Bank Name
Account Number
ABA/Routing Number
BSB
EFT Format – Set to ABA
EFT Bank Code
EFT Company Name – This is the name listed on the account with your bank.
EFT Company ID.
UK Direct Deposit Setup
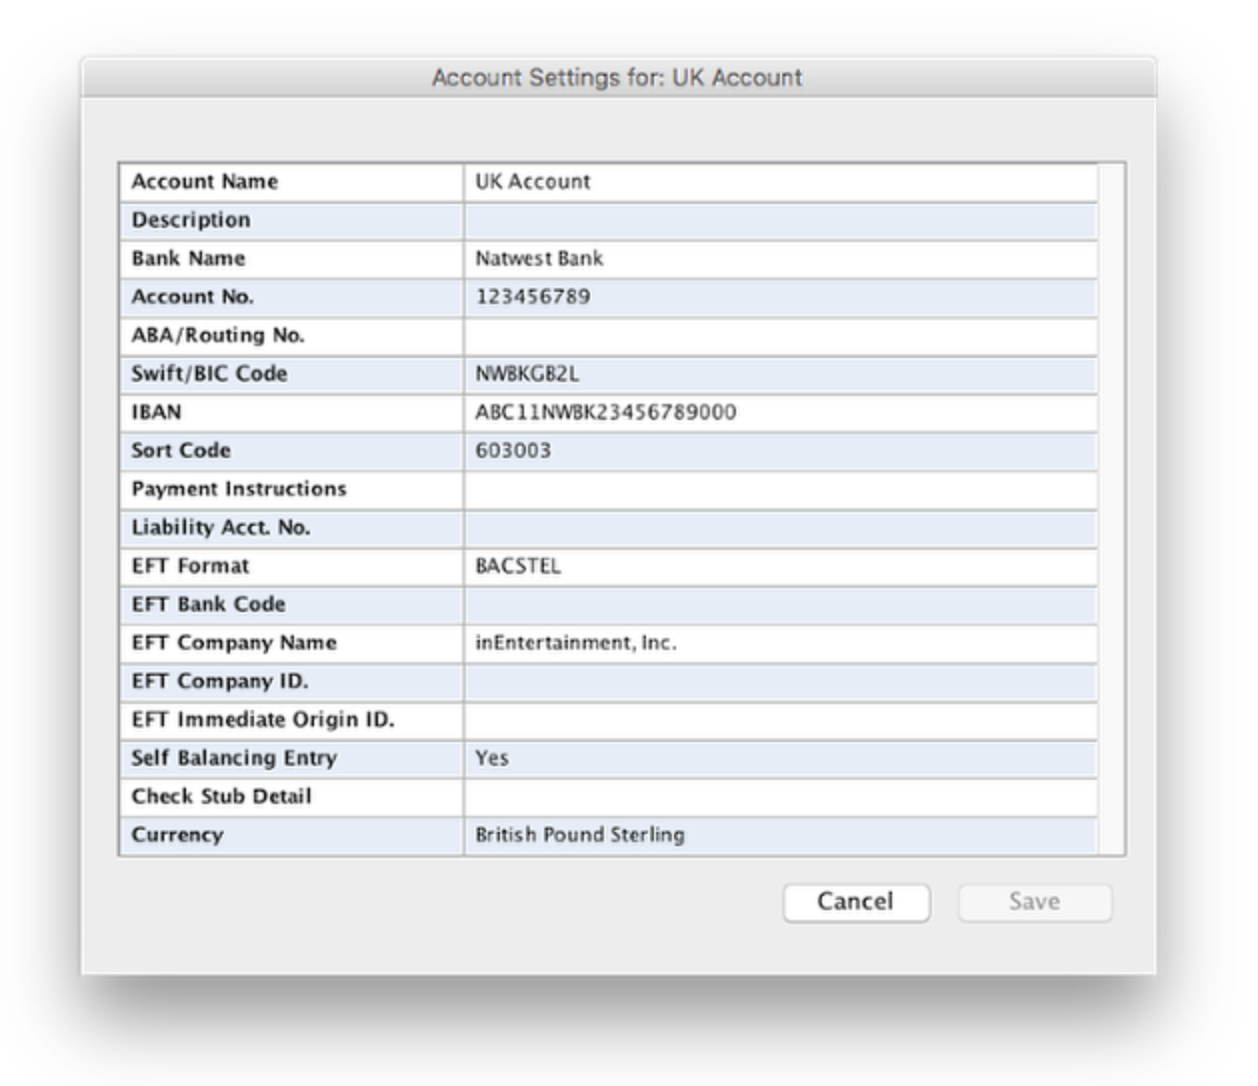
Bank Name
Account Number
Swift/BIC Code
IBAN
Sort Code
EFT Format – Set to BACSTEL
EFT Company Name – This is the name listed on the account with your bank.
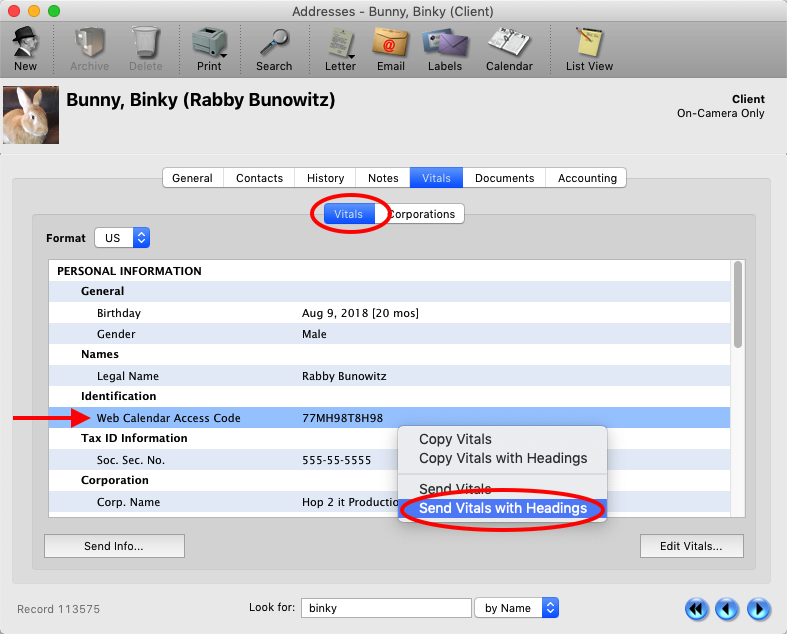
When a client is to be paid as a company and not as a PAYG then use the LoanOuts window in Addresses under the vitals tab.
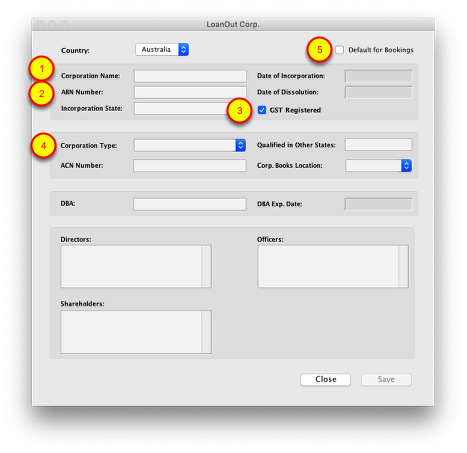
Step 1
Name: Can be the name of the Client, Company or Partnership. There can be multiple corporations all with the same Name but different Corp Types but they should have different ABN numbers.
Step 2
ABN Number: enter ABN details (eg: xx xxx xxx)
Step 3
GST Registered – Mark if GST registered. A company earning more than 75k should be GST Registered. This would not be the case for Overseas company. You can verfiy that the ABN, ACN or Name is correct at https://abr.business.gov.au
Step 4
Corporation Type – Select drop down arrow for a pop up list. The Corporation Type will be appended to the name when choosing the Pay To on a booking.
*IMPORTANT: You can add whatever you like to the list but Sole Trader or ST, either are recognized by the system, should be in to the list so that when selected and the compnay is not GST Registed a heading of “Tax Invoice” will not be used.
Step 5
Default for Bookings: Check this box if you would like the PAY TO set to the Loan Out entity by default instead of PAYG. The system will automatically default to the name of the client which is PAYG.
PAYG: If a booking’s Pay To is linked to the Client’s Name or Sole Trader, then the employer will collect pay as you go (PAYG) withholding amounts from the pay check.
If the client has an Overseas company then it should not be GST registered. Use the Corp. Type pop up list to signify it as OverSeas.
Invoice Remarks shown on the invoice will be determined by the way the Pay To is listed on the booking. Remarks are set up in the Admin using the three following criteria:
Loan Out
Sole Trader
Individual or PAYG
An globally alternate heading on Invoices can be entered into Admin for all Non-Taxable invoices, such “Payment Request”.
For Bank Account Instruction see https://www.inentertainment.com/help/Direct_Deposit_Transfer_Setup.html
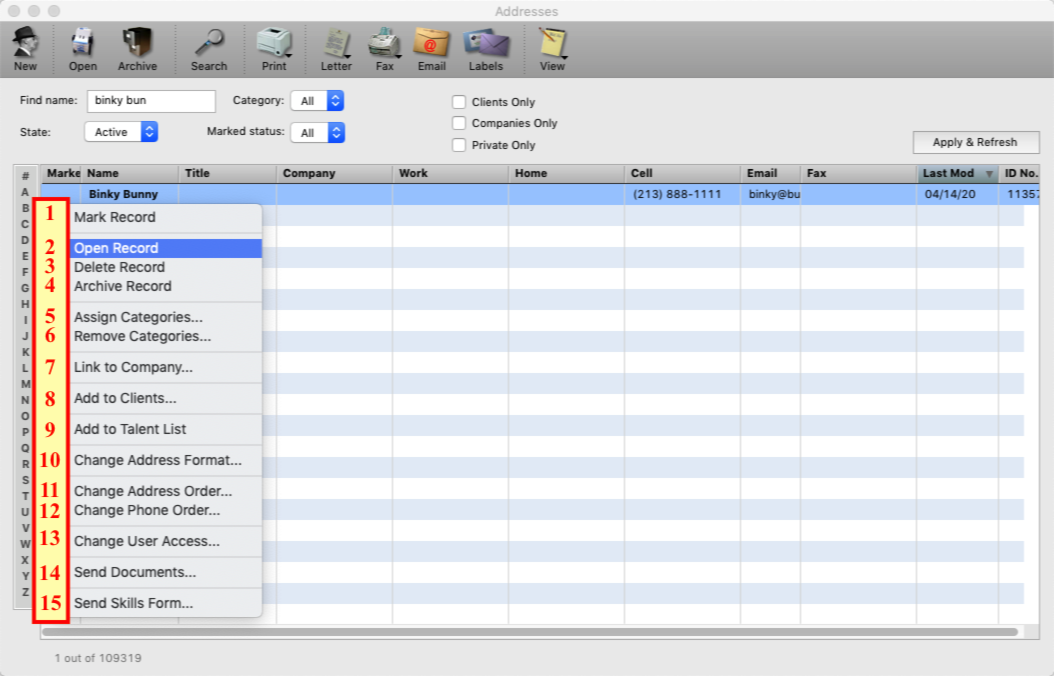
Addresses
This FAQ will guide you through the options available in the Addresses List View.
Step 1
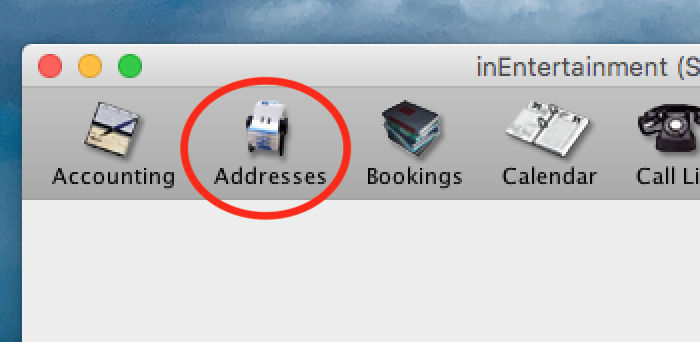
Open the Addresses Module.
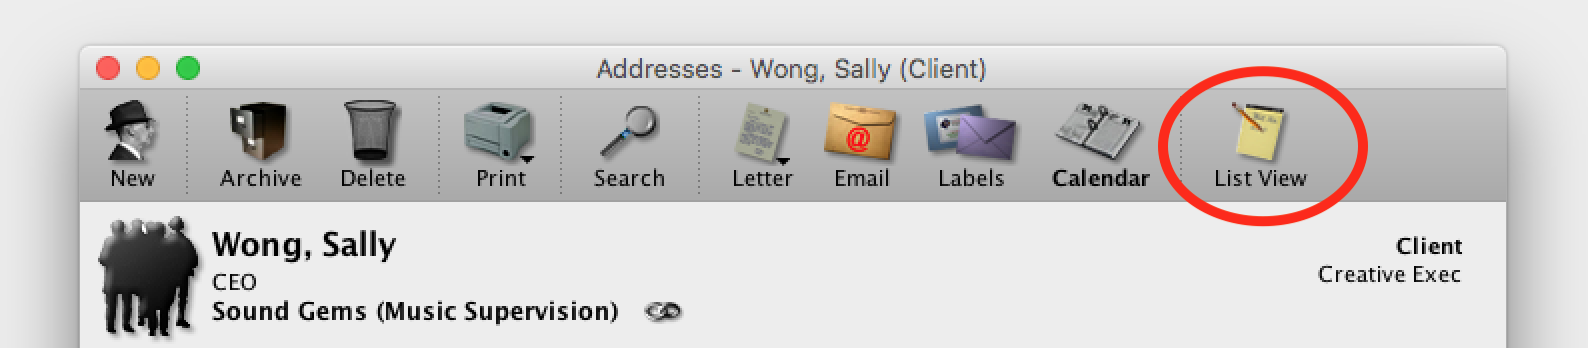
Step 2
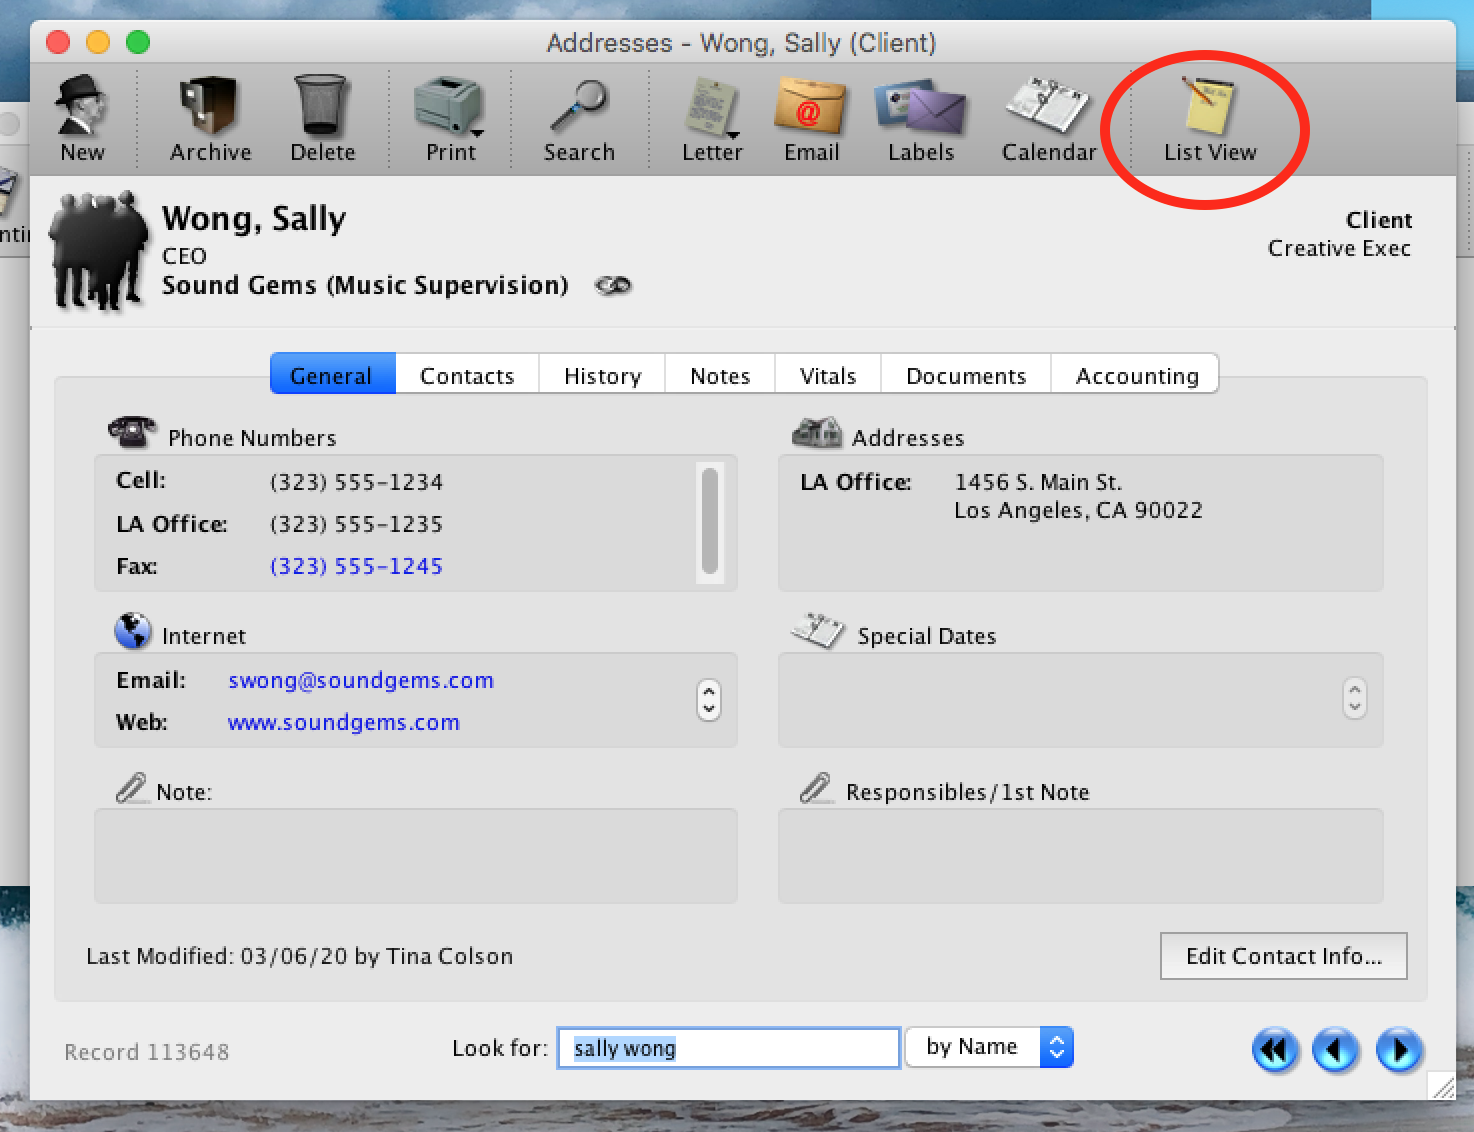
Click on List View.
Step 3
Once in List View, for the State field, select Archived or Deleted.
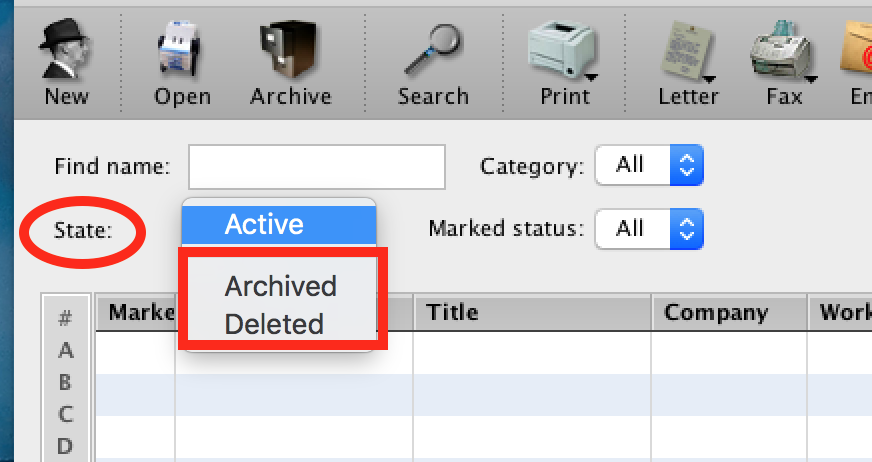
Step 4
Once you’ve selected the appropriate State, type in the name of the Contact you’re trying to retrieve and click on Apply & Refresh.
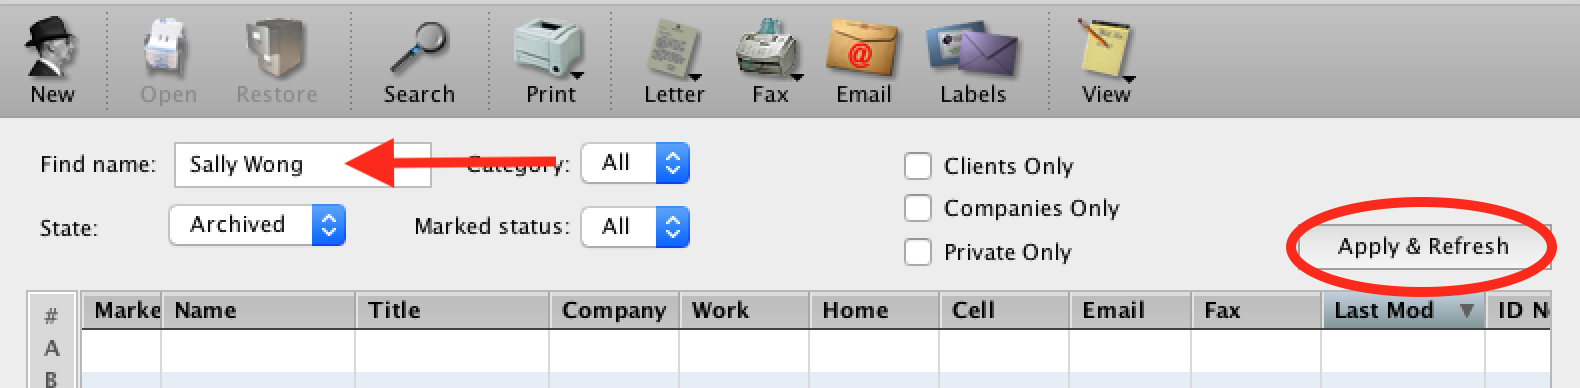
Step 5
Find your contact in the displayed results and Right click (or hold the Control key and click if on a Mac computer and unable to Right click) and select Restore Address.
Step 1
Select the “Search” (magnifying glass) button from the tool bar or the Tools menu.
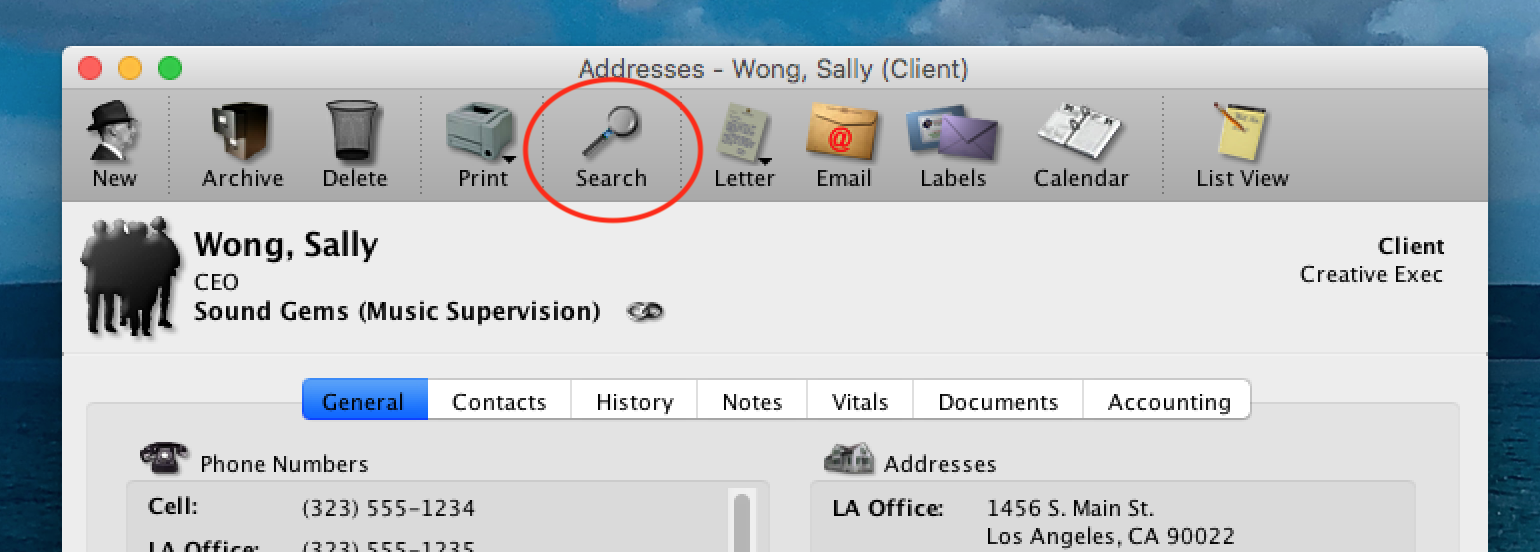
The Search window will appear on your screen. Click on the Addresses tab, if it is not already selected (1).
From the “Report” field at the left of the window, choose “Duplicate Names” from the drop-down list (2).
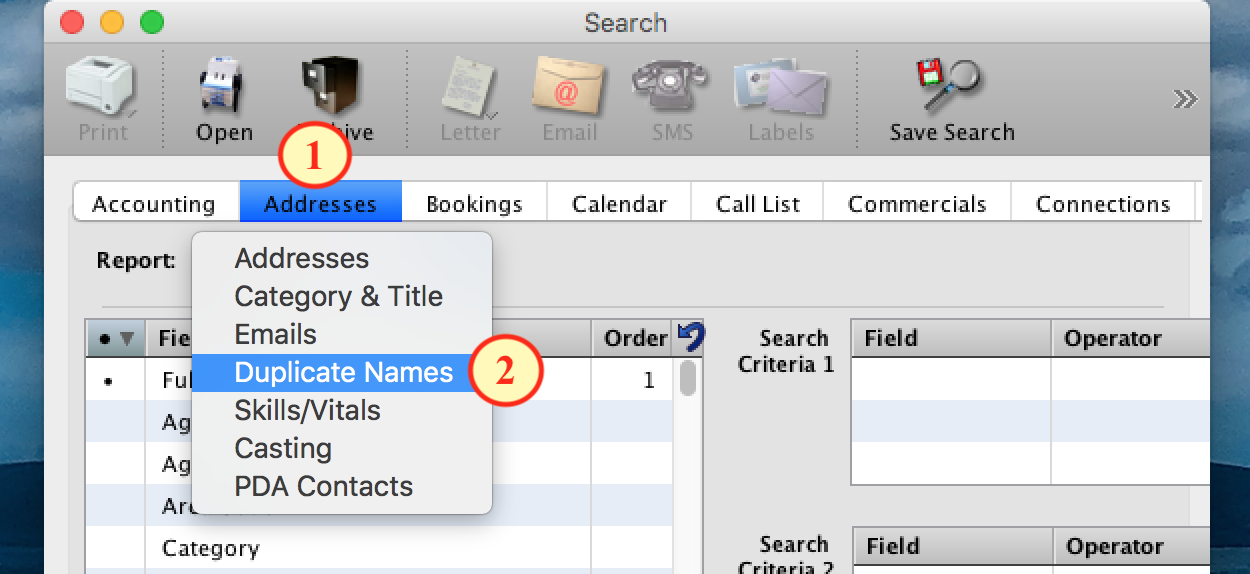
Click the “Search” button on the right side of the window. A list of duplicate names will appear in the results list. Click a column header such as “Company” or “Name” to view the list sorted in different ways.
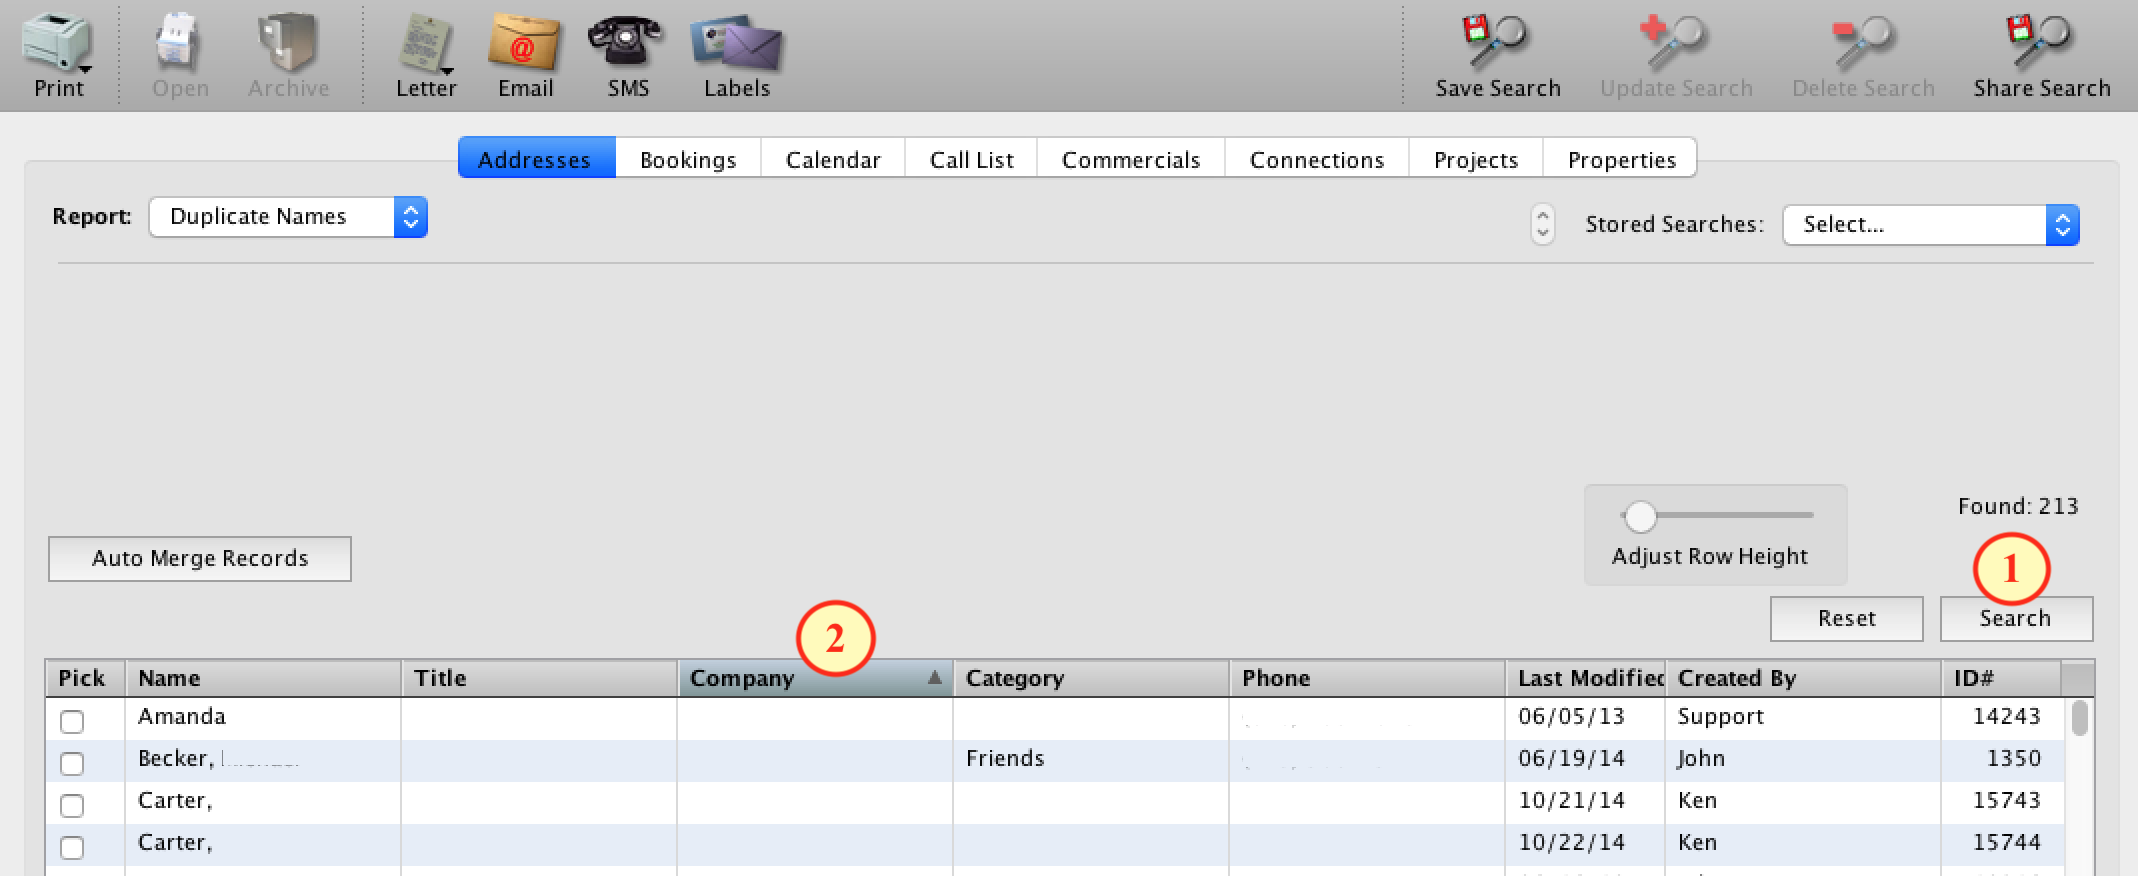
Step 2
Review the records you wish to Delete, Archive or Merge.
First, highlight the names from the list that you wish to view simultaneously.
To select records in the list use one of the following methods:
All – Command-A on Mac OS or Control-A on Windows.
Continuous – Click and drag OR select the first choice from the list and then while holding down the shift key, select the last line you want to include.
Discontinuous – Hold down the Command Key on Mac OS or the Control Key on Windows

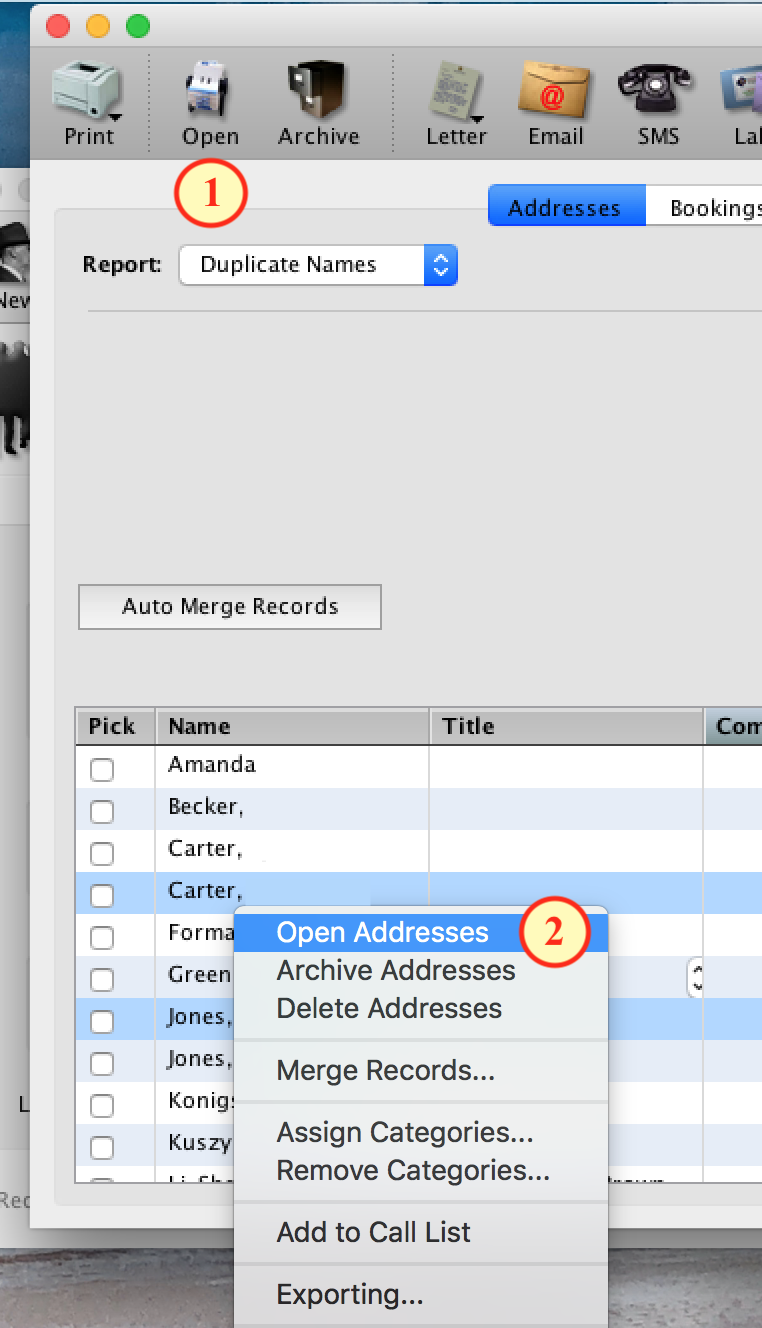
To view the selected records:
Click on the “Open” (rolodex) button in the tool bar (1),
OR
Right-click on Windows or Control-click on Mac OS on any one of the highlighted names. From the drop-down menu, choose “Open Addresses”(2).
The address cards for the selected names will now open up. Review each card’s information on the various tabs (General, Contacts, History, Notes, etc.)
Step 3
Back on the Search screen, decide whether you want to Merge, Archive, or Delete Records.
To access your options:
Right-click for Windows or Control-click for Mac OS on any one of the highlighted names. From the drop-down menu (1), choose “Merge Records”, “Archive Records” or “Delete Records”.
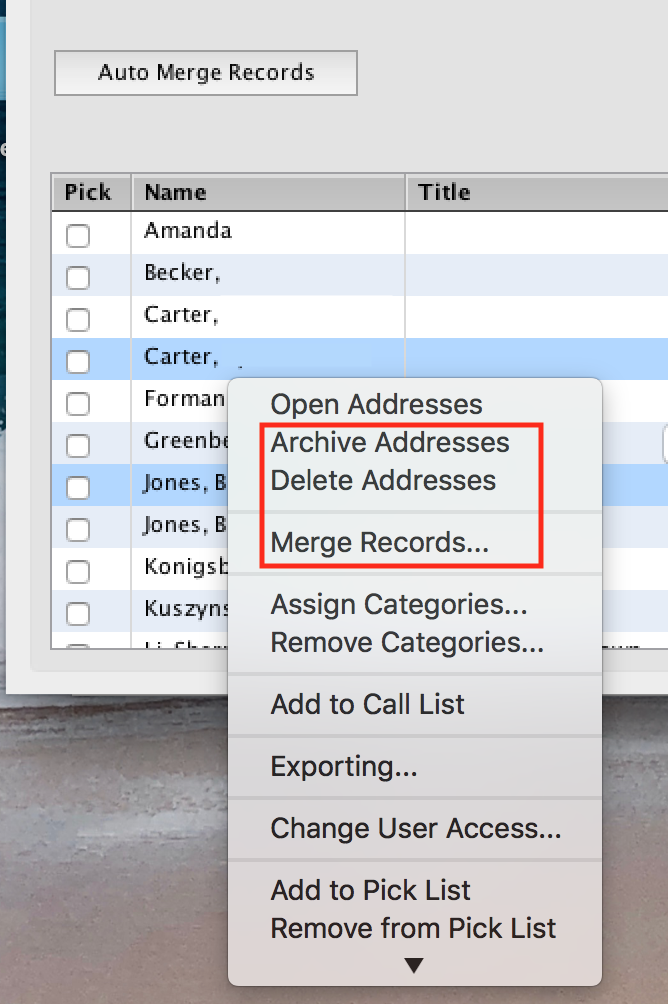
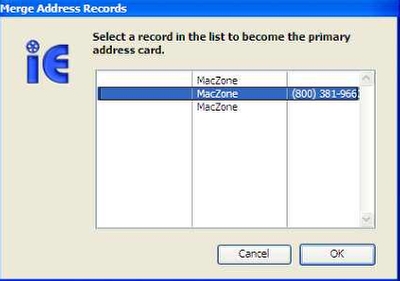
Merge Records
This will prompt you to choose which one of those names will be the new main record.
All Addresses, Phone Numbers, History, Notes and Vitals will be merged onto this record. Only the Company information from the main record will be used. You will not see duplicates of the same address or phone number on the record.
Archive Records
This will allow you to archive the highlighted names. You may also select the Archive (file cabinet) button in the Search menu toolbar (1), or in the toolbar of an open address card (see Step 2).
Delete Records
This will allow you to delete the highlighted names. You may also select the Delete (trashcan) button in the toolbar of an open address card (see Step 2).
Note: You can always go back and restore a deleted or archived address record. From any address card, go to the List View. In the “State” field, select “Archived” or “Deleted” from the drop-down menu and click “Apply & Refresh”. Highlight the record you wish to restore and select the Restore (file cabinet) button in the toolbar.
Step 4
Go back to the search window to work on the next set of duplicate records.
Step 1
Go to the Addresses Module > List View.
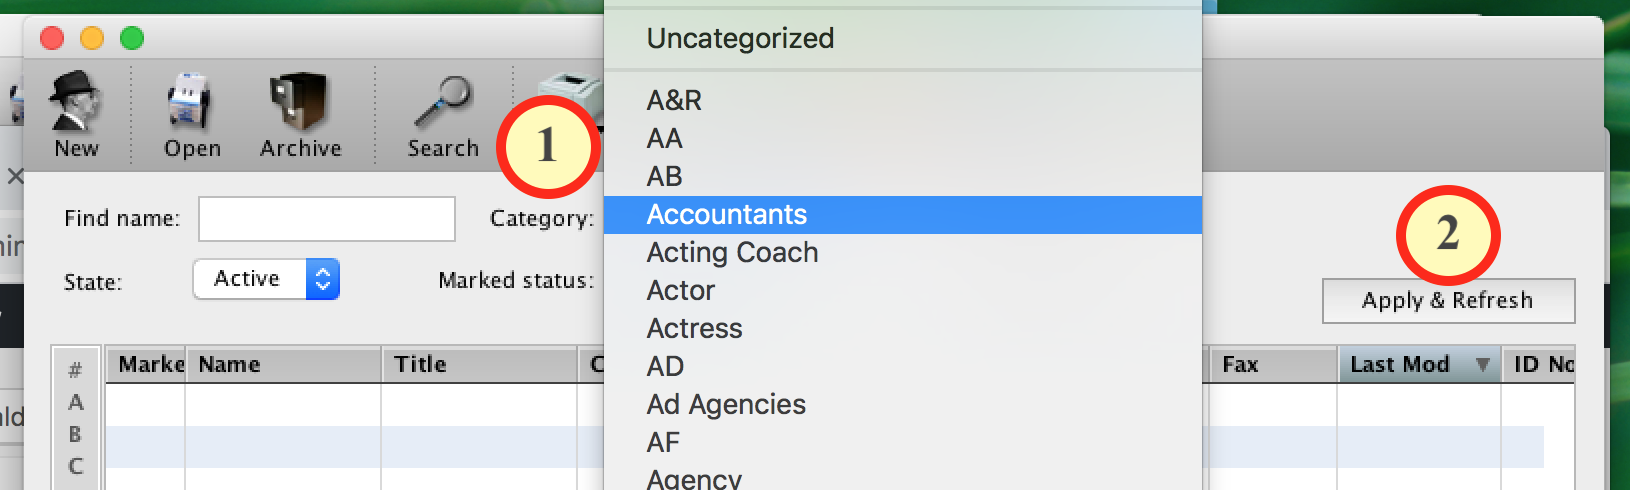
Step 2
Leave the Title box blank but select the Category from the dropdown list that you want to clean up Addresses for (1), or leave blank to view all of your Contacts. Click the Apply and Refresh button. (2)
Step 3
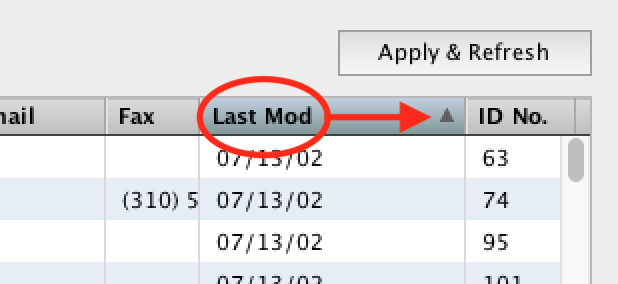
Sort the results by the Last Modified column. (Sort it so the black triangle indicator is pointing up. this puts the older projects at the top of the list)
Step 4
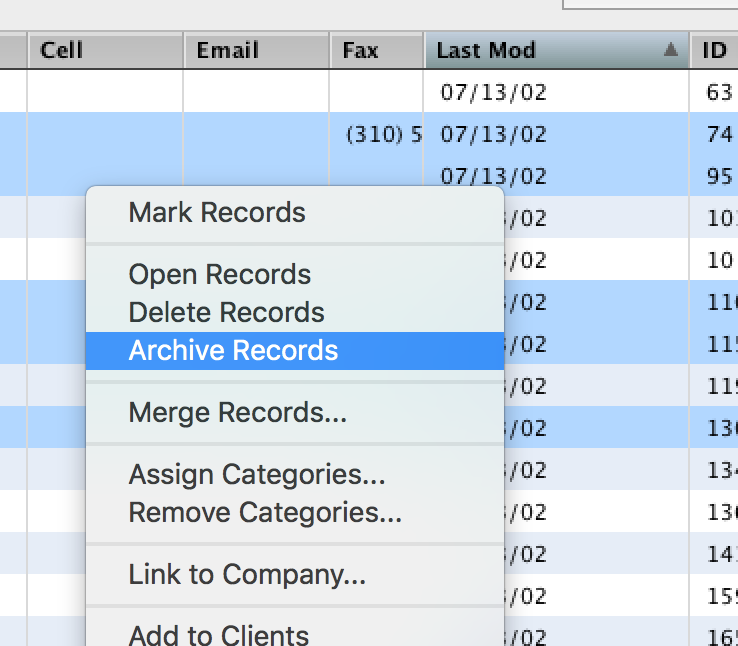
Select then R-Click (Control Click) on a Contact. Select Archive Records from the Pop-up menu. You can select multiple Contacts at one time to archive
*Note The more Contacts you have selected the longer the archiving process will take. 10 Contacts at a time is a good amount.)
Bookings
Step 1
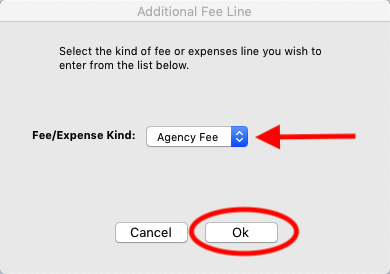
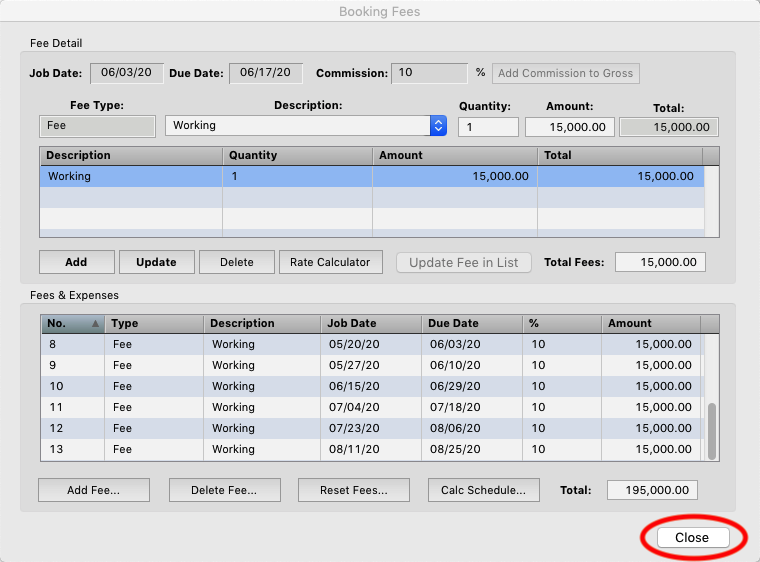
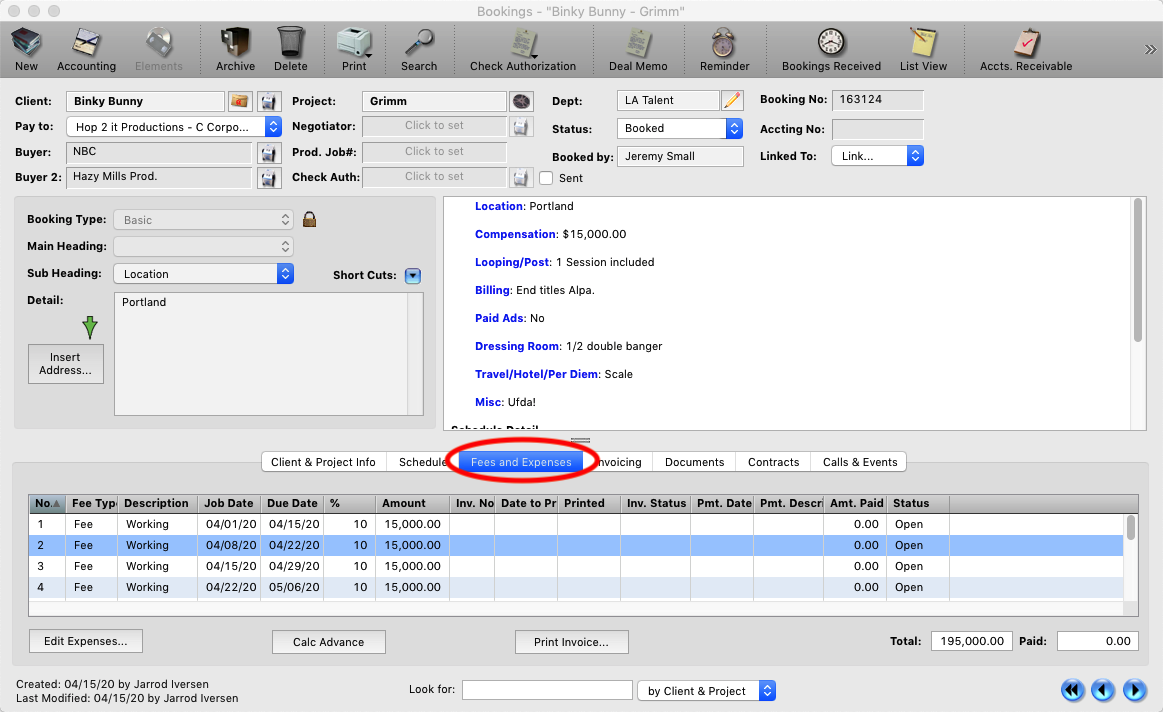
Once you have entered all the details for a booking click the Fees and Expenses Tab (1), then click the “Edit Expenses” button (2).

Step
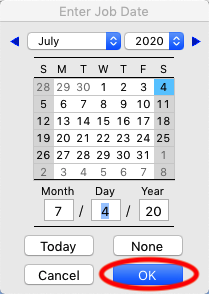
If you have setup a work schedule, (under the schedule tab), for the client you will prompted to enter a rate for the different activities you have created on their schedule. Enter the rate and hit “OK” (1) or click the “Cancel” button (2) to setup the fees manually.
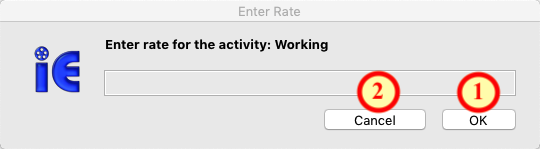
Step 3
If you entered the rate the fee(s) will be automatically created for you.
Step 4
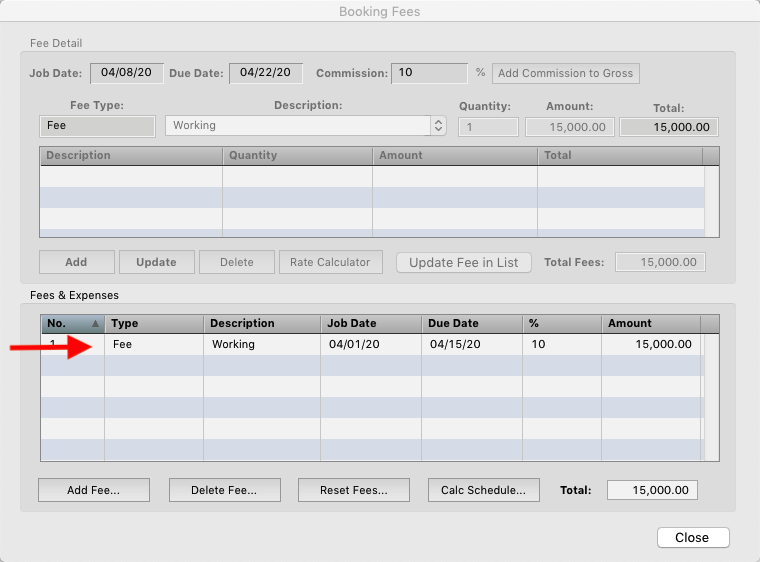
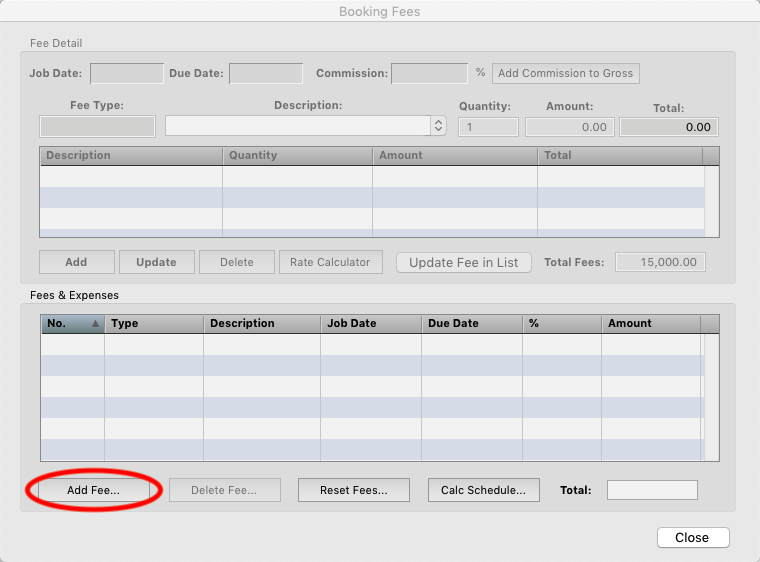
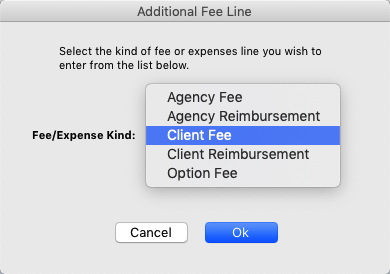
If you clicked “Cancel” in step 2 or if you don’t have a schedule yet, click the “Add Fee” button at the bottom of the window.
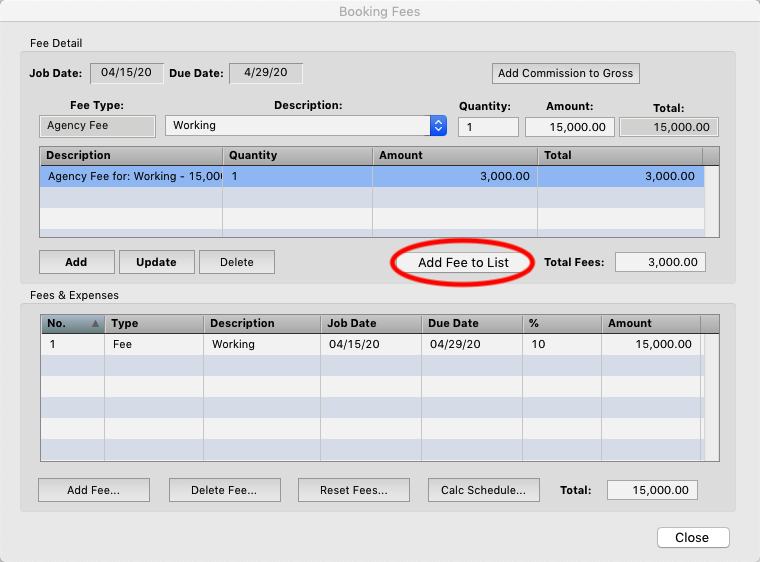
Step 5
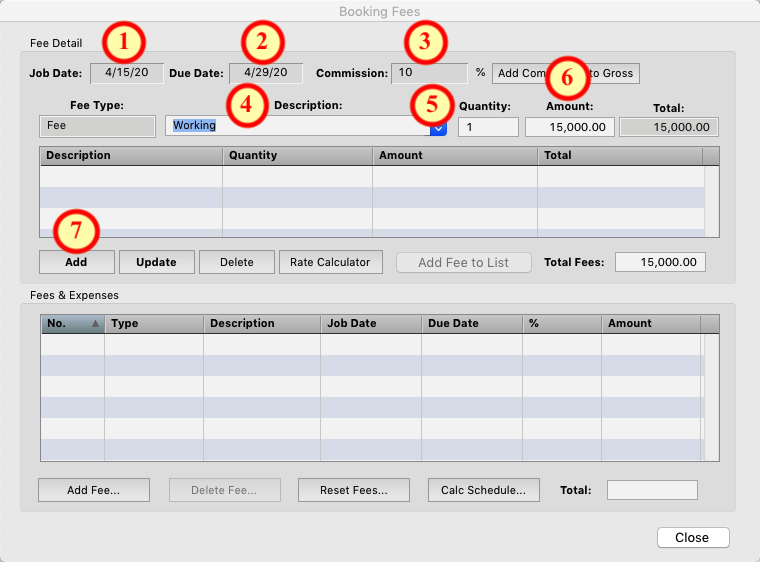
Step 7
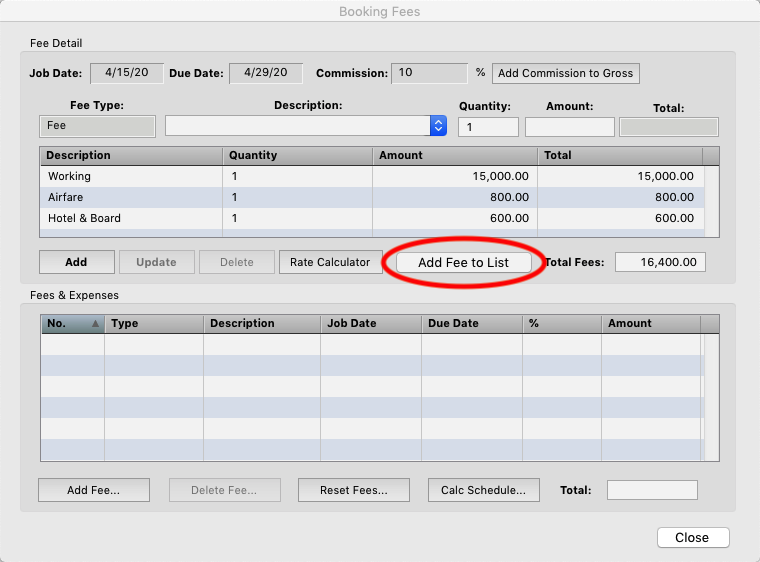
You can add additional expenses for the job, itemizing it like on a check stub, click “Add Fee to List” when finished.
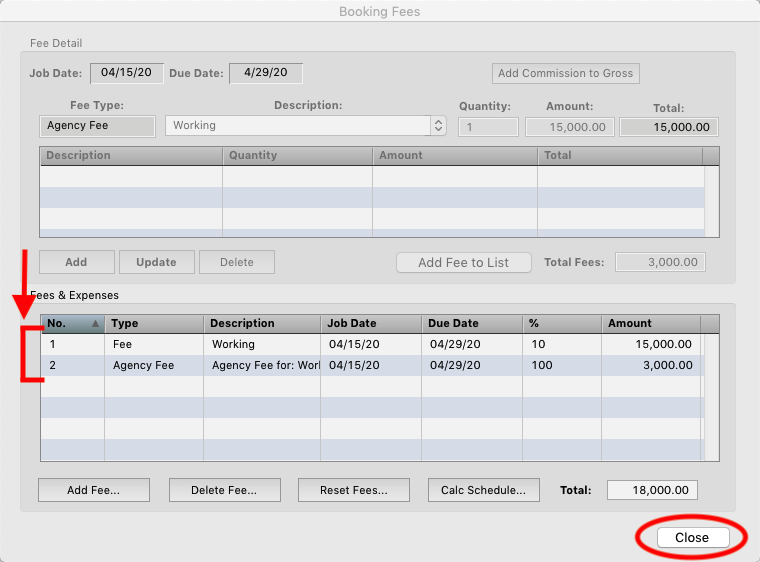
Step 8
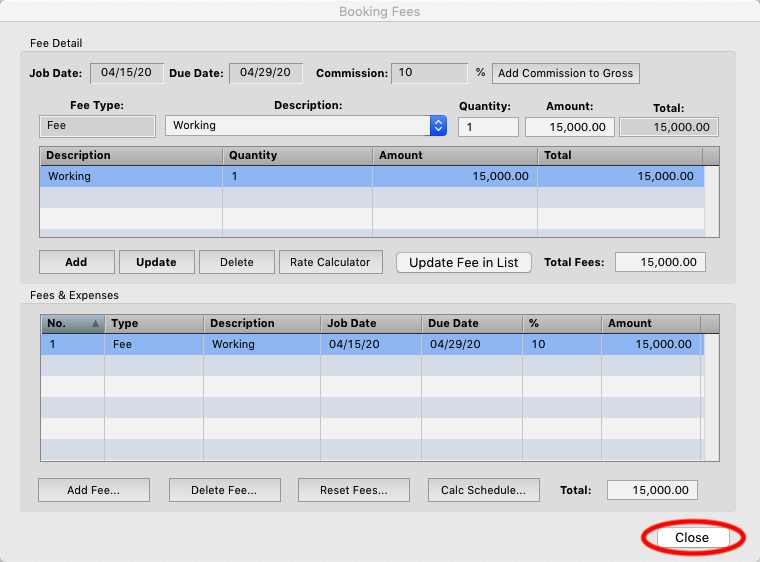
You will see the Fee you added in the Fees and Expenses area. If you are finished click the “Close” button or add additional fee lines.
Step 9
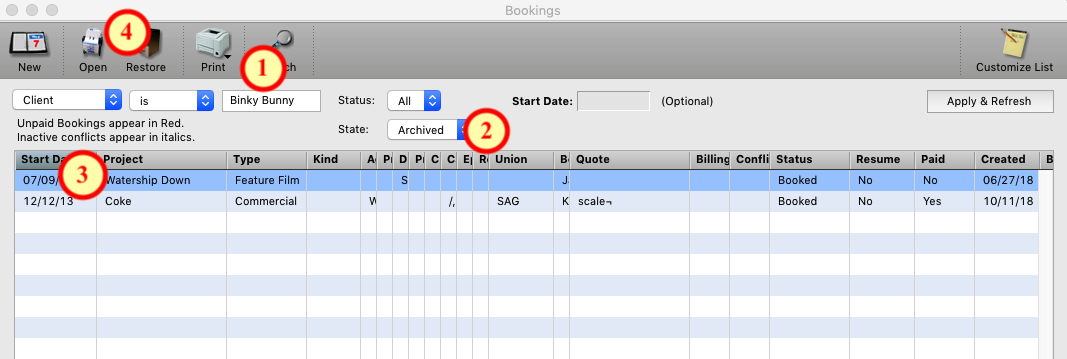
Step 1
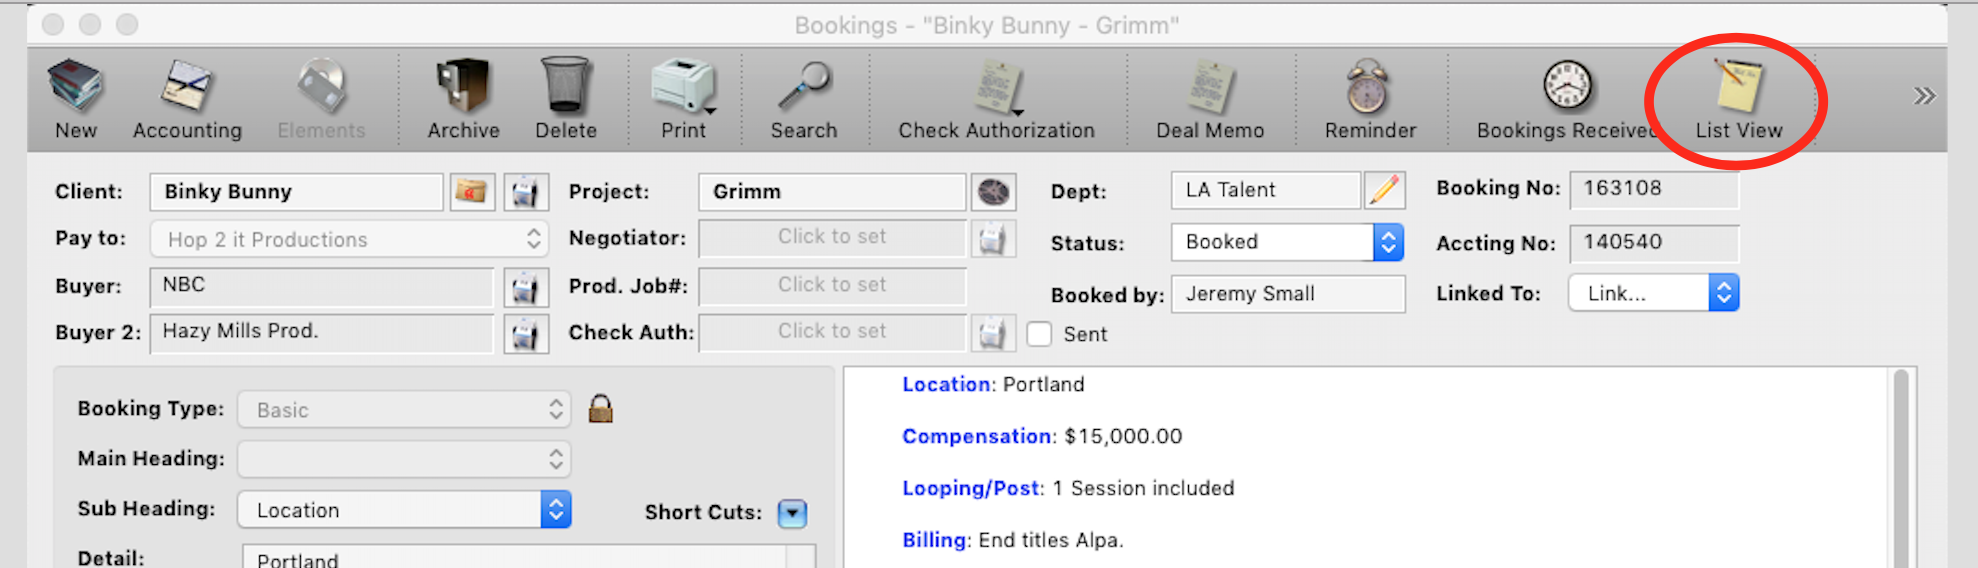
From any Booking click the List View button in the upper right corner.
Step 2
Enter the client’s name. (1) Change the “State” pop-up to either Archived or Deleted. (2) Select the booking you want to restore form the results. (3) Click the “restore” button at the top of the window. (4)
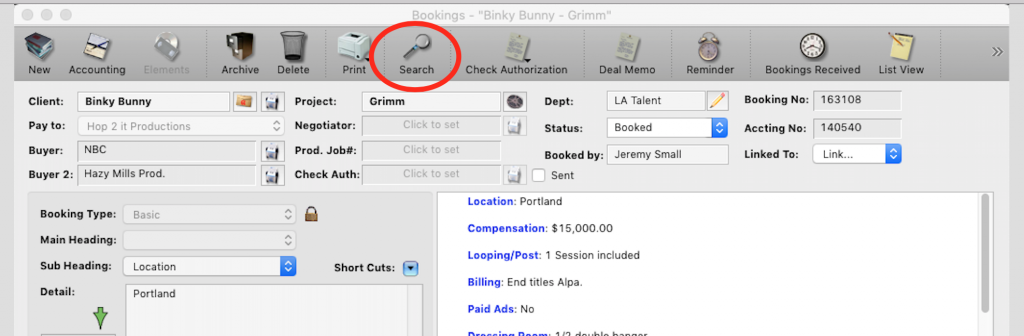
Step 1
From any Booking, click the Search button at the top of the record.
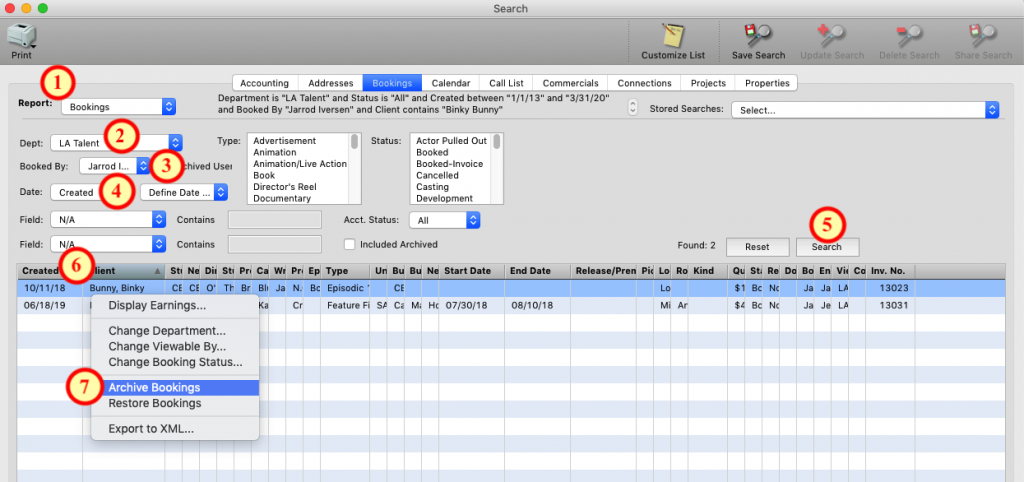
Step 2
The report should be Bookings. (1) Then Choose the Depart you want to look at bookings for. (2) Choose your user name you want to clean up the bookings for. (3) Select a date range for older records like last year or enter pick a date range for previous years example 1/1/16 – 12/31/2016. (4) Click the Search Button. (5) Sort the results by the Created date column so the older ones are on top. (6) R-Click on the booking and choose Archive Booking from the pop-up menu.
*NOTE Be sure to check the quote column to make sure you are not archiving bookings that contain the current usable quote. If you archive a booking by mistake you can restore. Instructions for restoring bookings can be found here. <Insert link for restoring bookings.>
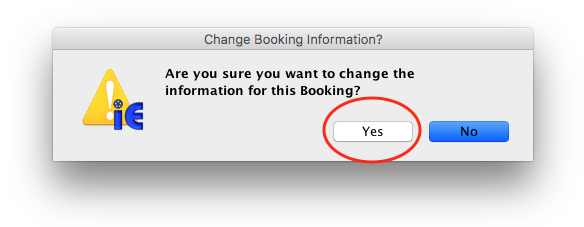
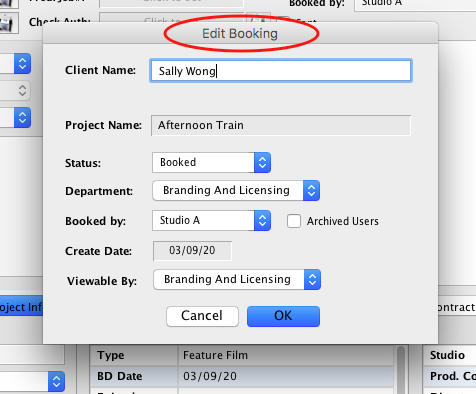
Step 1
When a booking is already created and you need to edit either:
- The client
- Project
- Who it was booked by
- Who the booking is viewable by
- The department
- The create date
Click on the pencil icon next to the Dept.
![]()
Step 2
Click YES on the pop-up message that follows.
Step 3
The window that allows you to change this information will then pop up.
*NOTE: However, you can’t change the create date if an accounting record has already been created. The Ok button in that case will be grayed out.
Calendar
Step 3
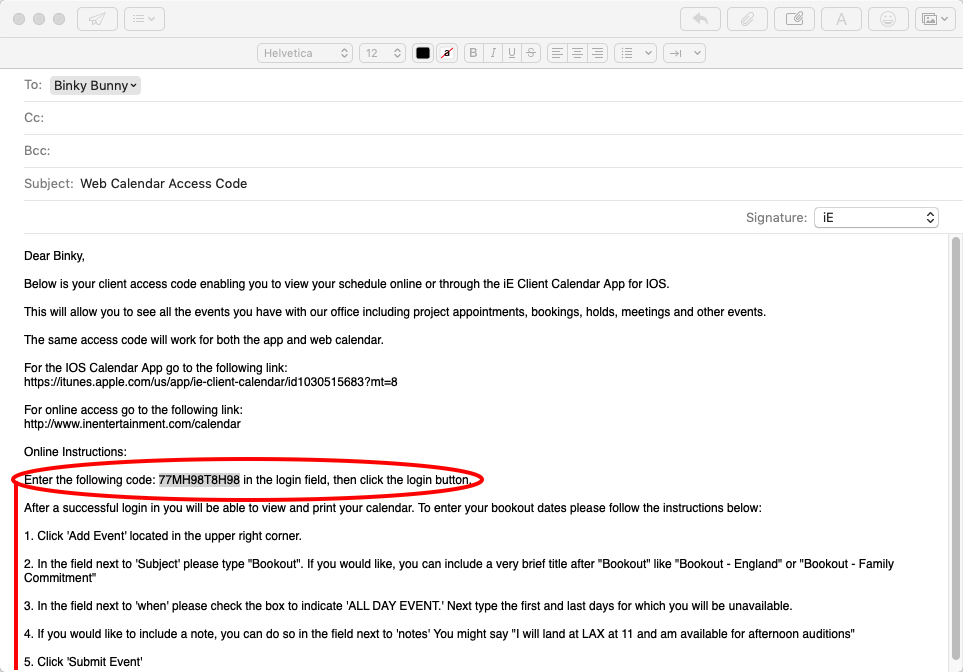
Step 5
Step 6
Step 7
Step 8
Step 9
Step 10
Step 11
Step 1
To group certain calendars together so they can be viewed simultaneously, you must create a Set. You can then allow other users to view this Set.
NOTE: In order to have privileges to edit Sets, you must be granted access by someone with Admin privileges.
From any calendar View, locate the “Sets” button at the top of the window.
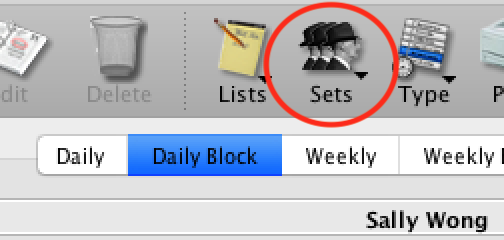
Step 2
Click and hold on the “Sets” button until a pop-up menu appears. Select “Edit Sets” from this menu.
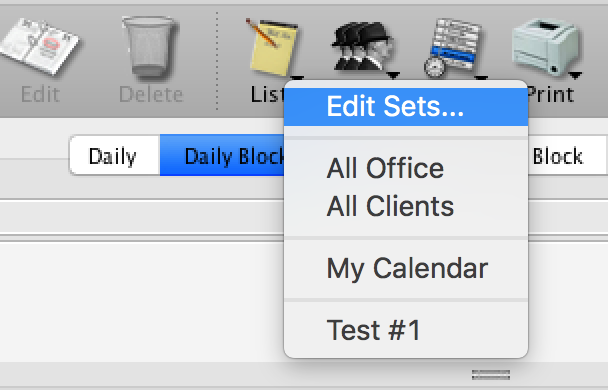
Step 3
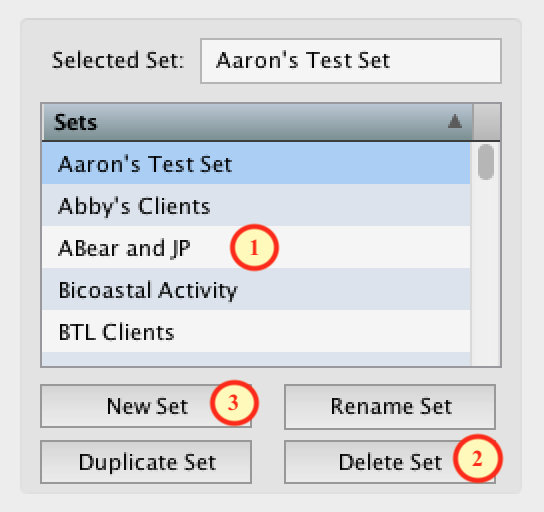
The “Manage Calendar Sets” window will appear.
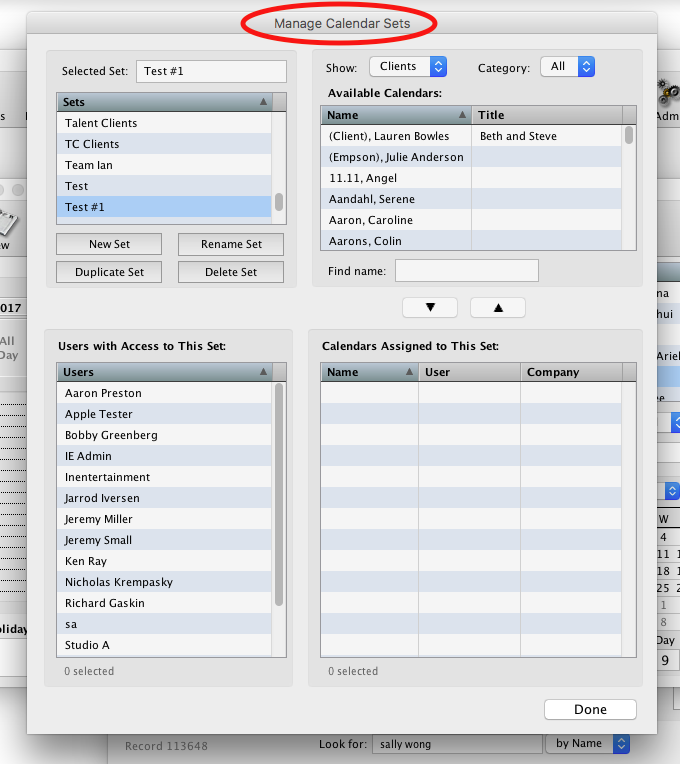
Step 4
The available Sets will be located in the upper left hand portion of the window (1). You can Rename, Duplicate or Delete a set by highlighting its name and selecting the appropriate button (2). Or you can select the New Set button to create a different set (3).
If you are creating a New Set, proceed to Step 5. Otherwise, skip to Step 6.
Step 5
Enter the name of the New Set you’re creating, and click “OK“. This new set will now appear in the available Sets list.

Step 6
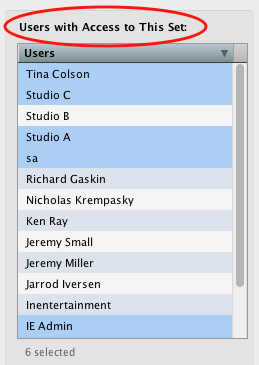
In the lower left hand portion of the “Manage Calendar Sets” window, select which users will have access to a Set by highlighting their names.
Step 7
The right side of the “Manage Calendar Sets” window allows you to assign Calendars to this set. The Calendars Assigned to this Set list will appear in the lower right (1). The Available Calendars list to choose from are located on the right (2).
![]()
Step 8
Use the arrow keys to assign a calendar (1) or removed calendar (2).

Step 9
The Available Calendars allow you to assign any combination of User and Client calendars to a set. There are several filtering options for displaying available calendars in the list: the “Show” menu (1), the “Category/Group” menu (2), and the “Find Name” field (3).
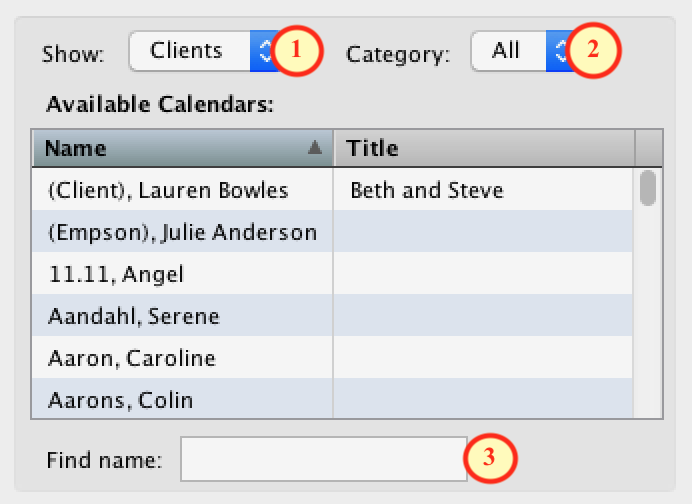
Step 10
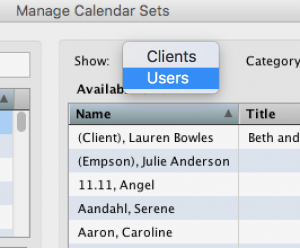
The “Show” menu will let you view User or Client calendars by clicking the blue arrow button and selecting “Users” or “Clients” from the pop-up menu. All User or Client calendars not already assigned to this set will be displayed in the list accordingly.
Step 11
The “Category” or “Group” menu will display depending on whether you are viewing Client or User calendars.
For Clients, you will be able to choose from a particular Category, or view all Clients.

Step 12
Click the blue arrow button to access the pop-up menu and select the appropriate Category.
Step 13
Use the “Find Name” field to look for a particular User or Client calendar. Possible matches will appear in the list as you type; continue until the correct name is displayed.
![]()
When you are finished, select “Done“.
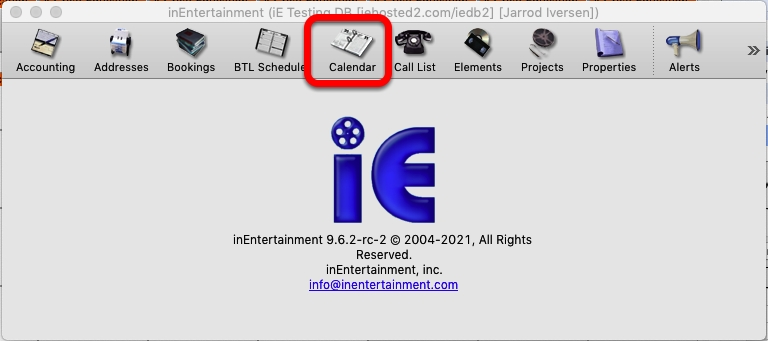
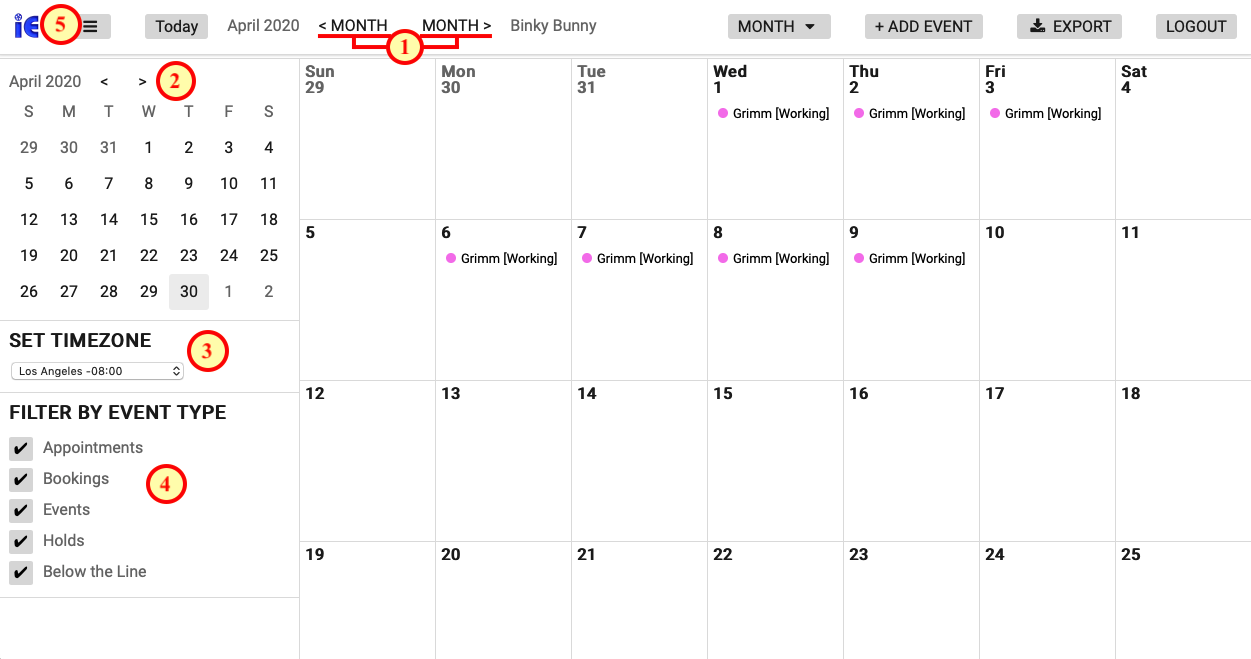
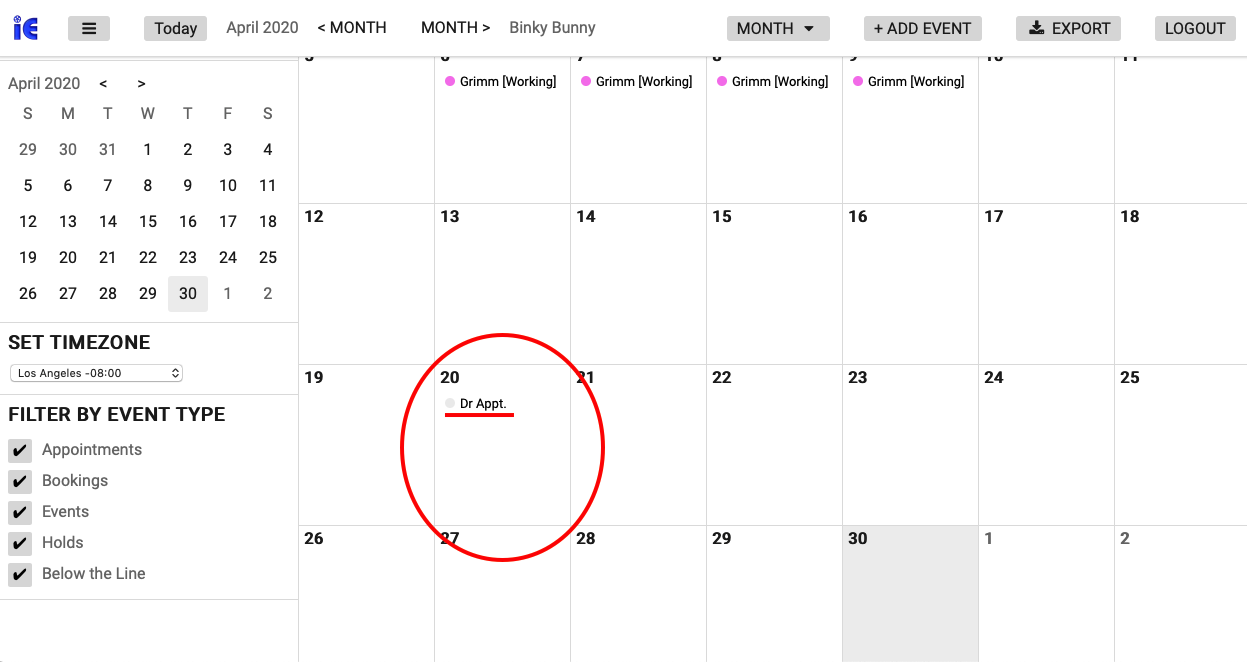
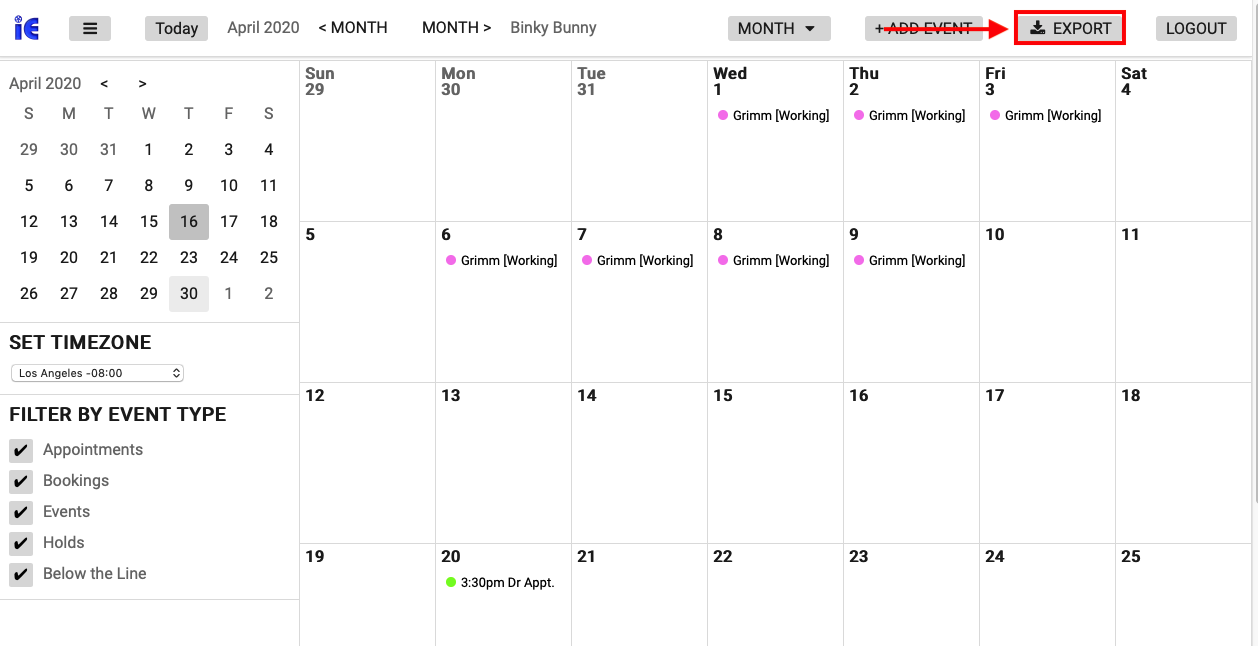
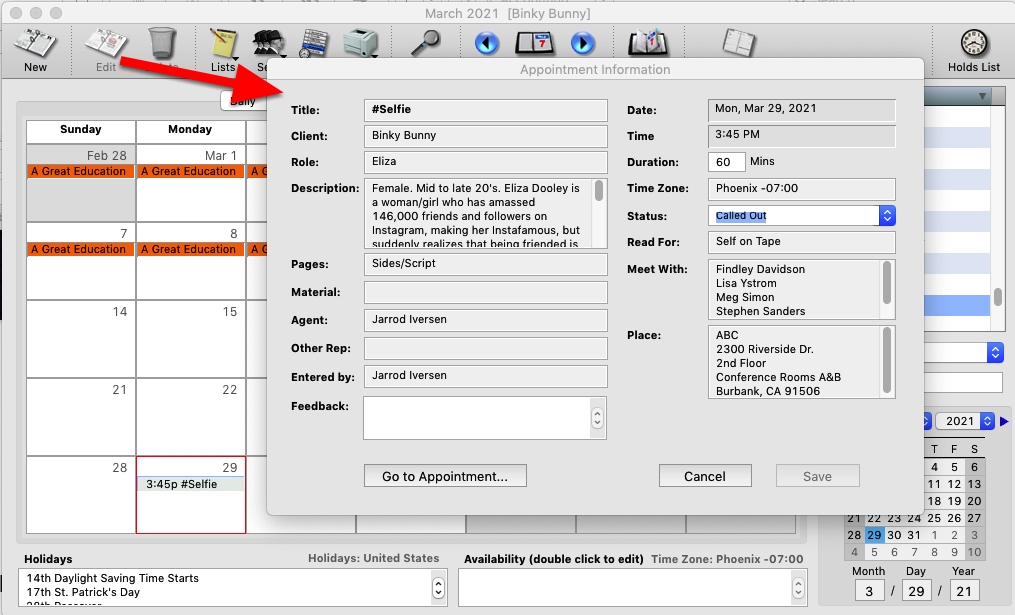
To open the iE Calendar, click the calendar button on the iE home window or select Calendar from the “Go” menu between Tools and Help.

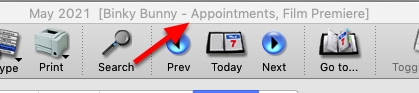
At the very top of the calendar window, it will display the Date and name, (either a Client’s, a User or a Calendar Set), you are currently viewing.
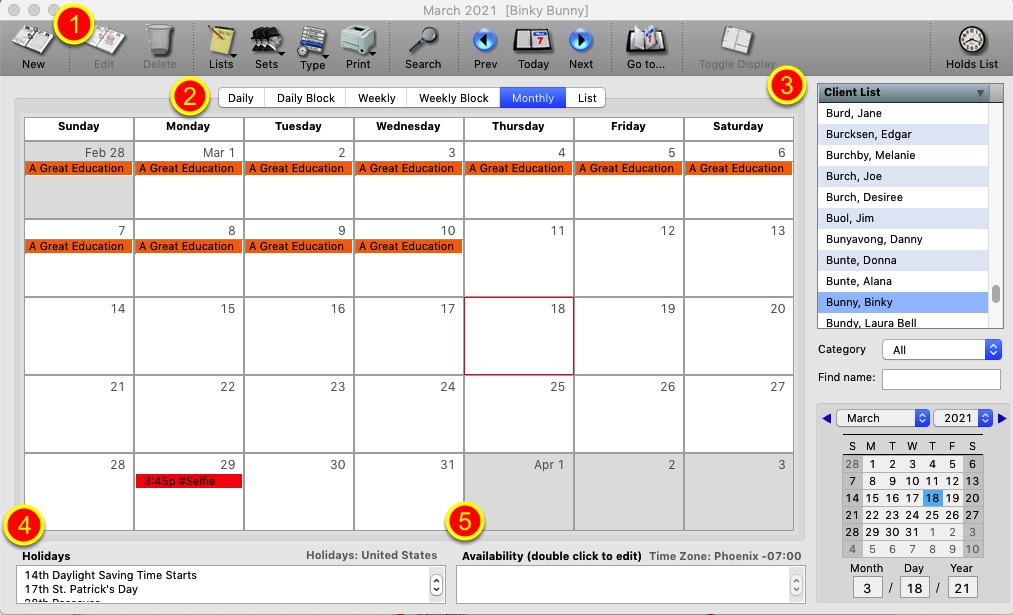
1. The tool buttons for controlling the calendar are across the top of the window. Their function is in the steps below.
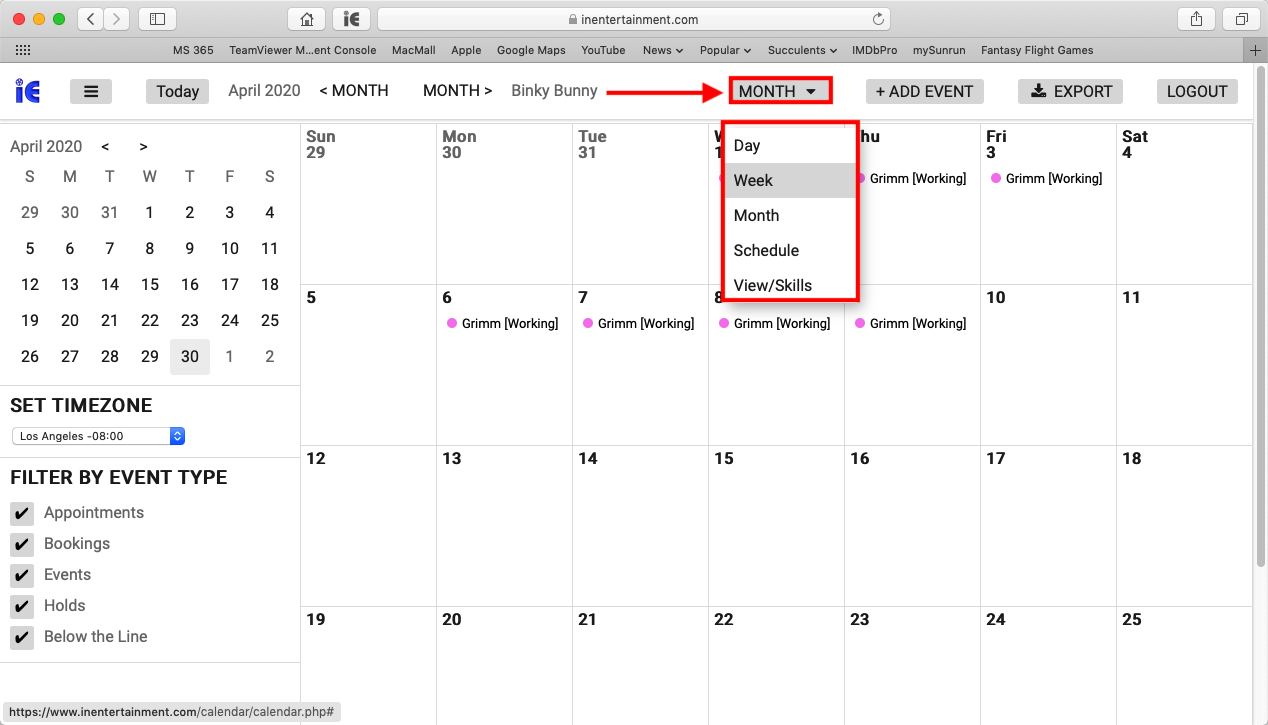
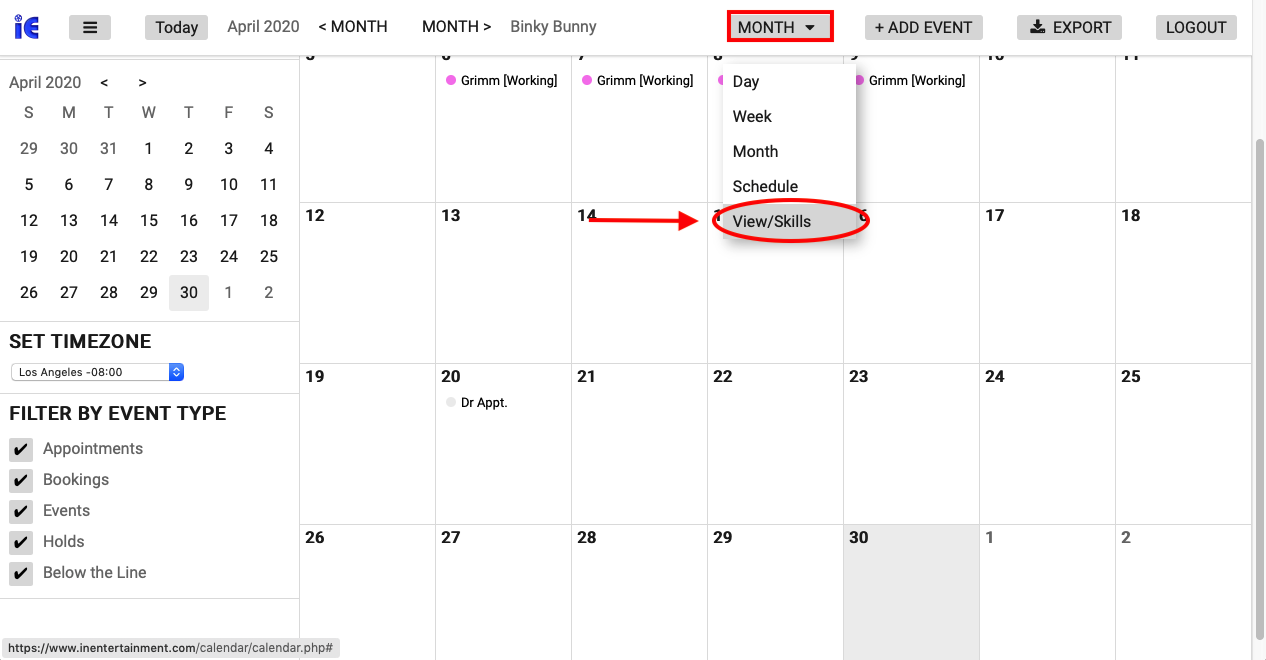
2. The calendar can be displayed as the following views.
Daily – One day at a time.
Daily Block – Displays a single day but in blocks of time.
Weekly – A single week.
Weekly Block – displays a week but in the blocks of time.
Monthly – A single month.
List – view a date range as a list of events.
3. This is a list of available calendars. You can view Client, User, Project or Properties, (tasks) calendars. You can also shorten the list by choosing a category form the addresses module, or look for specific calendar by entering the name.
4. Upcoming Holidays are displayed on the bottom left corner, use the up and down arrows o scroll through the list.
5. Availability Notes from the address record of the client or user you are viewing will be displayed at the bottom right.
Calendar Control Buttons

The top row of of buttons contains buttons that control the calendar and the events displayed. Here is the function of each one…
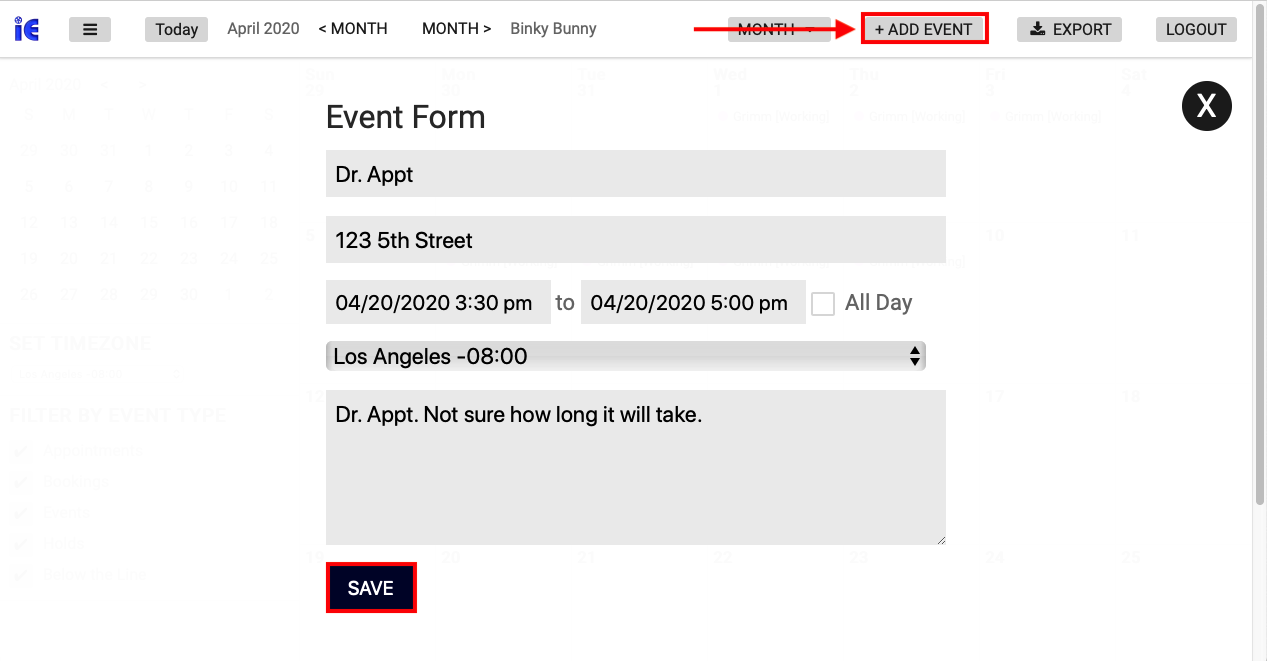
NEW
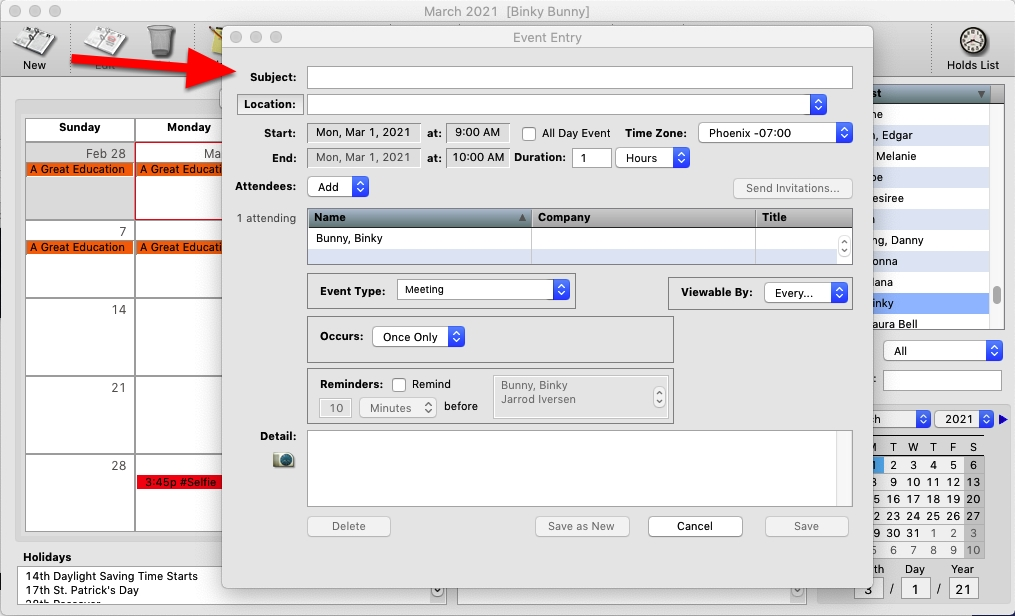
New – Creates a new calendar event.
*NOTE – You can also add an event to the calendar simply by double clicking on the bank area of a date on the calendar.
EDIT
Edit – Edit a selected event from the Calendar.
*NOTE – You can also Edit an event on the calendar by double clicking on it.
DELETE

Delete – Deletes the selected event from the calendar below. You will be prompted to confirm the delete of the event as this can not be undone.
LISTS
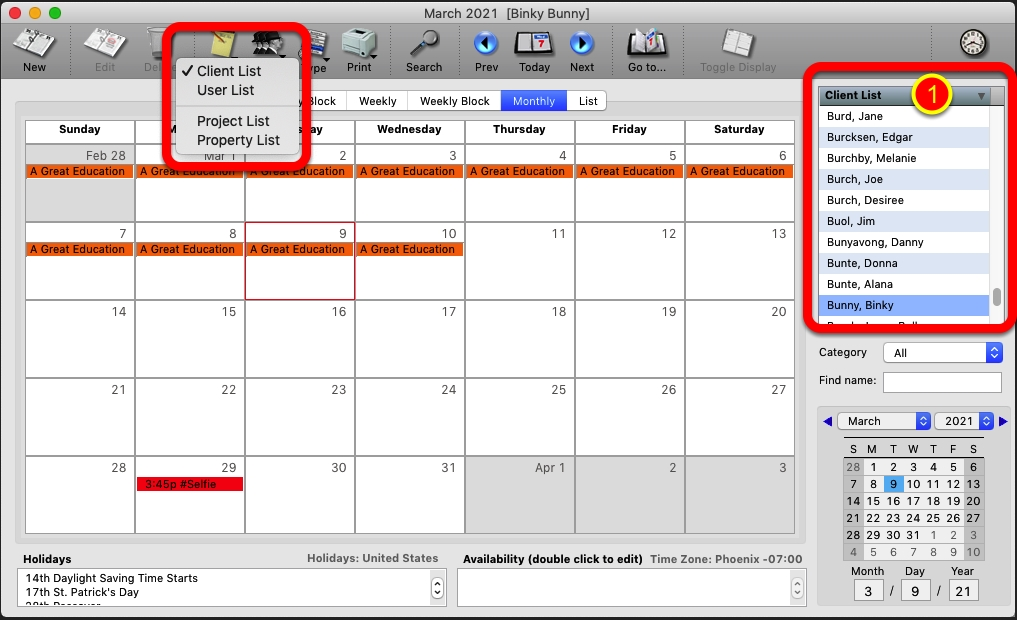
Lists – There are calendars available for Clients, Users (Employees of your company), Projects and Properties. Click and hold on the this button to get a pop-up menu of which list of calendar to display on the far right.
*NOTE – You can also change which list of calendars is being displayed by R-Clicking in the list header (1).
SETS
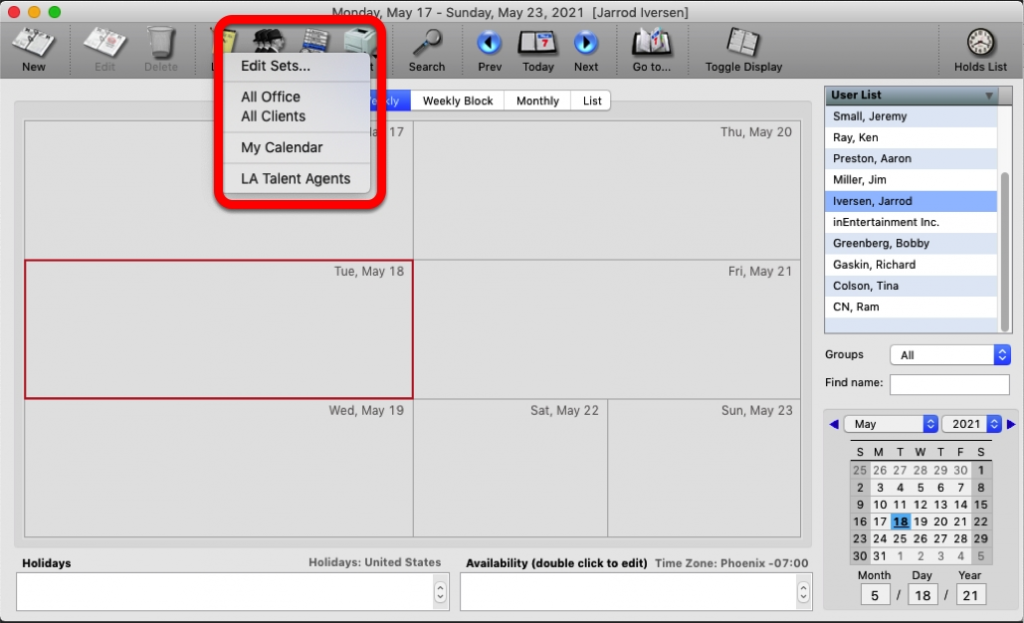
Sets – You can create a set of specific Client and Users calendars to view all at once. Click and hold on the Sets button to choose or create a new set. Instructions for creating Calendar sets can be found here. How to Manage Calendar Sets.
TYPE
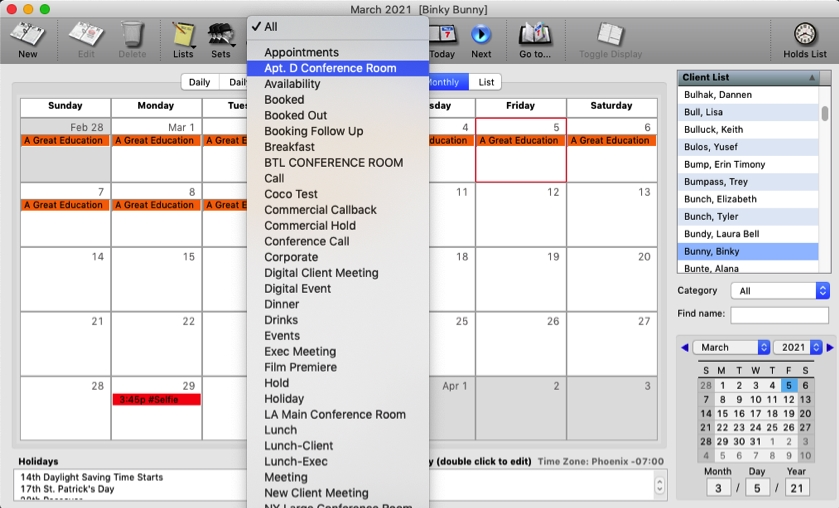
Type – This button allows you to view only selected “Event Types” on the Calendar.
NOTE – When you choose to limit the calendar to specific event types, you will see a dash and the selected event type(s) after the client’s name at the top of the Window. Choose “ALL” from the Types menu to view everything on the Calendar.
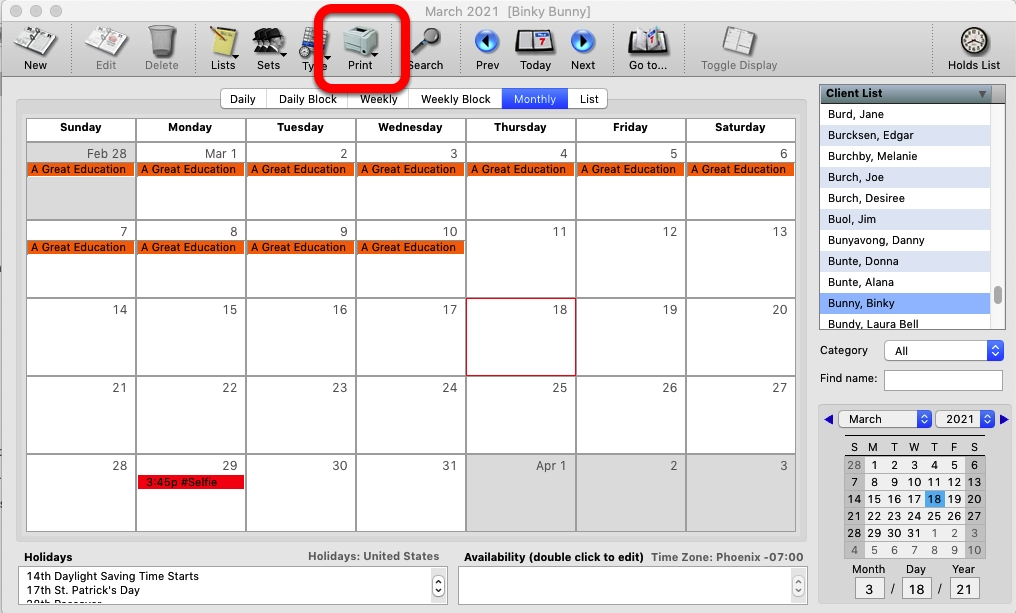
Print – Prints the currently viewed calendar as a MS Word Document.
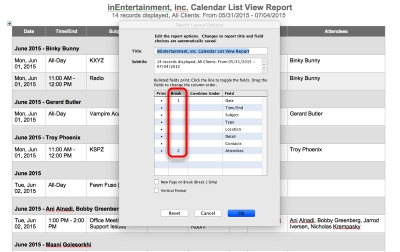
*NOTE – When printing out the iE calendar list view, you can now set 2 breaks for the report. To achieve this, you will need to sort your data correctly. You should sort your report first by the 2nd break and then the 1st in the previous window before selecting print. Follow the example below to sort as shown above.
EXAMPLE – In the picture we have assigned the results to first Break by Date (Month) and then by Attendee. So before you print, you must sort the report first by attendee and then the date to achieve the result show in the example
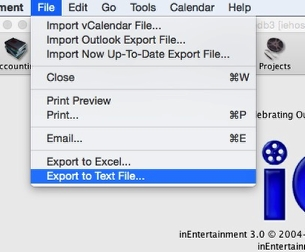
*NOTE – Calendar List View can be exported as a MS Excel document or a Text File. The export feature is located under the File menu.
SEARCH
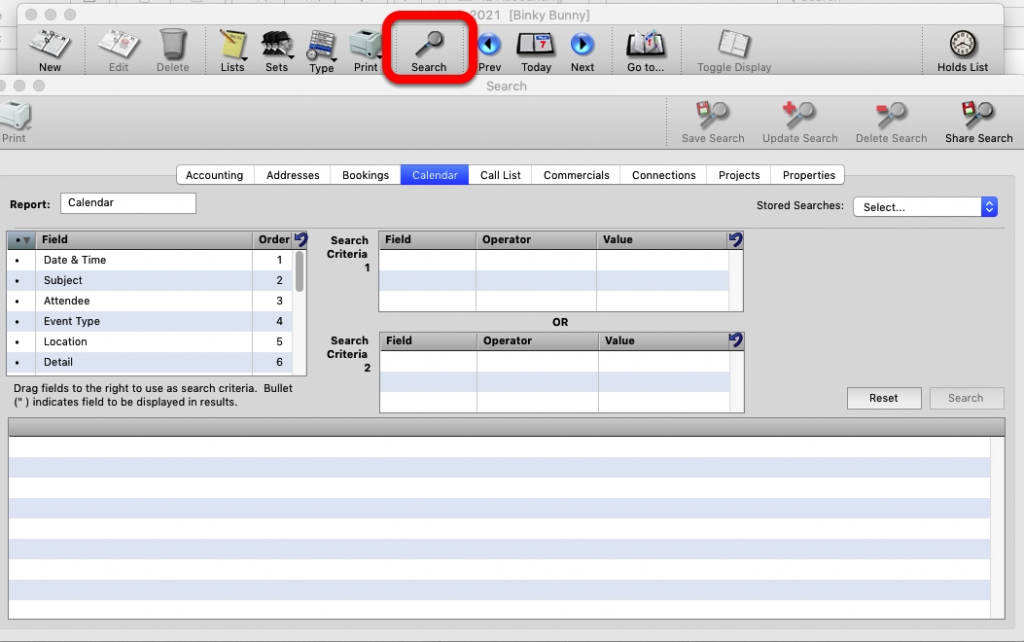
SEARCH – Opens the Calendar Search window.
PREV, TODAY, NEXT and GO TO…
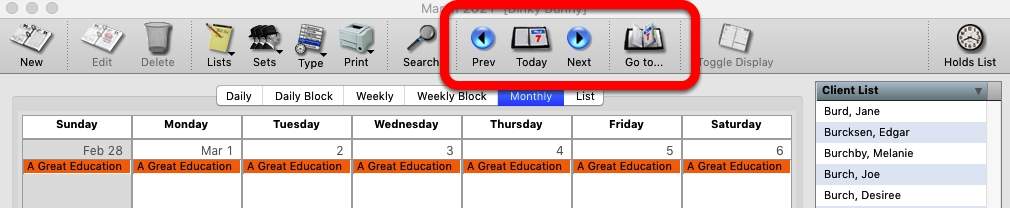
The next section of four buttons is for date selection.
The Previous and Next buttons will advance the calendar to the previous/next week, month day etc. depending on the calendar view.
Today will take you to the current day on the calendar.
Go To… will present you with a date picker window to go to a specific date.
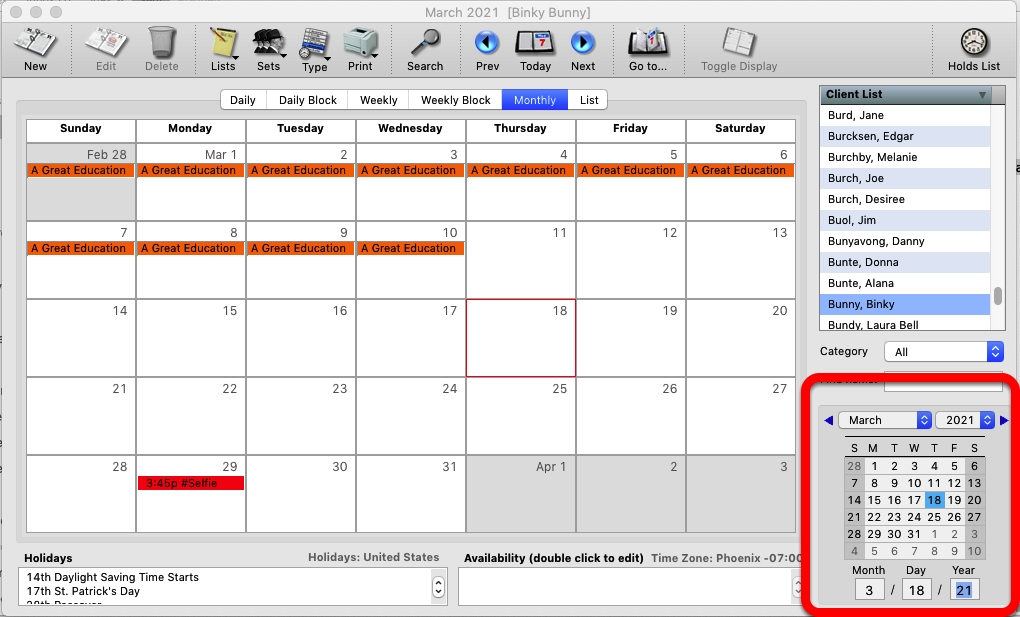
*NOTE – You can also change the date you are viewing with the mini calendar in the bottom right corner.
TOGGLE DISPLAY
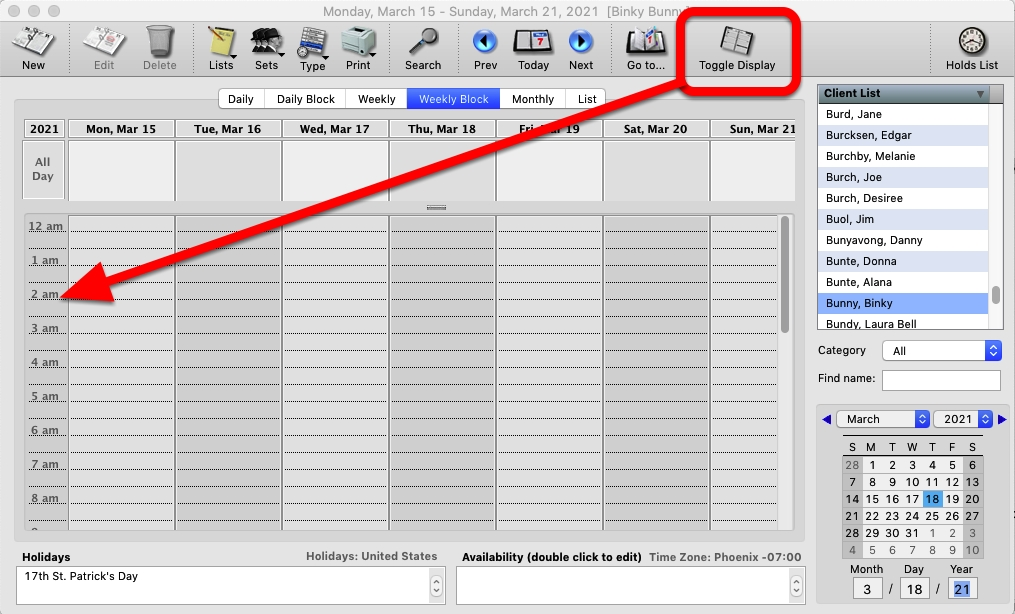
When viewing the Calendar by either daily or weekly block view. You can toggle the display of hours listed along the left hand side off or on.
HOLDS LIST
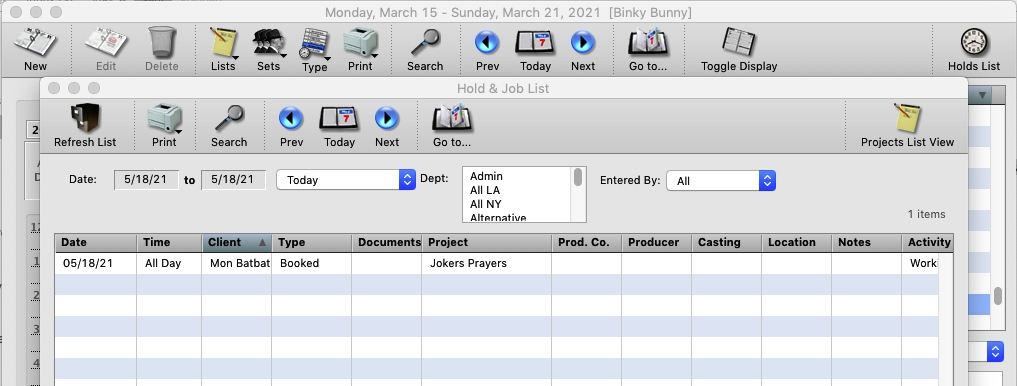
Holds List will open a window that will display all clients that are on hold for a given date range.
Call Lists
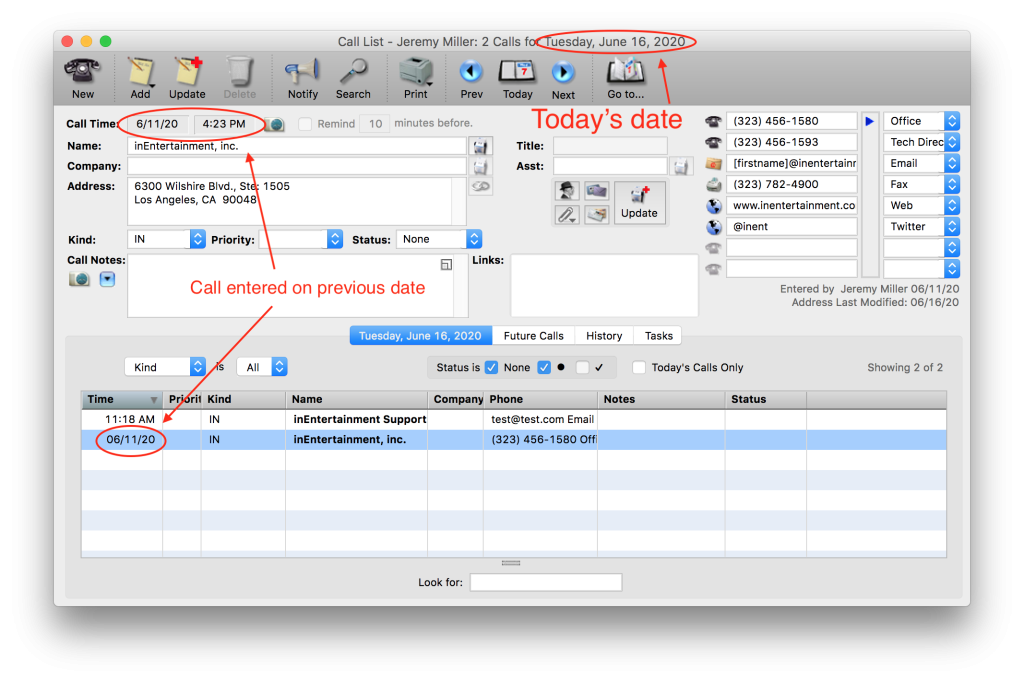
Sometimes when we try to edit or update an existing call in a Call List, there is a functioning “Delete” button at the top left of the Call List window, and the call in question can be fully deleted from the Call List

But other times, the “Delete” button is grayed-out and not functional.
Why is this? And how do we remove calls from the Call List when the “Delete” button is not functioning?
Beyond tracking daily business interactions as they happen, the iE Call List is designed to keep a lifetime log of business interactions for any company database. If a call was entered into a Call List on any date, and is revisited for editing any time after 11:59PM on the date which it was created, the “Delete” button will become non-functioning when editing the call record and you will need to mark the call “Complete.”
This functionality is designed specifically to ensure that iE can provide a unaltered record of interaction history between any number of parties in a court of law, and to ensure that history of important business interactions are not erroneously deleted.
In the screenshot below, observe that the Call List date is June 16 2020, and the call highlighted for editing on the list has an entry date of June 11 2020. Because this call remained on the Call List beyond 11:59pm on June 11 2020, this call can no longer be deleted. We will need to mark this call’s status as Complete to clear it from the list
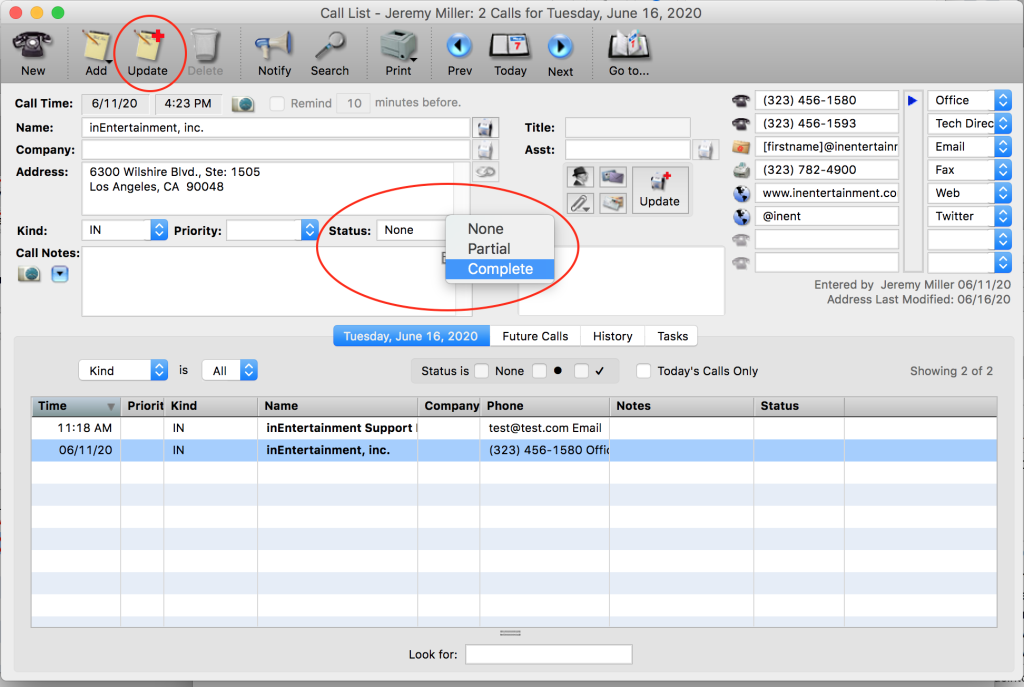
There are 2 ways to change the status of a call to Complete:
-with the call highlighted, locate the “Status” dropdown box. Click it to reveal your status options, select “Complete” from the list, and then click the“Update” button top left of the Call List window.
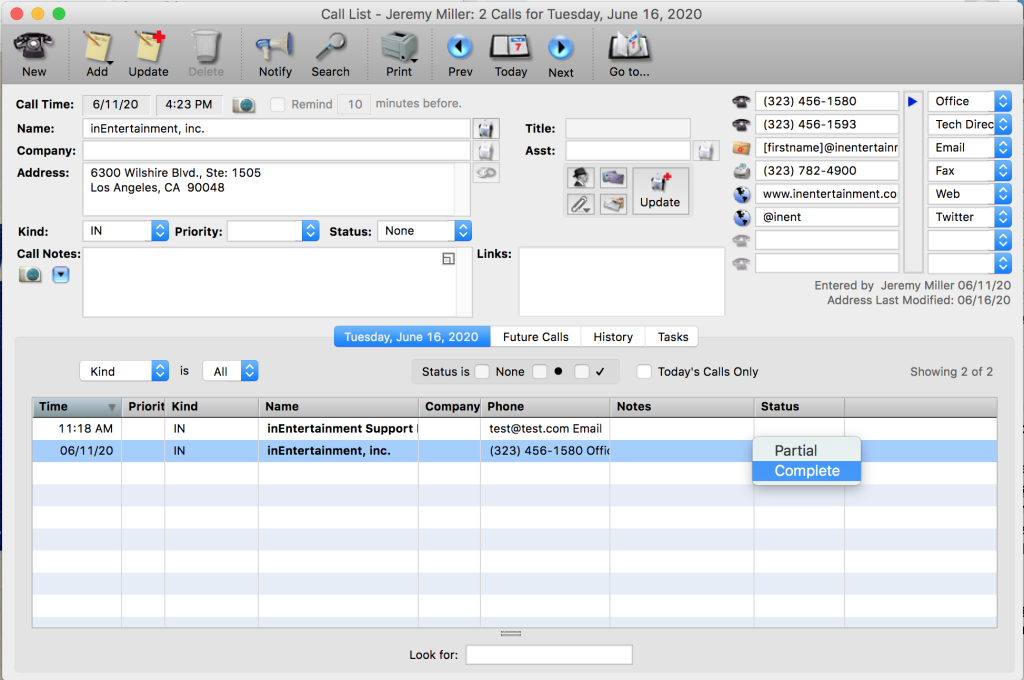
-with the call highlighted, locate the column for “Status” in the bottom portion of the Call List. If we right-click (or hold Ctrl on your keyboard while clicking, depending on your computer) within that “Status” column next to the call you wish to update, a menu will appear from which you can select “Complete”. This will automatically update the call’s status; no need to click the “Update” button up top with this method.
Once a call’s status is marked as “Complete,” the call will disappear completely from the call list at 12am the following day. At that point, details of the completed call can be found in the History tab of the Address card for the contact with which the correspondence took place.
Using the “Status Is” checkboxes to immediately filter out Complete calls
If you wish for “Complete” calls to disappear from the Call List view immediately, you can toggle “Status is” checkboxes in the very center of your Call List.
In the following screenshot, none of the “Status is” boxes are checked, and we can see the “Complete” call from June 11 2020 referenced earlier is still in the list, with a check mark in the status column to indicate that it is “Complete” .
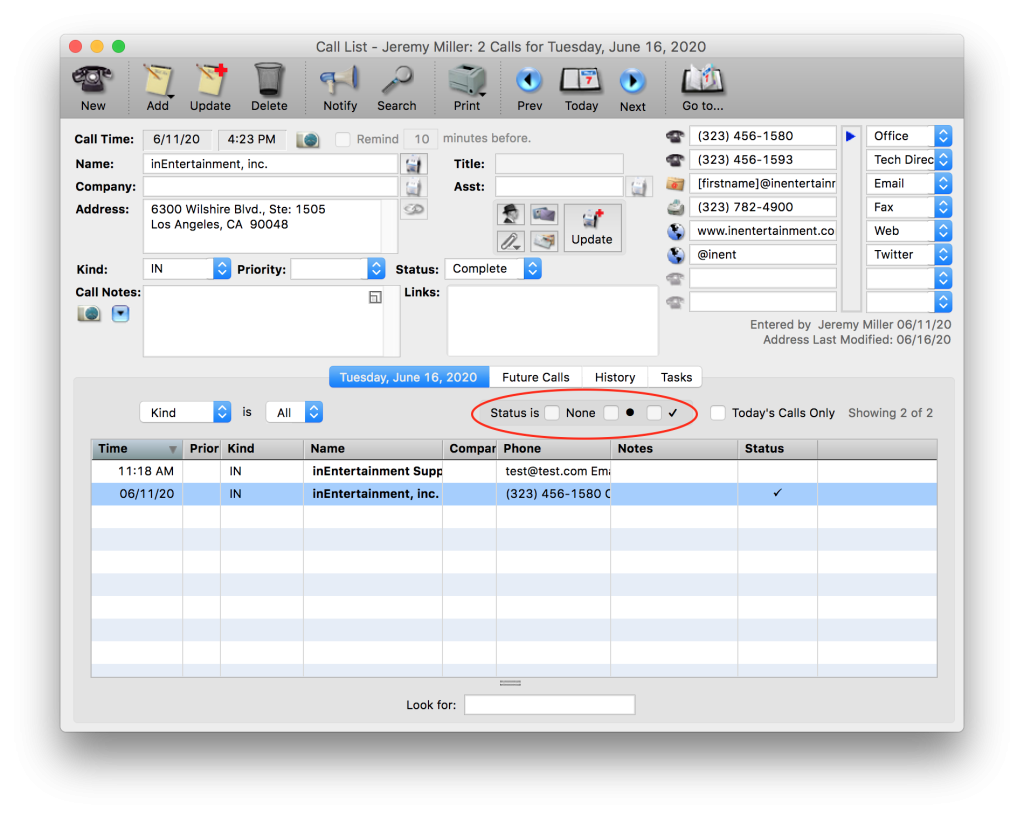
Now in the next screenshot, the “None” and “Partial” (noted with a black dot) boxes are checked, telling the Call List that we only wish to see calls that are partially complete or incomplete. “Complete” (noted with a check mark) remains unchecked, telling the Call List that we wish not to see completed calls in view.
With these “Status is” filters configured, calls will disappear automatically from view as you mark them complete without a need to refresh the call list in any way.
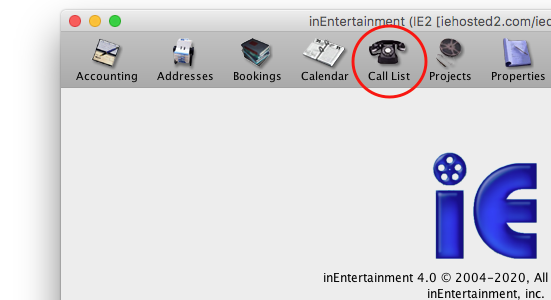
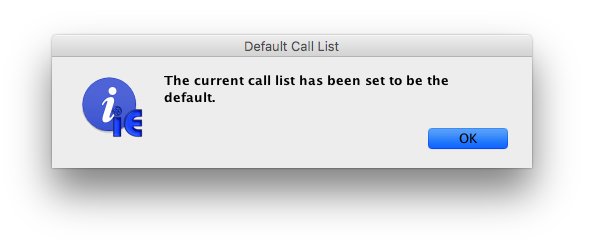
Step 1
Click on the Call List icon on the IE home page. This will open your call list originally set as your default list.
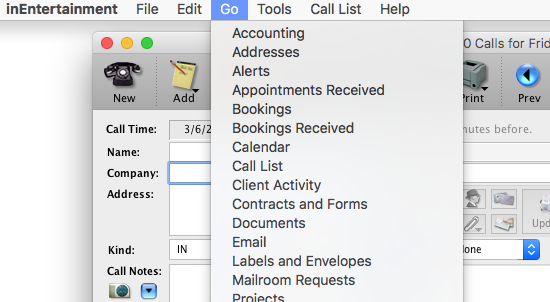
Step 2
To change your Default Call List, use the GO drop down menu and open the call list that you would like to set as your default.
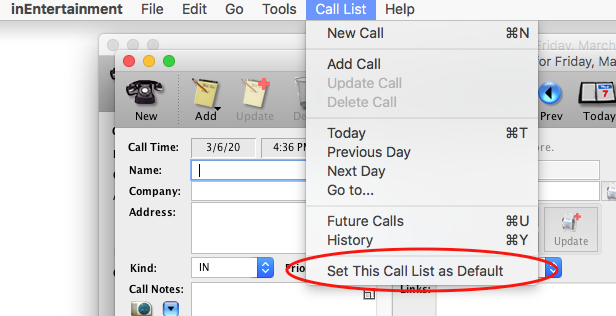
Step 3
Once that call list is open, go to the Call List drop down menu. Select the last option on that menu; ‘Set This Call List as Default’.
Step 4
You will then receive a confirmation popup that this call list has been set as your default.
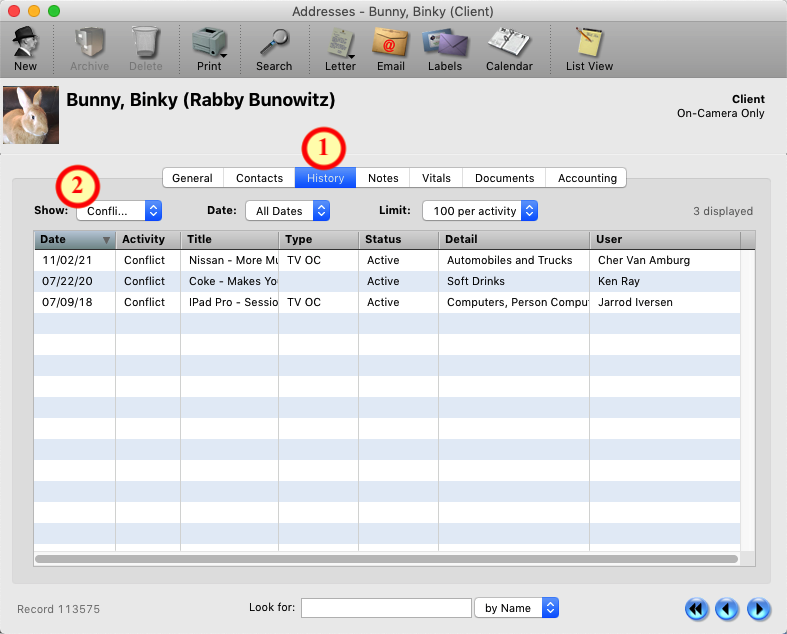
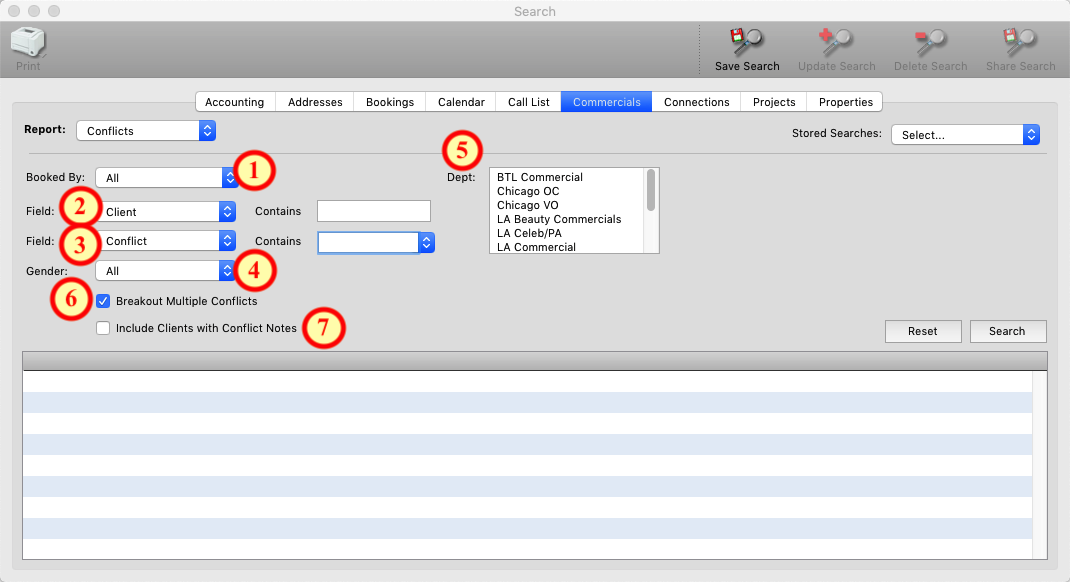
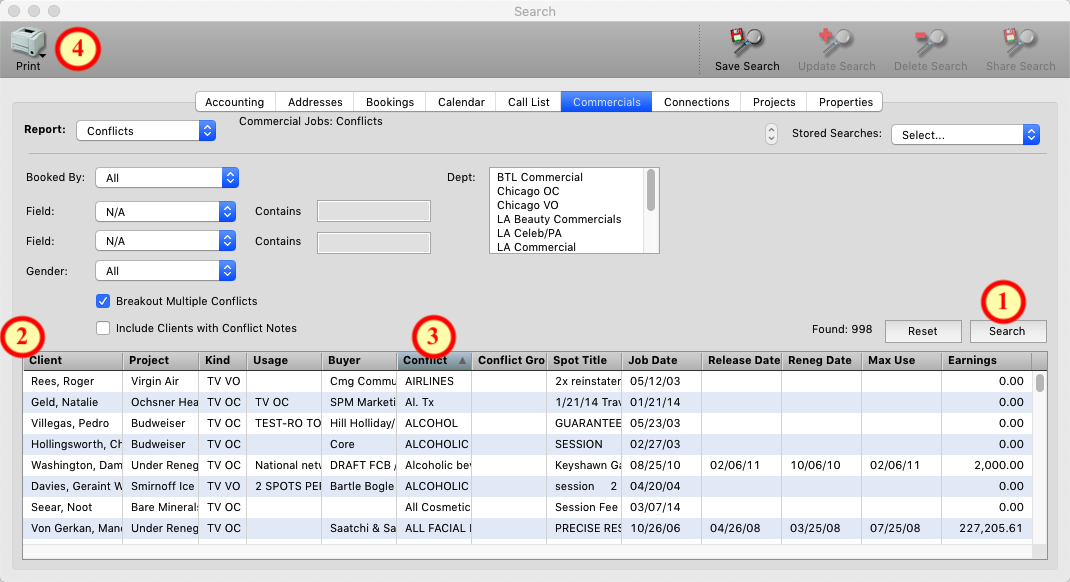
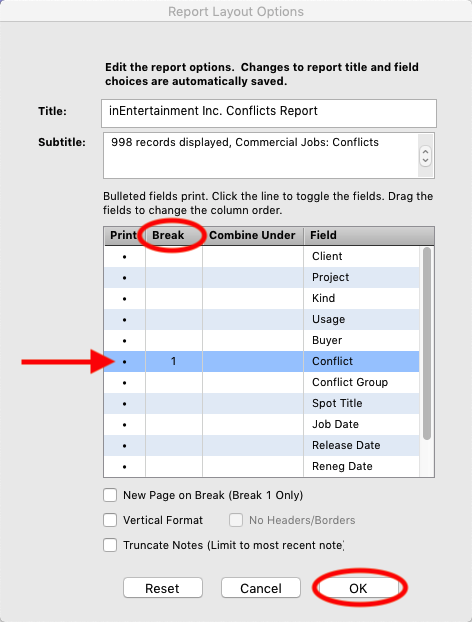
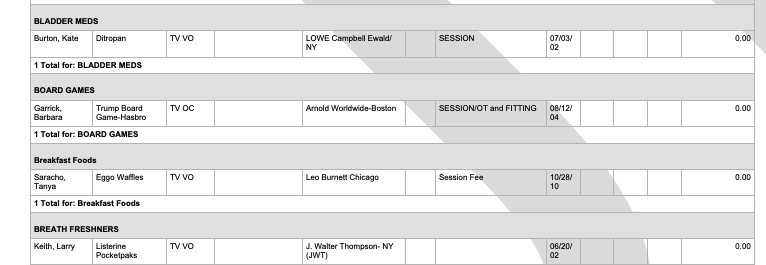
Commercial Conflicts

Installation
Step 1
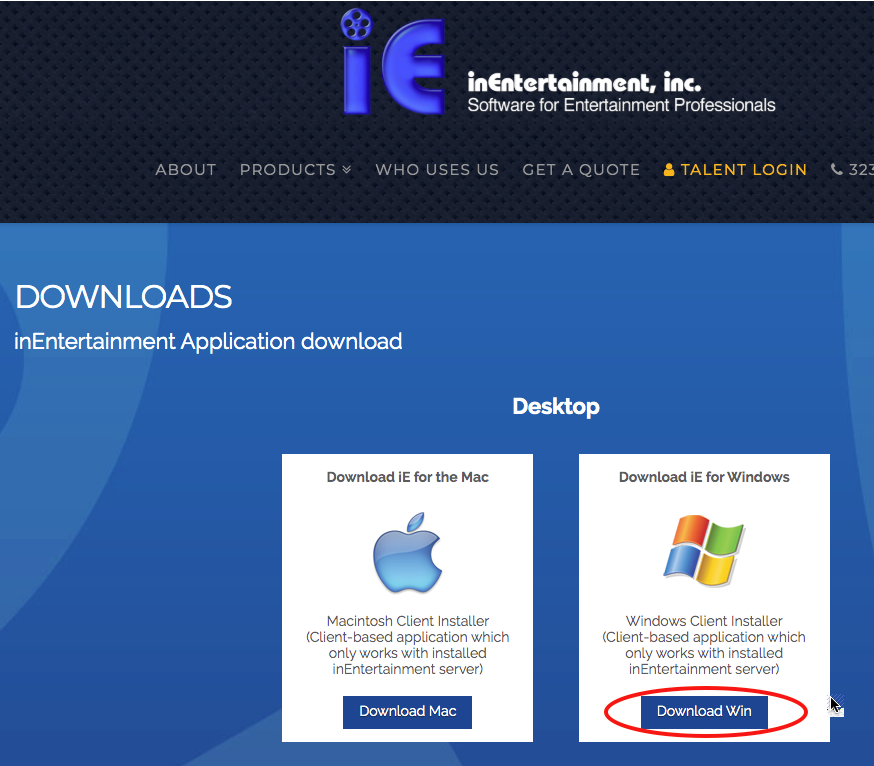
Open up a web browser and go to our website, inentertainment.com/downloads.
The first option on this Downloads page should be “Download iE for Windows” under the Desktop heading. Click the blue “Download Win” button below this option. This should automatically begin download.
Step 2
If prompted, save this file to your computer in a folder that you’ll know where to find it. Most browsers will automatically place it in your “Downloads” folder.
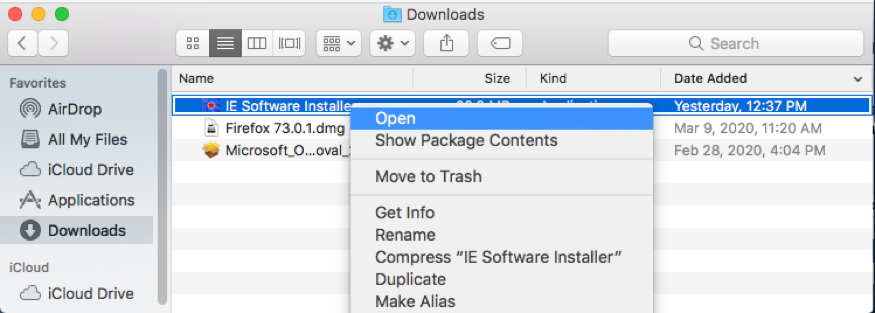
Step 3
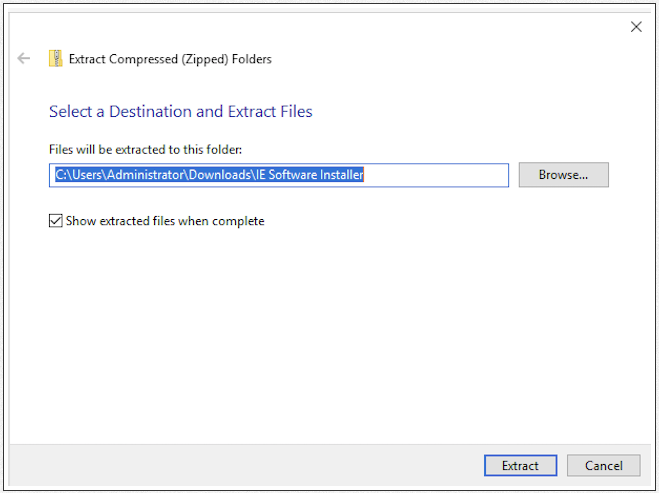
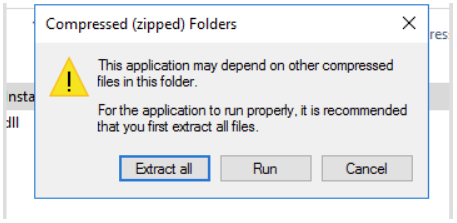
Once you locate the IE Software Installer file, double click on it. This will unzip the file and take you to the IE Software Installer folder. Double click on the IE Software Installer folder which will show you one folder and two files. Double click on the IE Software Installer and select Extract All.
Step 4
Select a destination and extract files. Double click on the IE Software Installer folder that pops up in a new window.

Step 5
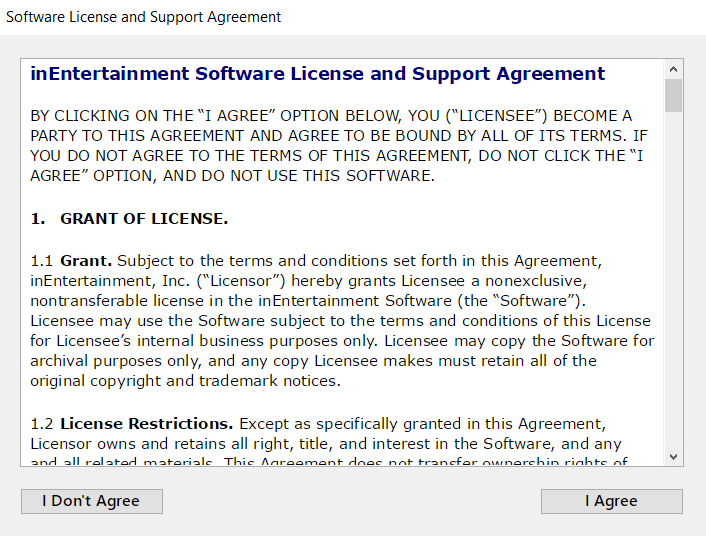
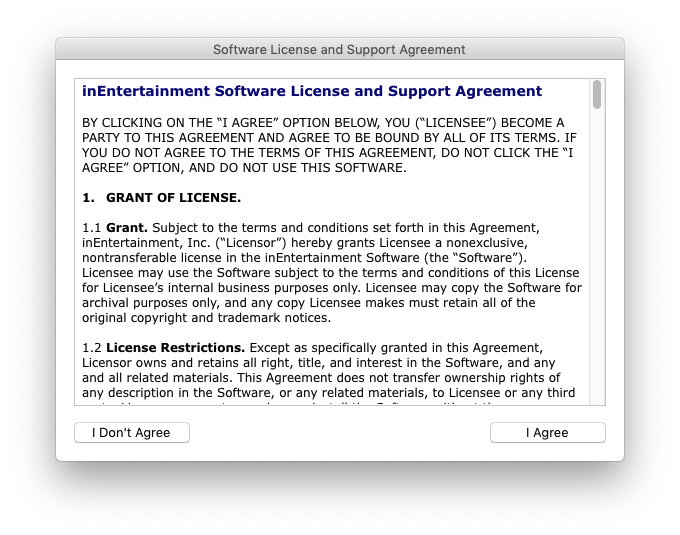
Once you’ve gotten the iE Software installer open, you should be looking at our “Software License and Support” Window. This window includes our full License and Support Agreement that you agree to by downloading the software.
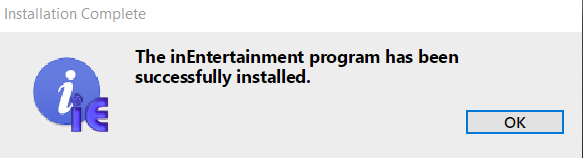
Step 6
Once installation has completed, you’ll get a pop-up message alerting you that the installation has been successful.
Step 7
A “Host List” window will open with blank spaces for Company Name, Host Address, Database Name, etc. Enter the following information in the corresponding fields:
Step 8
Click the “Add” button mid-window, then click “Save” on the bottom.
Step 9
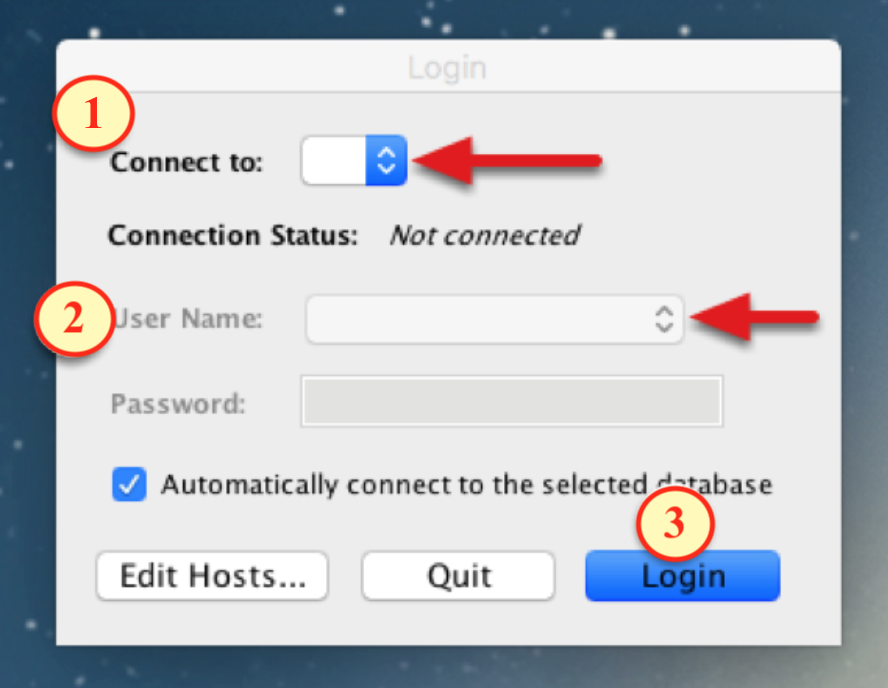
You should be back at your smaller “Login” window and you should be able to select your company database from the first “Connect to” dropdown. Once you’ve selected your database there and the Connection Status below says “Connected” you will be able to select your username, enter your password and log in to iE.
Once you’ve successfully logged in to IE, log back out and then log in again by double clicking on the IE shortcut on your desktop.
Step 1
Open up a web browser and go to our website, inentertainment.com/downloads.
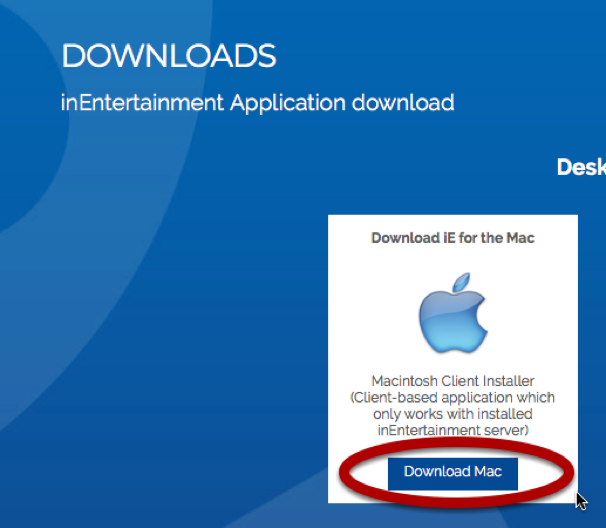
The first option on this Downloads page should be “Download iE for Mac.” Click the blue “Download Mac” button below this option. This should automatically begin download.
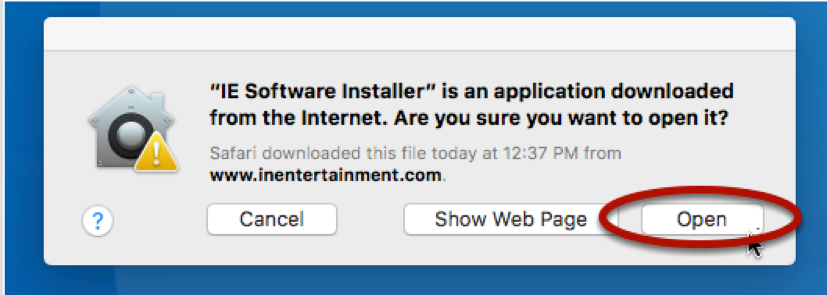
If prompted, save this file to your computer in a folder that you’ll know where to find it. Most browsers will automatically place it in your “Downloads” folder on the Mac. Navigate to the Finder on your Mac and locate the folder where you saved this installer. Then locate the downloaded “iE Software Installer” file. If it appears to still be a .zip file, double-click it to reveal the Installer app itself. Once you see the “iE Software Installer” .app file in your finder, right-click on it, or hold CTRL on your keyboard and click on it, to reveal a menu. Select “Open” from this menu.
Once you select “Open” from this menu, you will likely receive a prompt from the Mac warning you that this app did not come from the App Store. You should be able to click “Open” on this warning to continue to the installer. In some cases, there may not be an “Open” button in this warning. If you don’t see an “Open” button on the warning, click “Cancel” on the warning and repeat Step 3.
You may also be prompted by your Mac at this time to grant permissions for iE Software installer and iE to access your internet connection and make changes to files on your Mac. Grant these permissions as “Allow” where prompted.
Once you’ve gotten the iE Software installer open, you should be looking at our “Software License and Support” Window. This window includes our full License and Support Agreement that you agree to by downloading the software.
Once the install is completed (this will take a few minutes), you’ll be asked if you want to open inEntertainment. Click “Yes”

Another prompt will appear telling you that you need to define your iE Connection Details. Click “Continue”.
A “Host List” window will open with blank spaces for Company Name, Host Address, Database Name, etc. Please call us at the office or email us at info@inentertainment.com for these connection details.
Step 7
Once your successfully logged in to iE, your Mac may ask you for further permission for iE to access your system calendar, finder, network connection, downloads, documents, etc. Please grant “Yes” or “Allow” on all of these permissions asks for iE; your iE stands to malfunction or receive partial/bad updates if it doesn’t have proper permissions assigned at these prompts.
iPhone App
Step 1
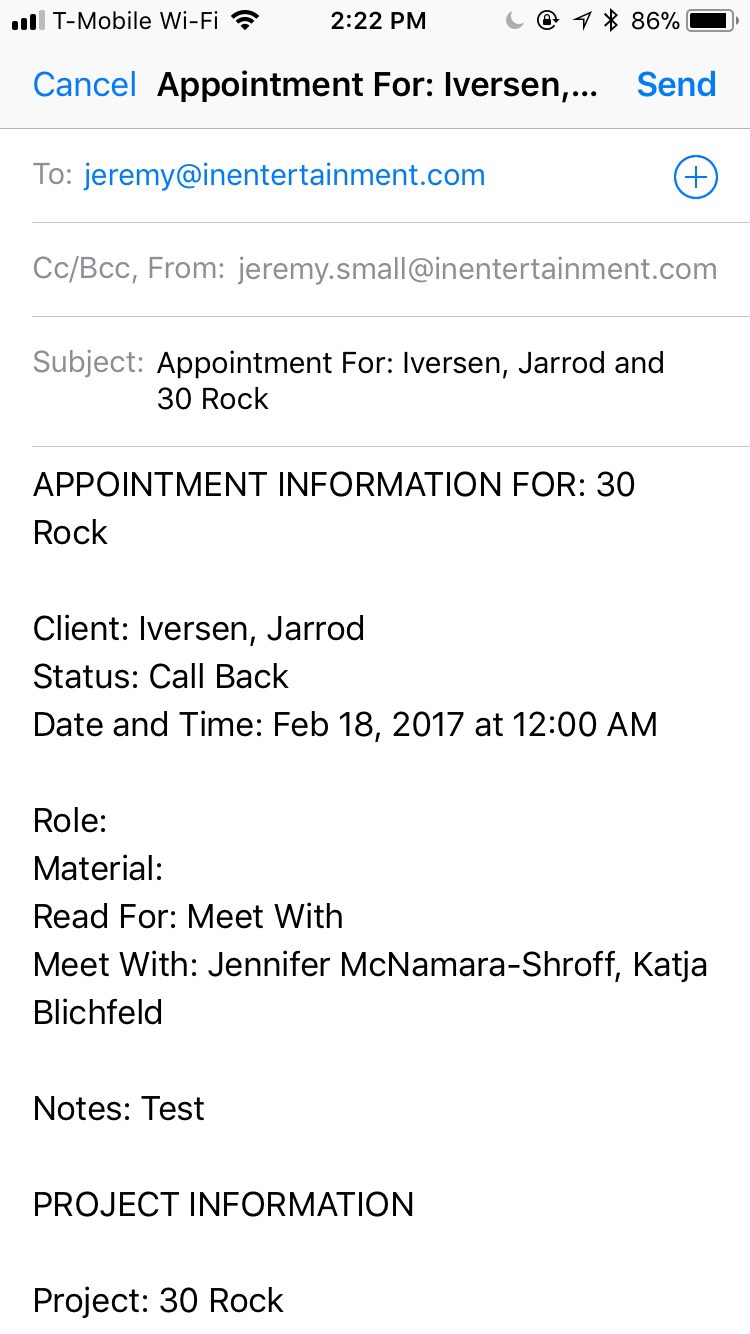
Retrieve the project you need to send out the appointment for.
Step 2
Click on the Appointments box.
Step 3
Select the appropriate department by clicking on the blue bar that lists the department types.
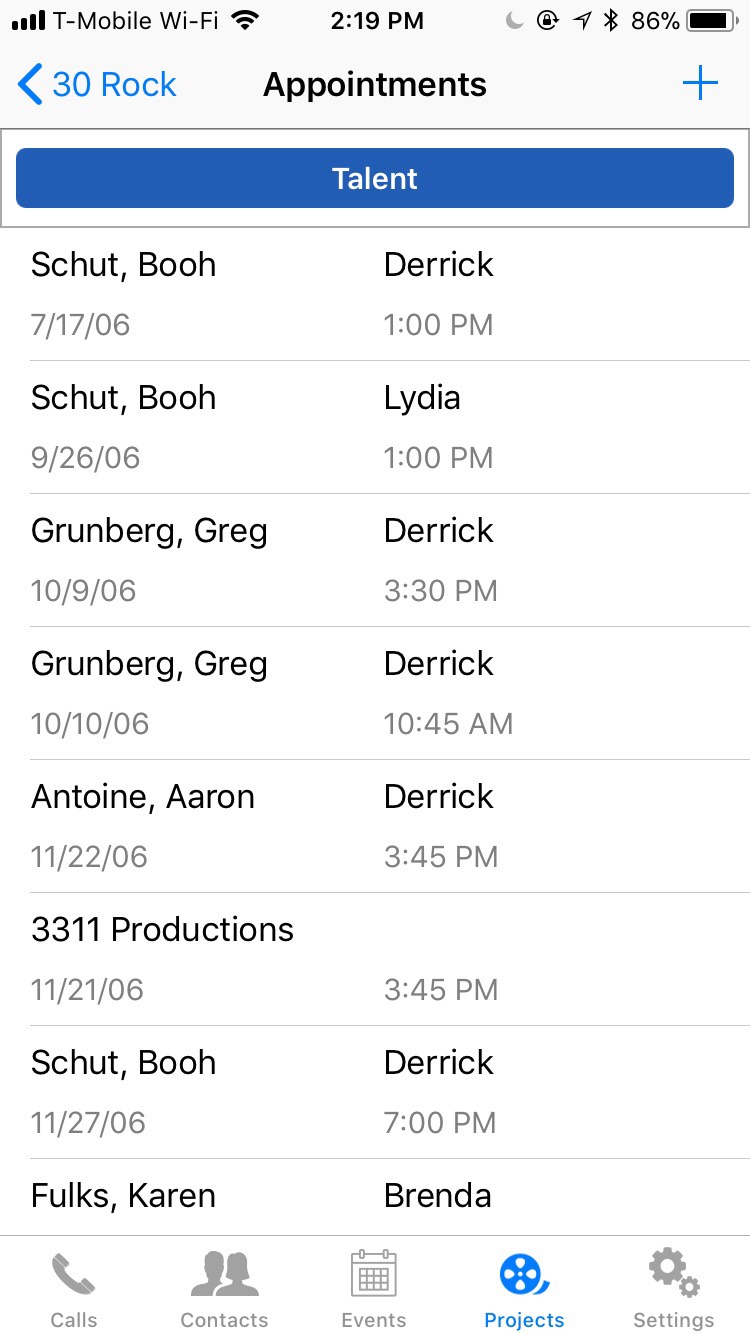
Step 4
Click on the + icon displayed at top right of the screen.

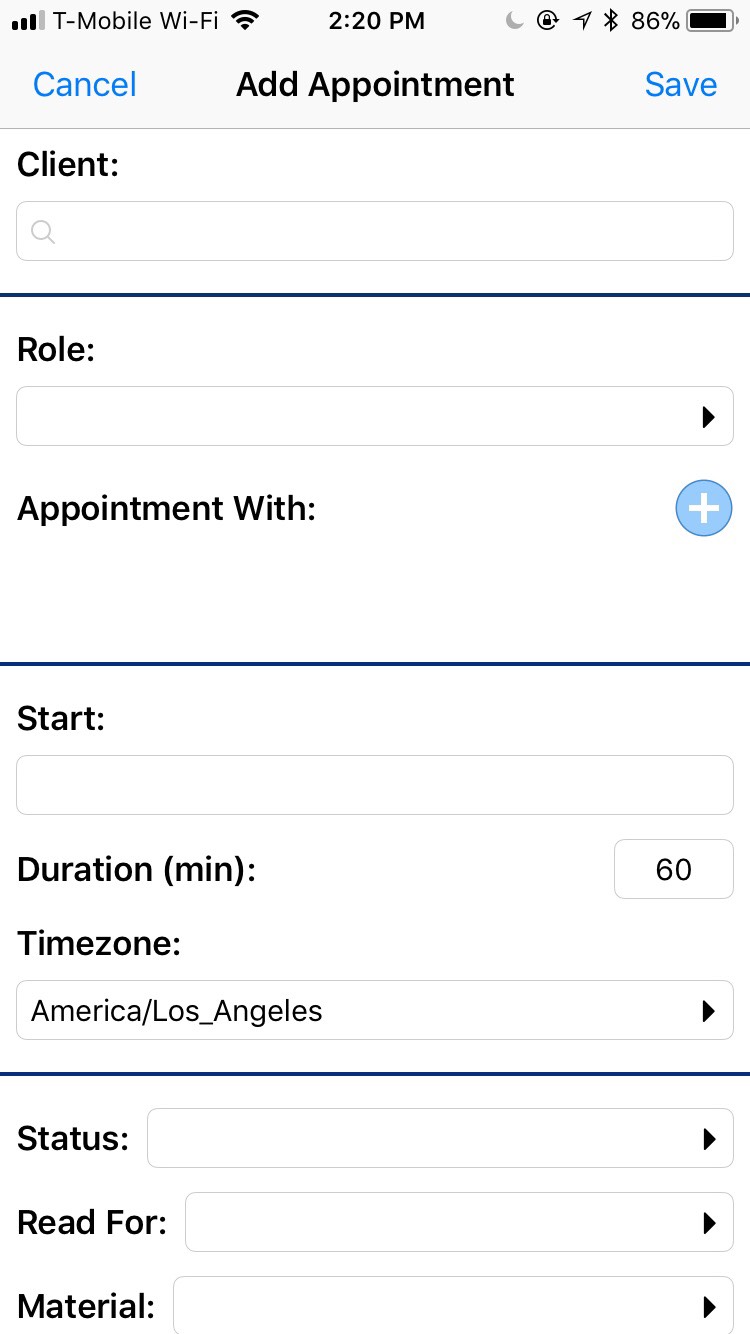
Step 5
Input the necessary appointment information in the given fields. These information fields are the same as you would see on the regular computer version of IE. Once you’ve entered all the information, click Save.
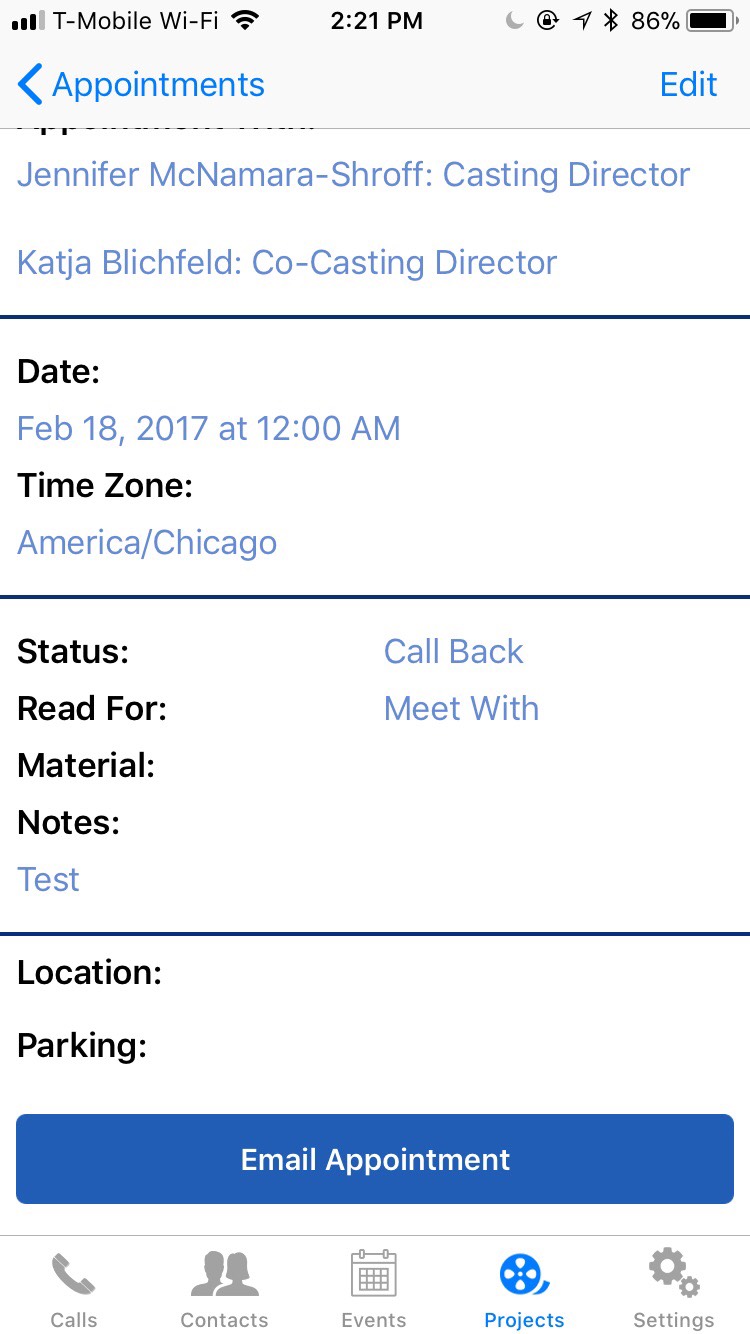
Step 6
Once you click on Save, it’ll bring you back to the list of appointments for this project. Find the proper appointment and click on it.

Step 7
Scroll to the bottom and you will see a blue Email Appointment button. Click on that button.
Step 8
Locate the person in your contacts that you want to send this email too and select them.
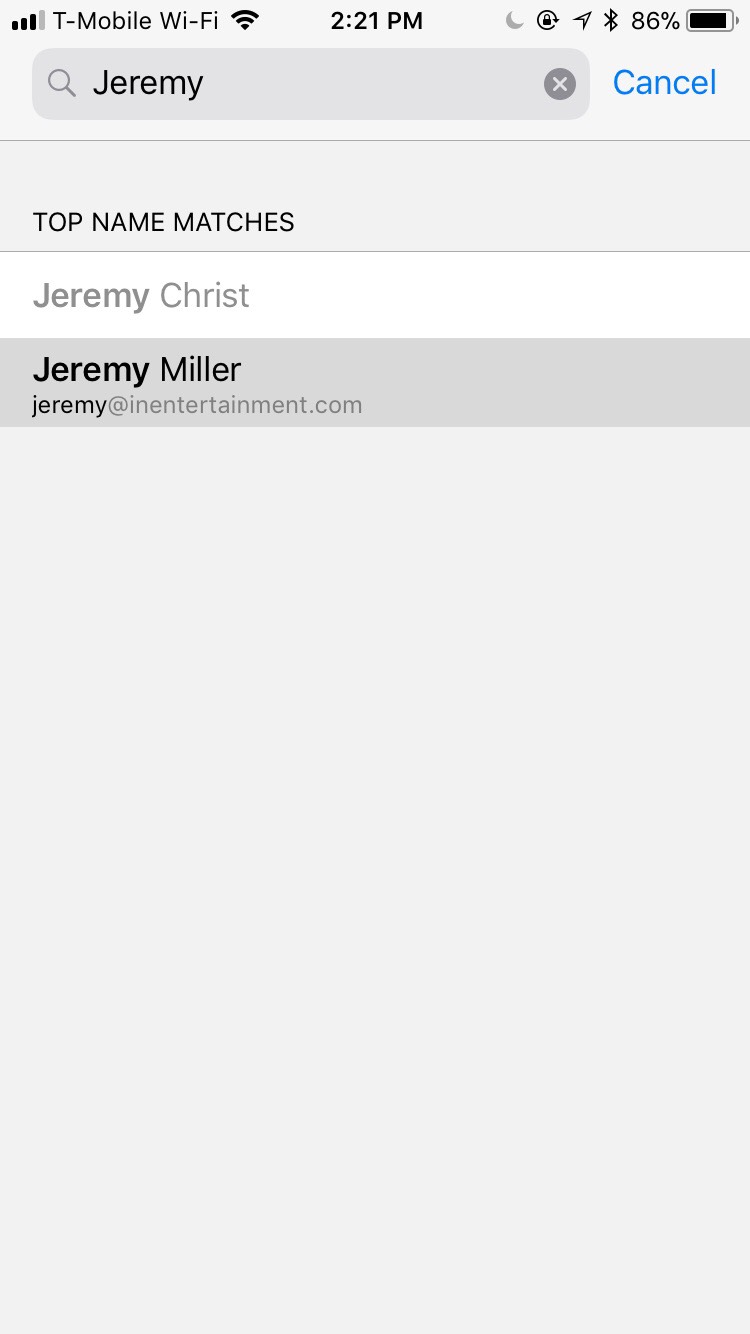
This will take you to their address card where you can select the email address you’d like to send the appointment to.
Step 9
The email will automatically generate through your mail app on your phone. You’ll have a chance to see and review it and then you just need to hit Send.

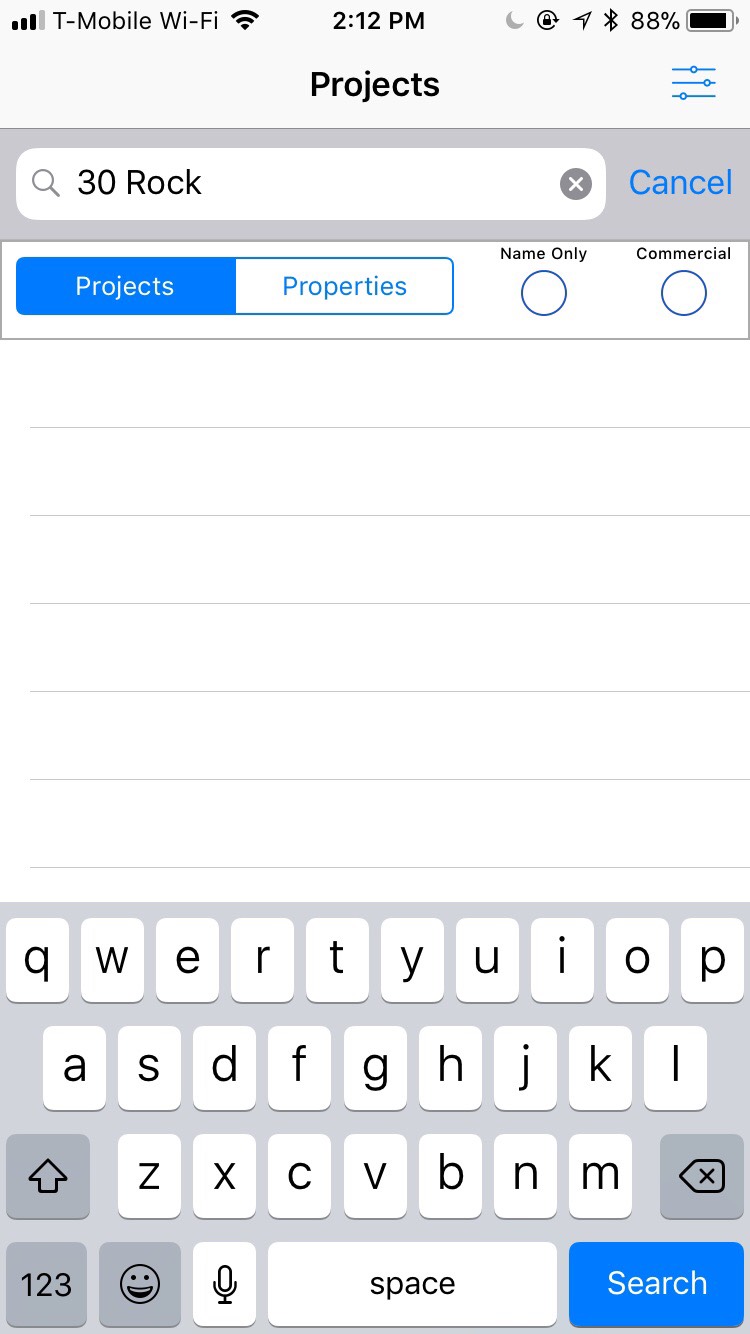
Though the icon at the bottom of your screen says Projects, you can also use this part of the program to search your properties as well. To switch from projects to properties, click on the 3-line icon that can be found on the top right of the screen.
Step 1
To retrieve a project from your database, type in the name of what you’re looking for in the search bar and then click on Search.
Step 2
Once your results are displayed, click on the project that you want to view.
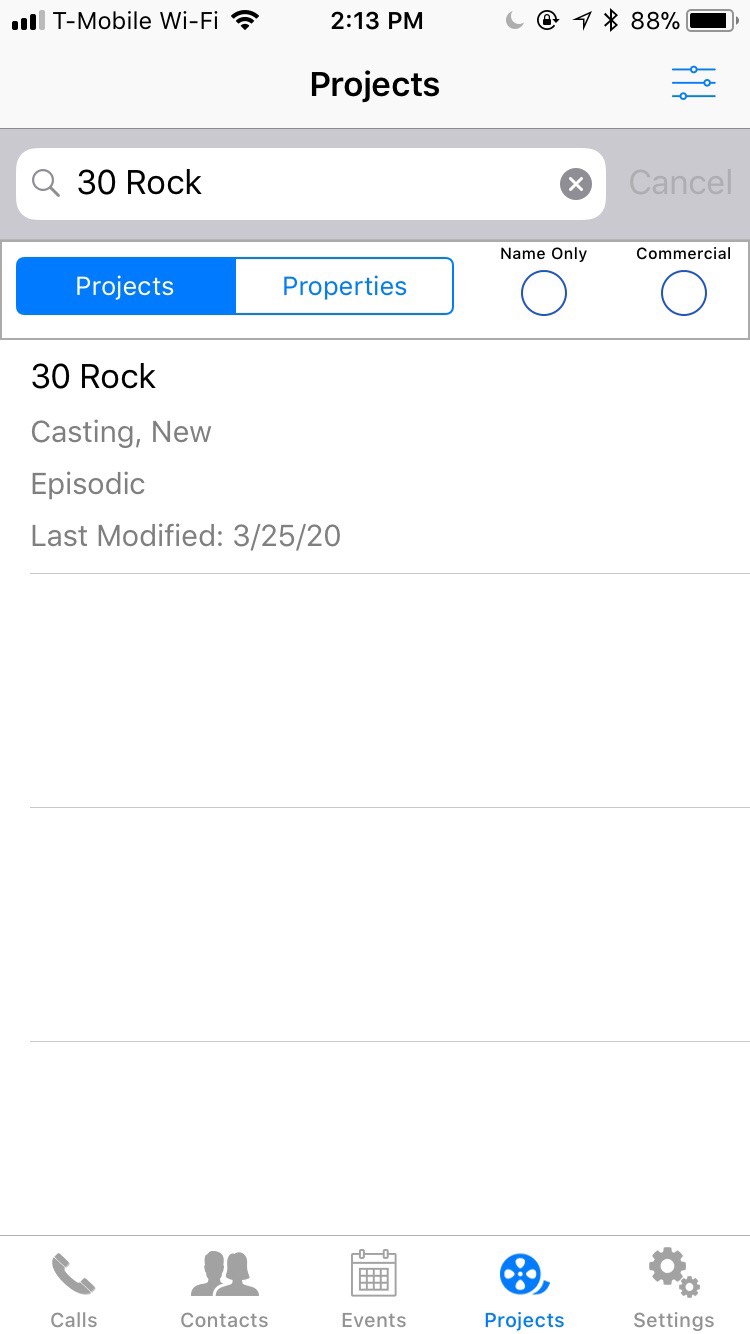
Step 3
Once the project is selected, you will be able to view all the project information, separated into eight different options in which you can click and view.
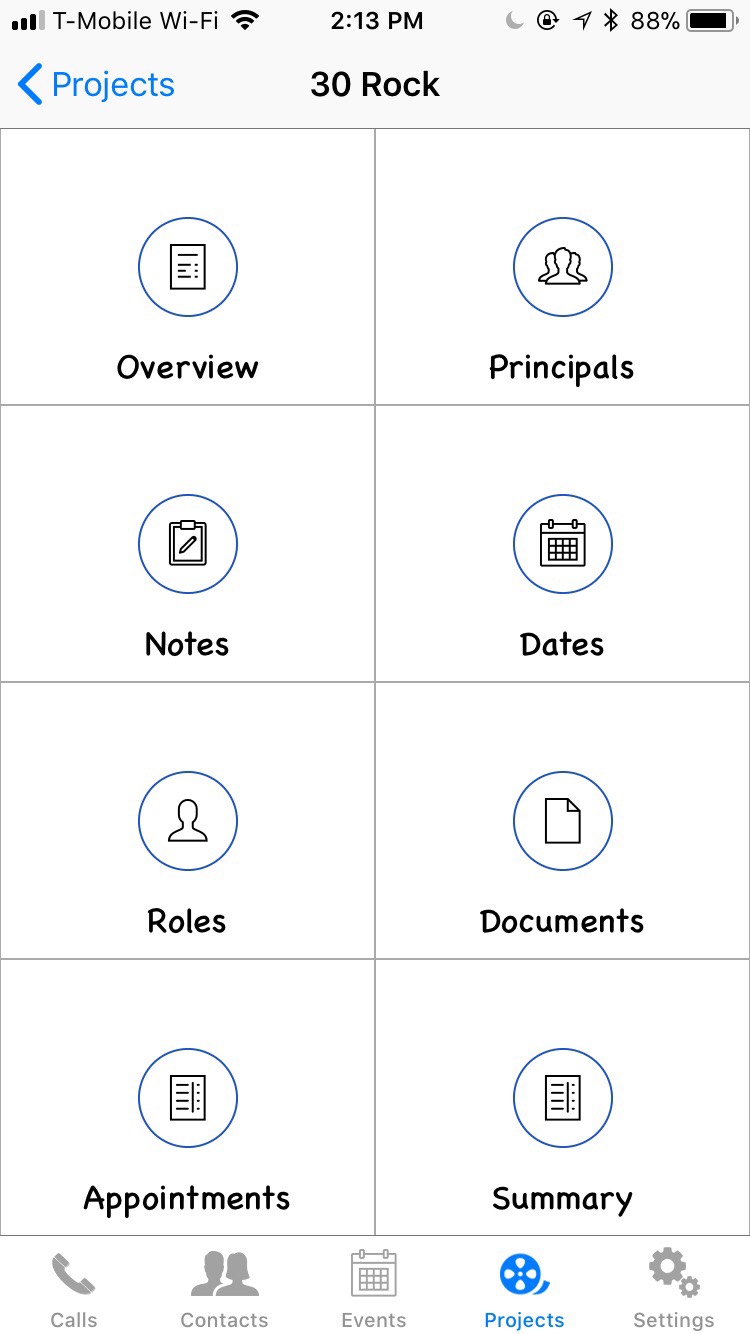
Step 4
Most of the options are for informational purposes only as you can’t edit the information from the mobile app.
Step 5
However, you can input and email out appointments now.
Step 1
Click on the + sign. If you have contacts synced on your phone, you may select Open Contacts and select the appropriate contact and number to use. If you don’t have contacts synced, then simply type in the name/company/callback #
Step 2
The date will default to current date and time. If you need to change the date, you may do so by tapping the Date line.
Step 3
Change the Status by tapping on Status Line and selecting appropriate status. To set the Kind, tap on that line and then select appropriate Kind. The Kind types listed will match what is on your desktop.
Step 4
If you need to add any notes you can do so by tapping the Notes field and then typing in the information.
Once all the information has been inputted, click on Save.

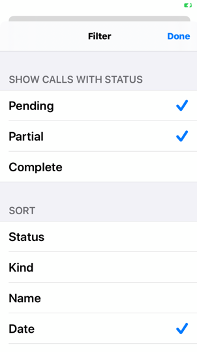
Use the filter function in the call list to set the display options.
Step 1
You can find the Filter in the top left of the screen when on the Calls tab within the app. Within Filter, you can decide how to Sort the calls, which calls will show in your list based on Status, and the direction you would like the calls to show.
Step 2
Because you’re unable to delete calls from the mobile app you can choose only certain calls to show based on the Status. You have three options, Pending, Partial, or Complete.
For Sort, you can choose how to organize your calls on the list. You can only choose from 1 of the options: Status, Kind, Name, Date, and Company.
Sort Direction is either Standard or Reversed order.
Step 1
Download the IE mobile app from the app store. When you open the app, you’ll be prompted with a bunch of permissions; say yes to all these, you can say no to notifications.
Step 2
Once app opens, in settings, you’ll see a User ID. To the right of that, click the email button and send us your ID (1). We’ll respond with the URL, which you’ll need to input into the line above User ID (2). Then hit save.

Step 3
Your phone is now ready to sync. Scroll down in settings to Get All Calls, Contacts, or Events and select it. Check Calls and Events and then hit download. Your phone should sync.
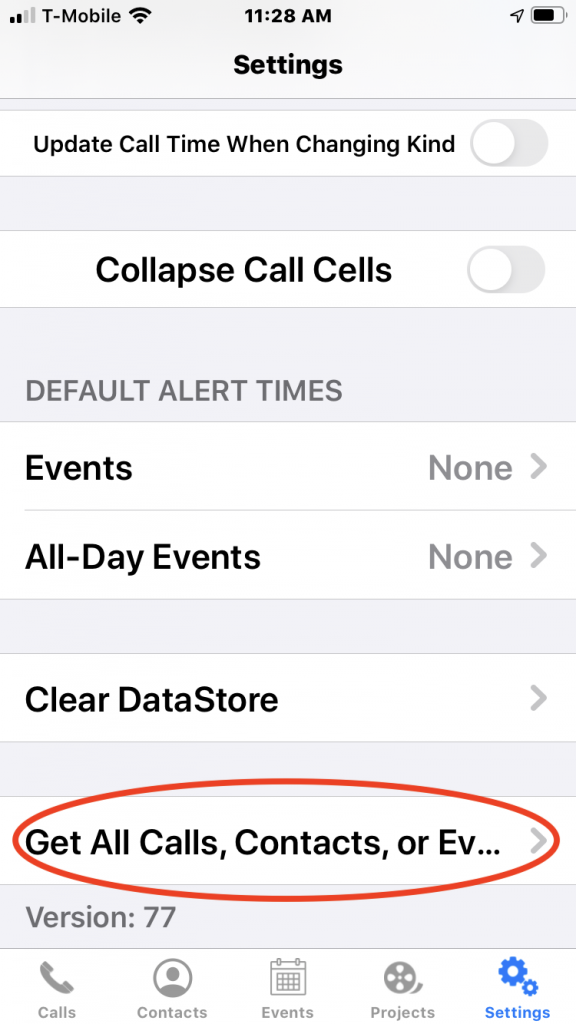
For contacts, we don’t recommend syncing because of how many contacts the database contains, but if you go to the contacts section, you can type the name of any contact and use “Continue Search on Server…” to search your database and retrieve the information.
If you do want some contacts on your phone for the purposes of caller or IM recognition, we can enable certain categories to be synced. Remember that you can’t have more than one set of contacts sync per device.
*NOTE If you want to sync your mobile app with a call list and/or calendar that is different from yours, then let us know which call list and/or calendar we should set to sync with your app. You can only link one call list and calendar on the app, though you can link with a calendar set if you’ve created one.
Step 1.
Open the file in messages.
Step 2.
Select “Create New Contact”
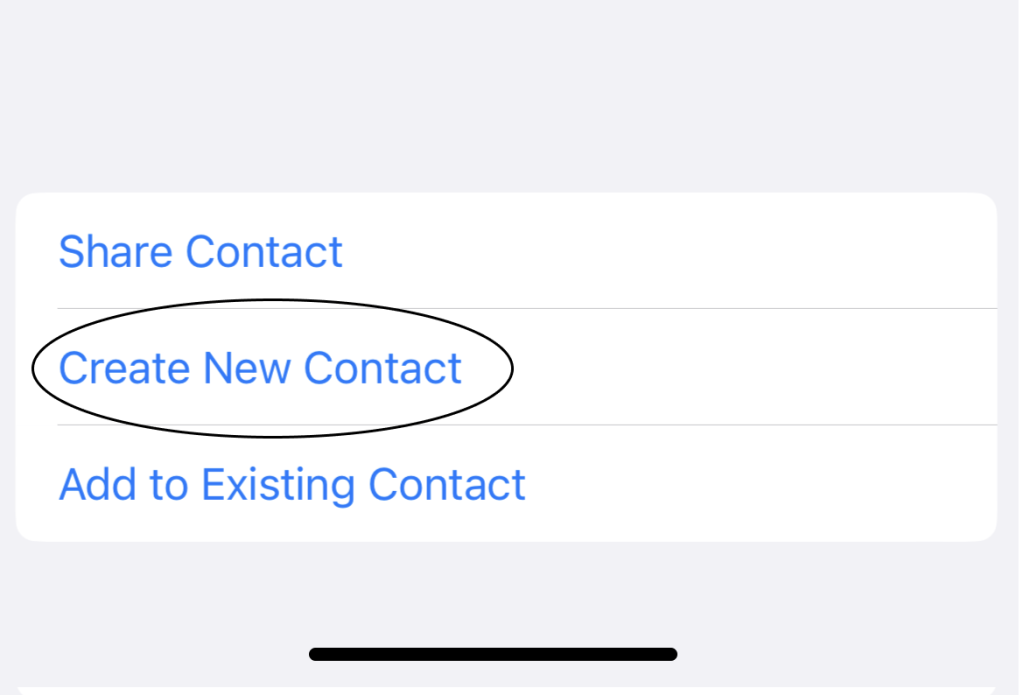
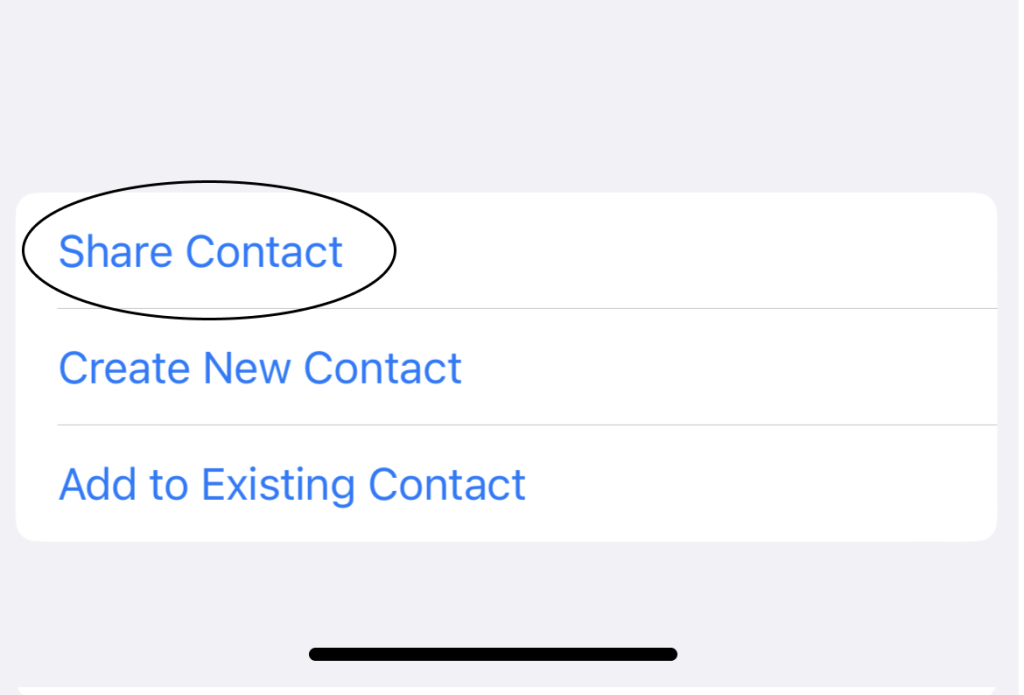
Step 3.
Select “Share Contact”
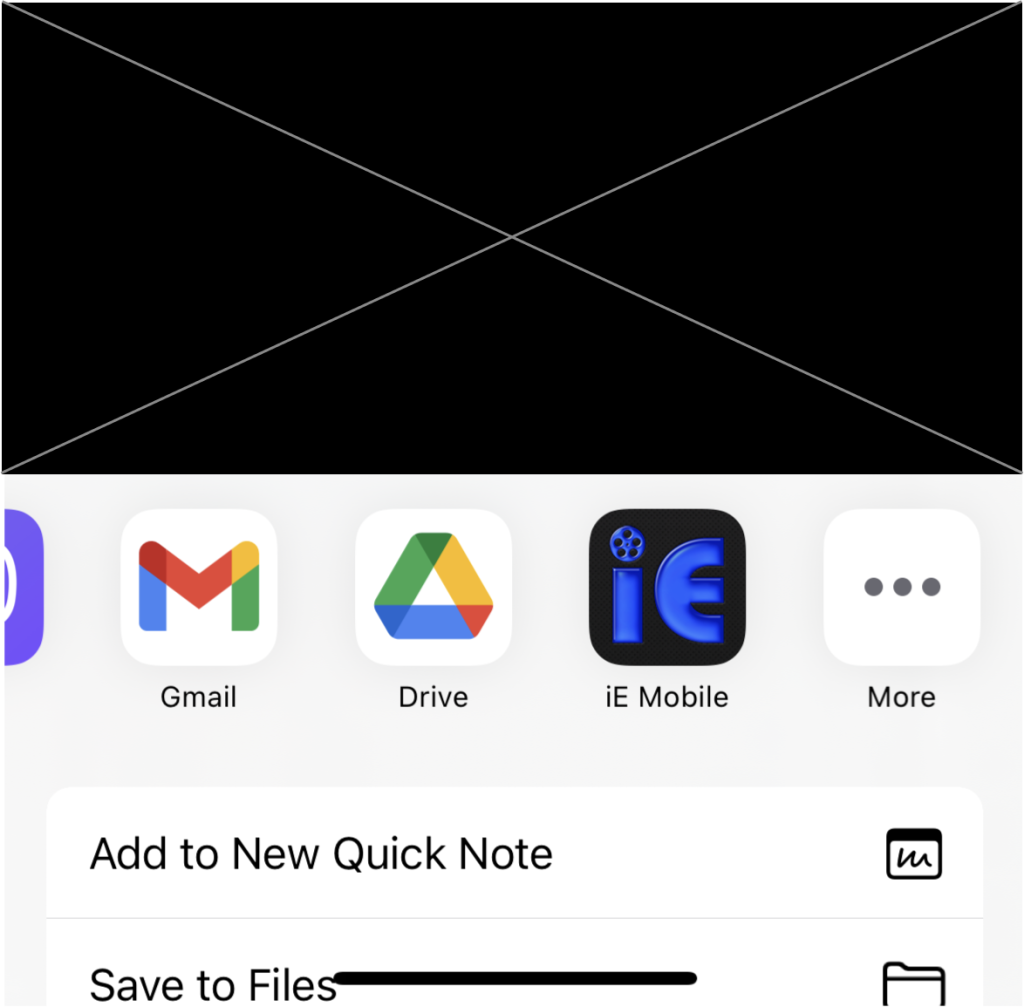
Step 4.
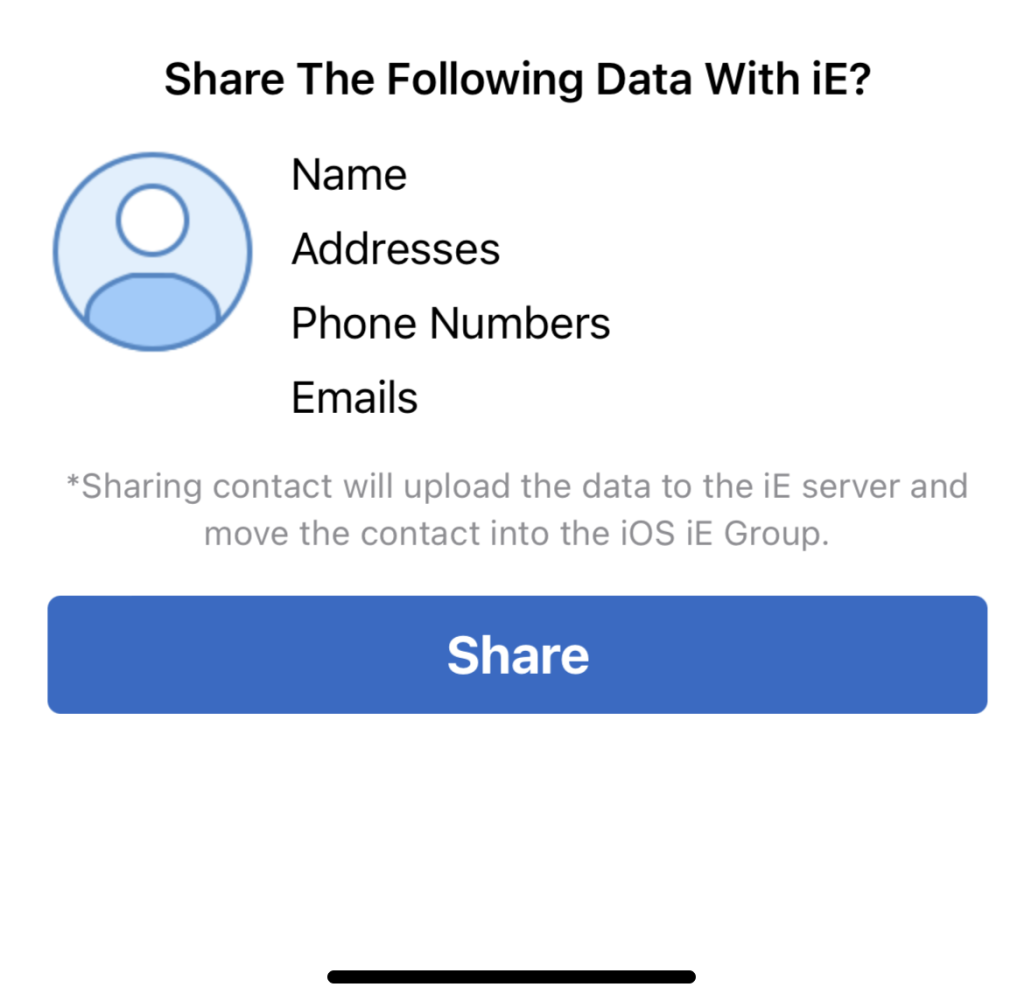
Select “IE Mobile”
Step 5.
Select “Share”
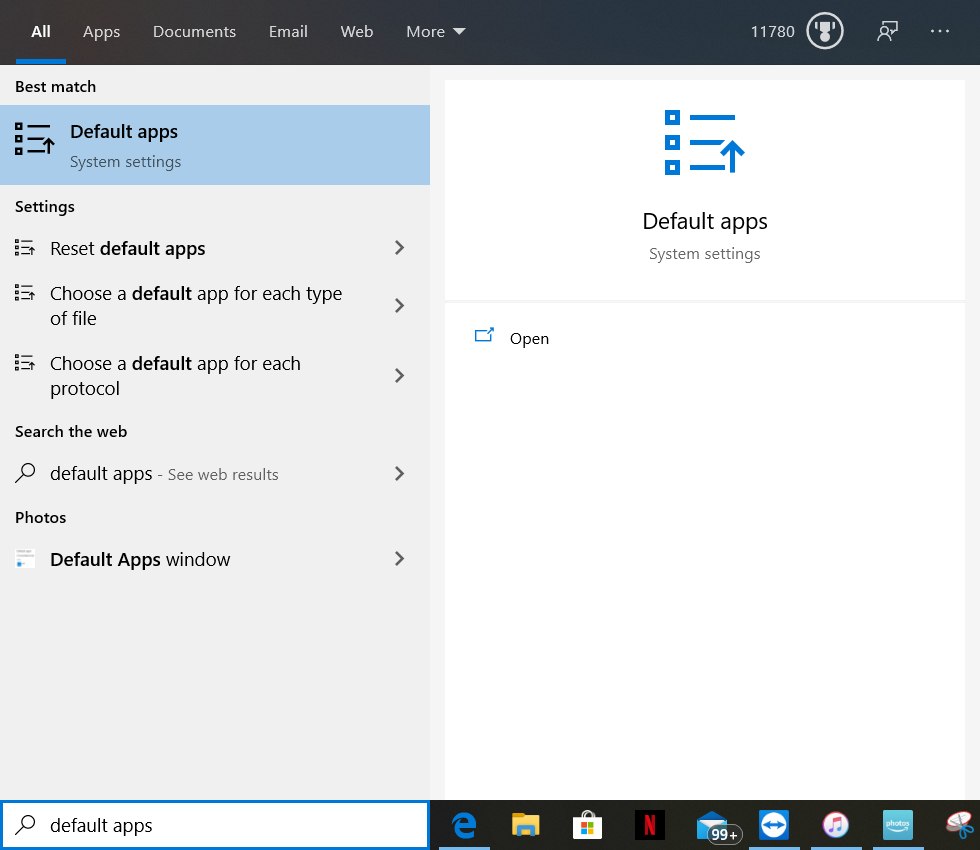
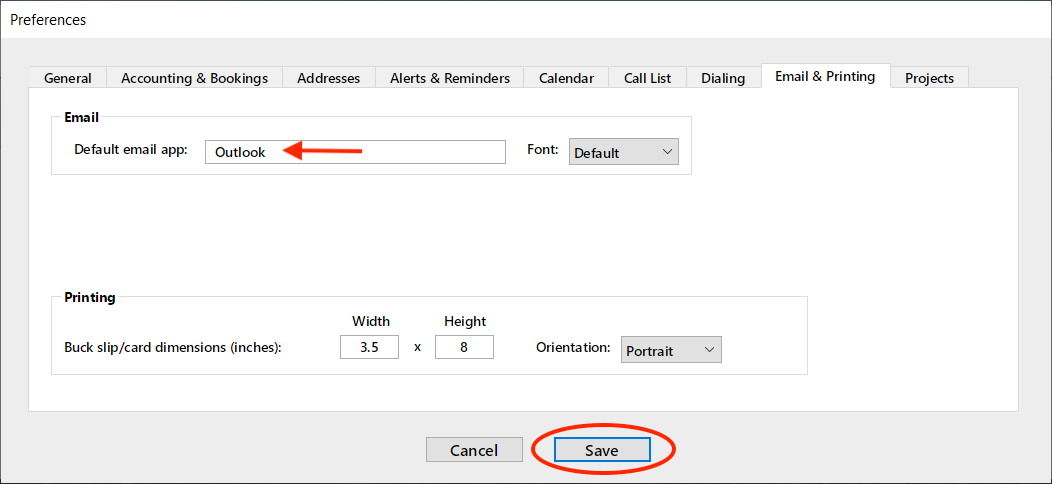
Step 1
In the search field next to the Start button on your taskbar, type: Default Apps
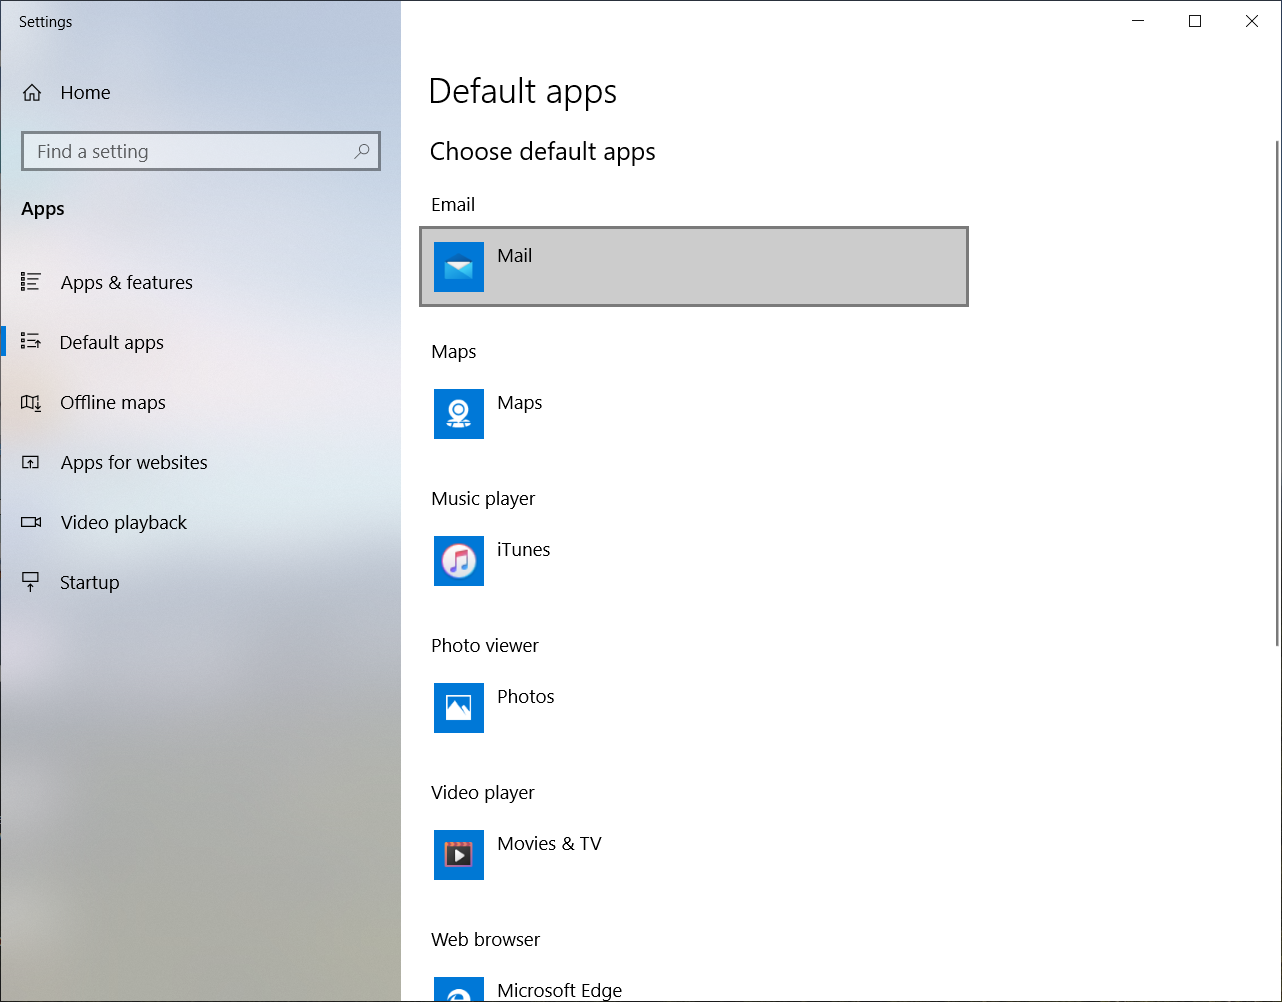
Step 2
After clicking on Default Apps, scroll down and select Outlook
Step 3
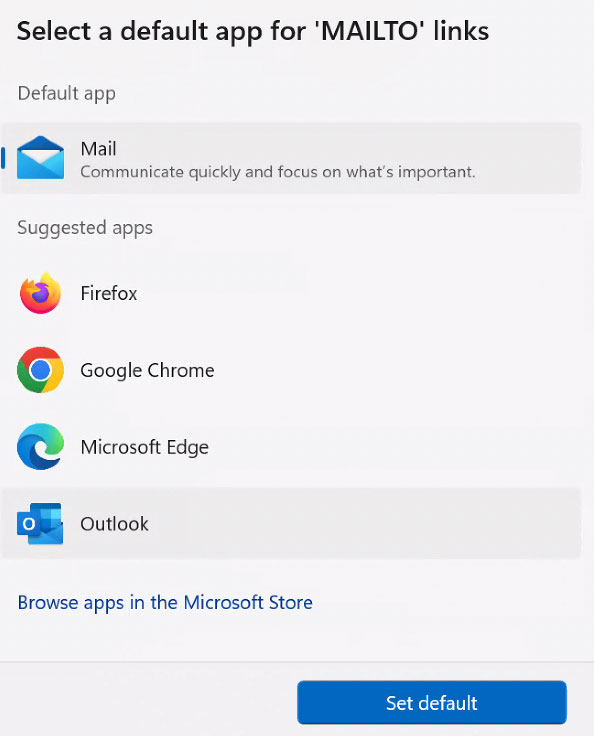
Once the Outlook window opens up, scroll down and click in the MAILTO field.
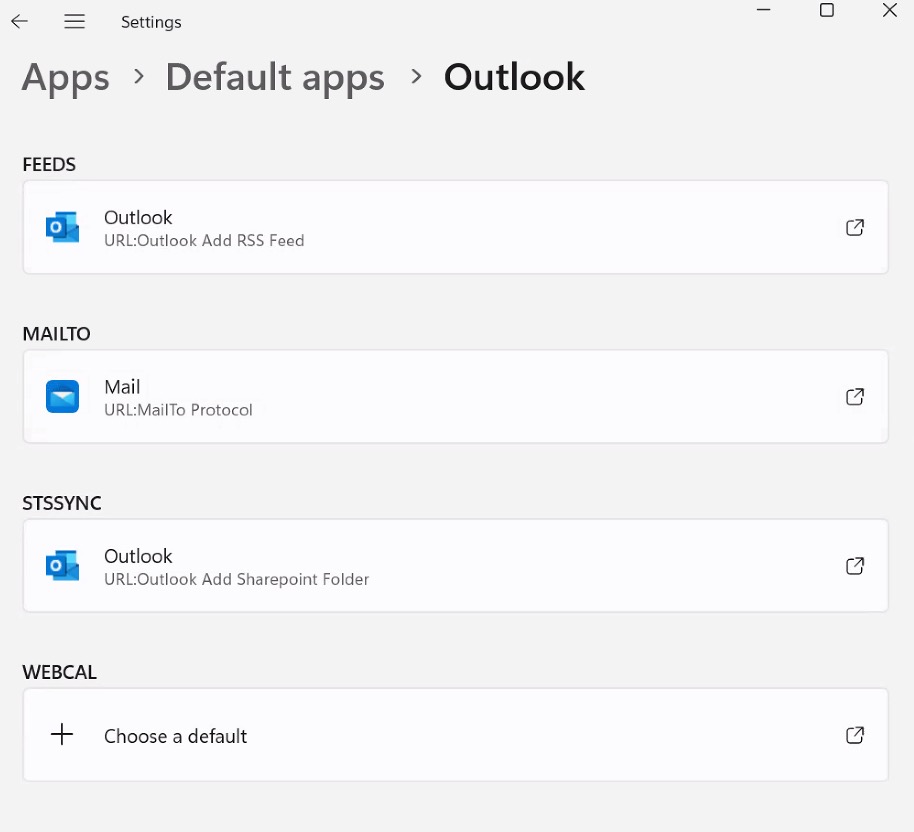
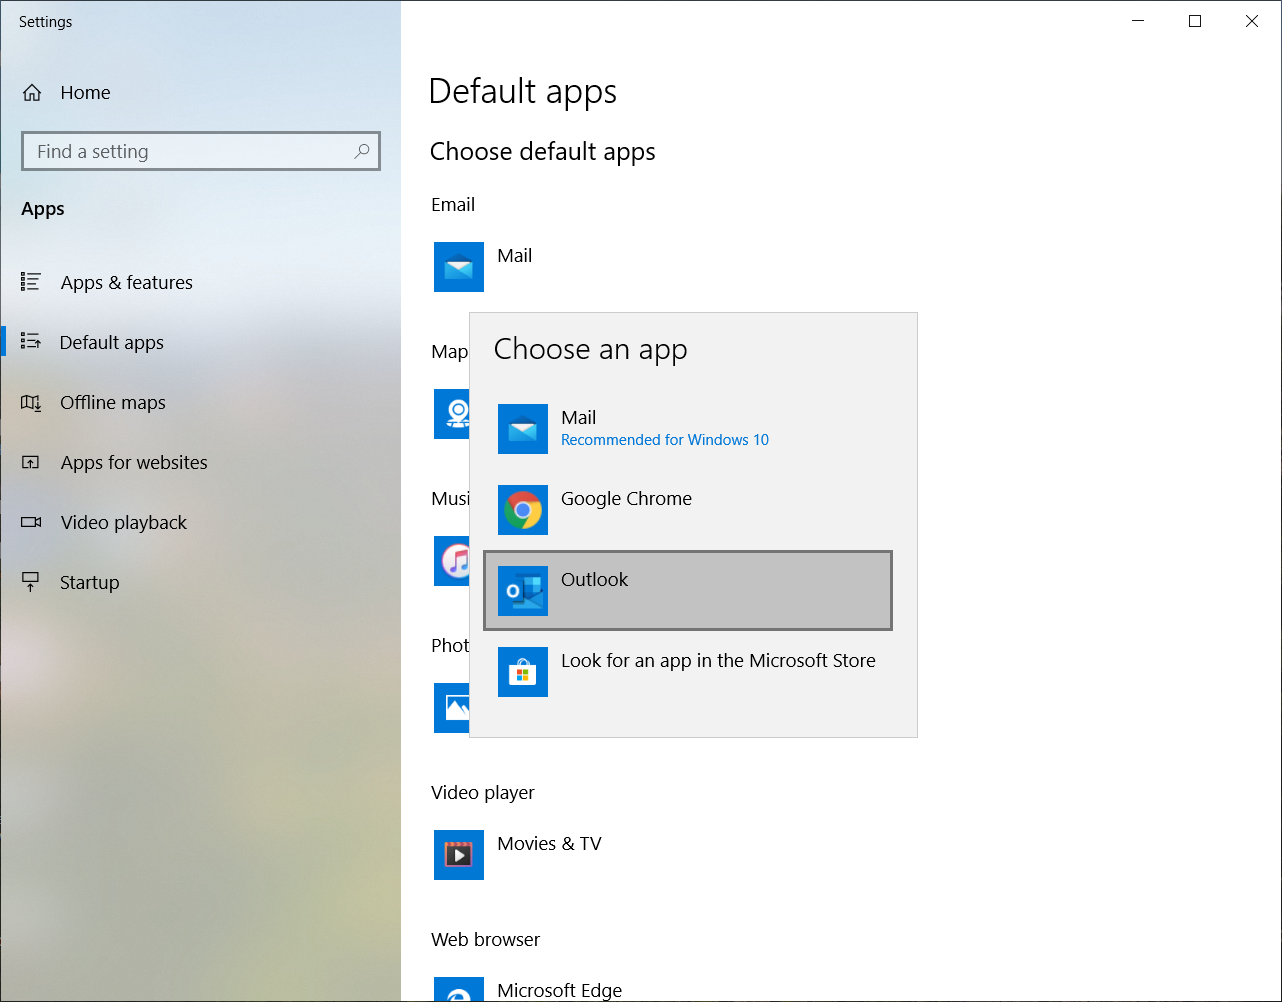
Step 4
Select Outlook from the list of options for the default app for ‘MAILTO’ links.
Step 5
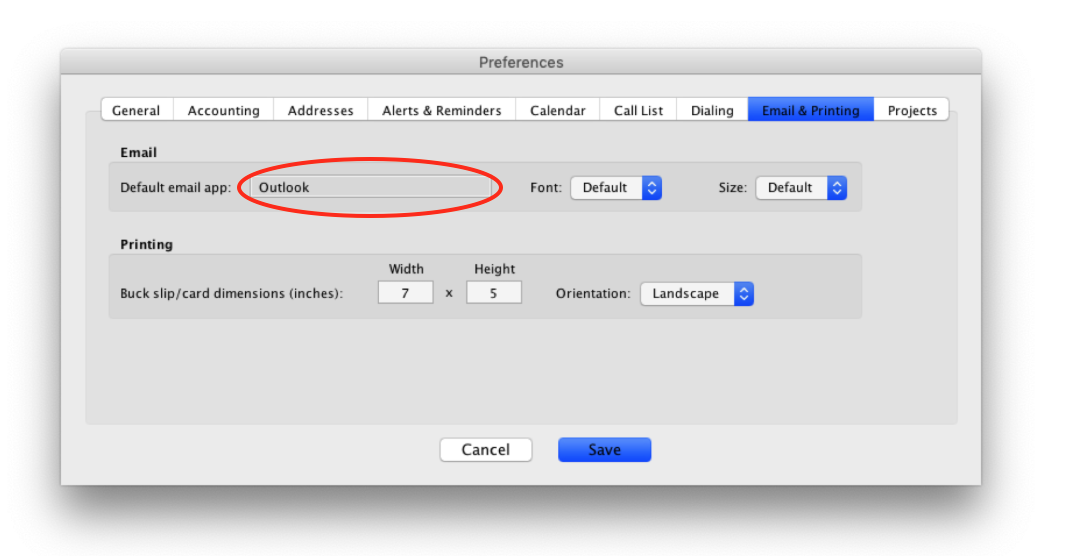
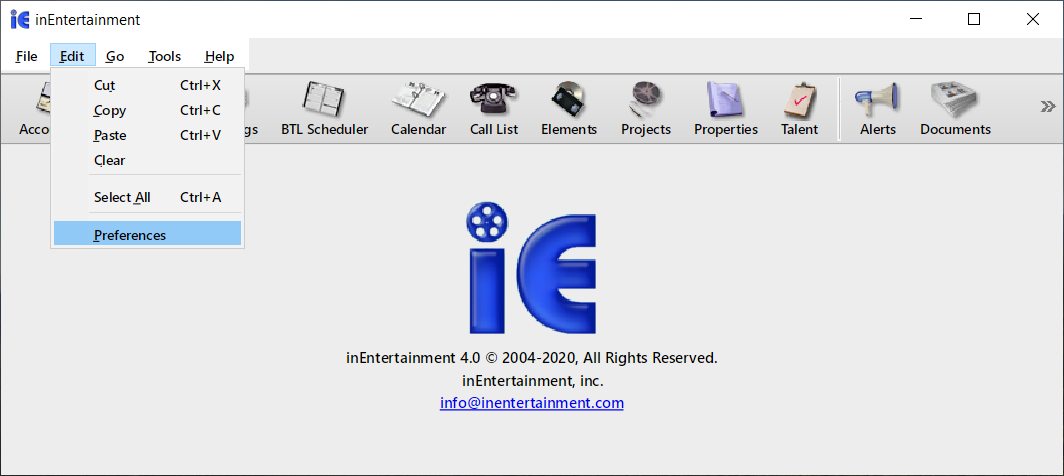
Click on any IE window and then select Preferences from the Edit dropdown menu.

Step 6
Click on the Email & Printing tab. Double click on the word in the field box next to default mail app. Once it shows Outlook, click on Save.

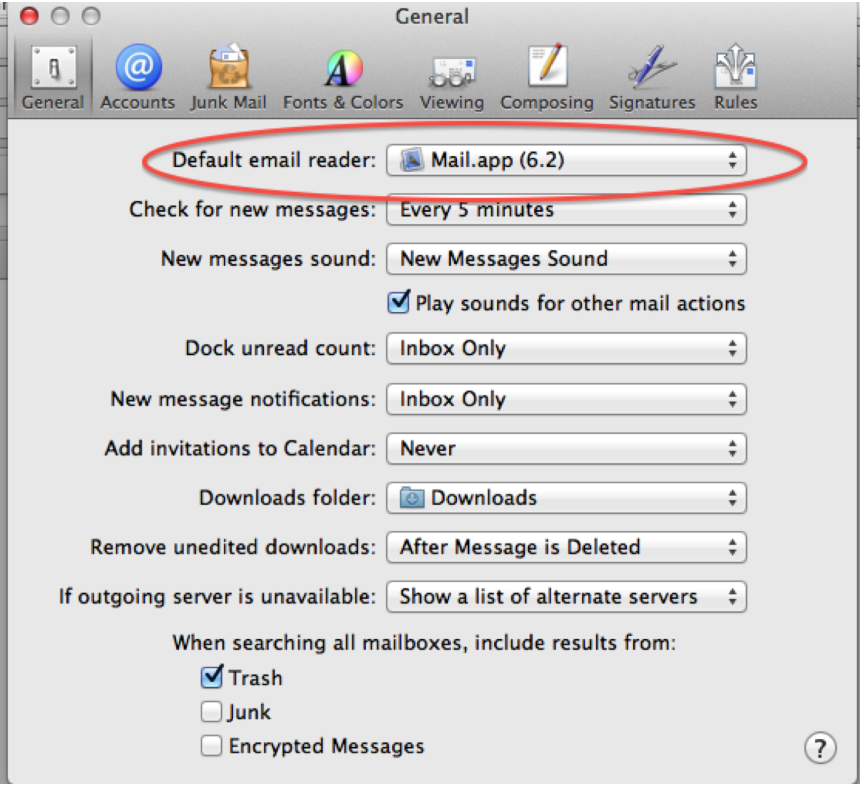
Step 1
If emails do not show up correctly inEntertainment, it may be necessary to reset the default email app on your computer.

To do so, open Apple Mail, Outlook or Thunderbird.

Step 2
Open the preferences pane from the “Mail” menu.
In preferences, change the “Default E-mail Reader” to your mail app either Apple Mail, Outlook, Thunderbird or…
Close the preferences window in Apple Mail.
Step 3
In inEntertainment open the preferences under the inEntertainment menu and select the “Email & Printing” tab.
Next click inside the field for Default email app. Click on the word in the field. It should switch from “Other“, or whatever you had previously, to your selected email app.
Step 1
In the search field next to the Start button on your taskbar, type: Default Apps.
Step 2
After clicking on Default Apps, locate Email listed under ‘Choose Default Apps’.
Step 3
Click on the icon. Select ‘Outlook’.
Step 4
Click on any IE window and then select Preferences from the Edit dropdown menu.
Step 5
Click on the Email & Printing tab. Double click on the word in the field box next to default mail app. Once it shows Outlook, click on Save.
Misc.
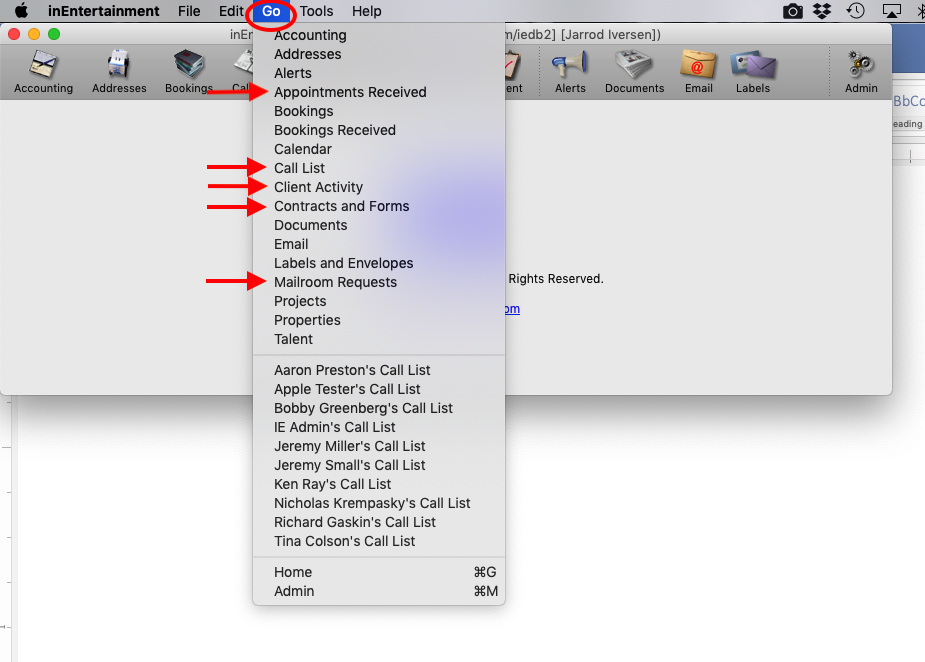
“Go” menu
Located between edit and tools, you can access any of the main modules like you would from inEntertainment Home screen.
You can also access any users Call List you have permission to use, and bring the Home screen to the front of your open windows. Additionally, you can access a few other features, such as Client Activity, Appointments Received, Bookings Received, Contracts & Forms, and Mailroom Requests.
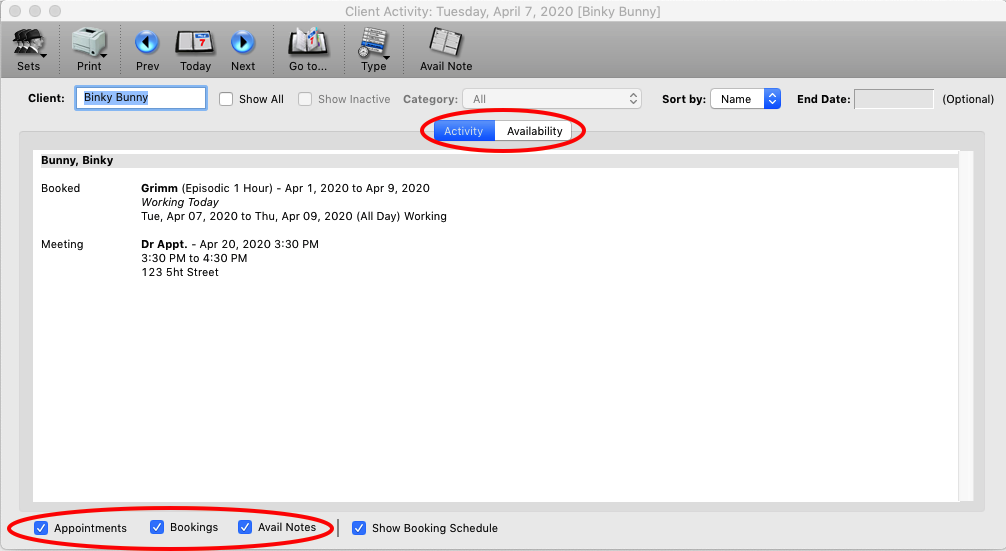
Client Activity, Activity Tab
This allows you to see the activity and/or availability of your clients. You can view one specific client or all at the same time.
Additionally, you can select a category and see only those listed in that category or use a previously created calendar set to display that particular list. You’re able to also show clients that are inactive in your date range (meaning they’re available) and can choose what type of activity you want displayed from Appointments, Bookings, and Avail Notes.
*Note With the exception of Avail Notes, you can’t add or modify any appointments or bookings directly from Client Activity. However, the entries displayed as hyperlinks can be double clicked and will take you to the original appointment or booking.
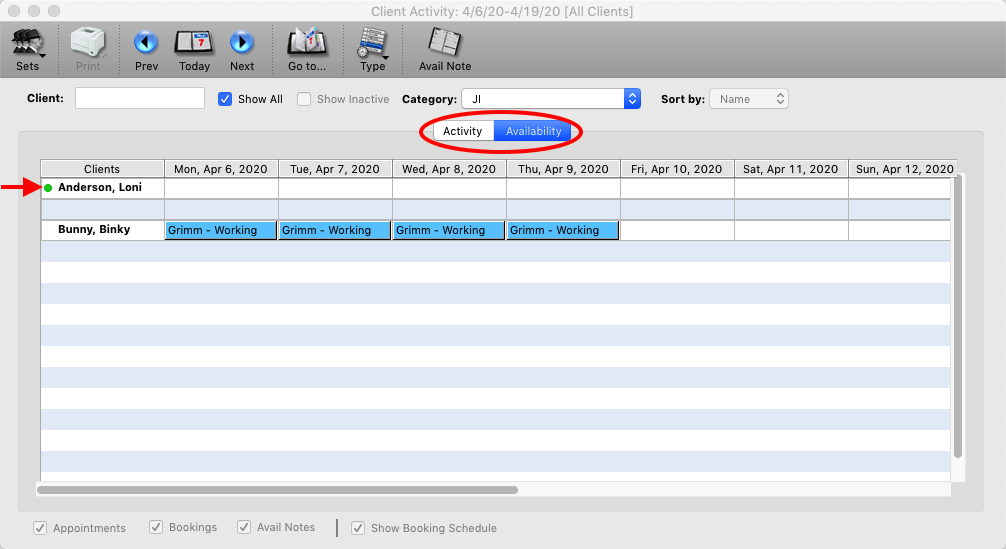
Client Activity, Availability Tab
The Availability tab will show you clients and their schedule for a 2 week period. Clients with a green dot before their name are available for the days being viewed.
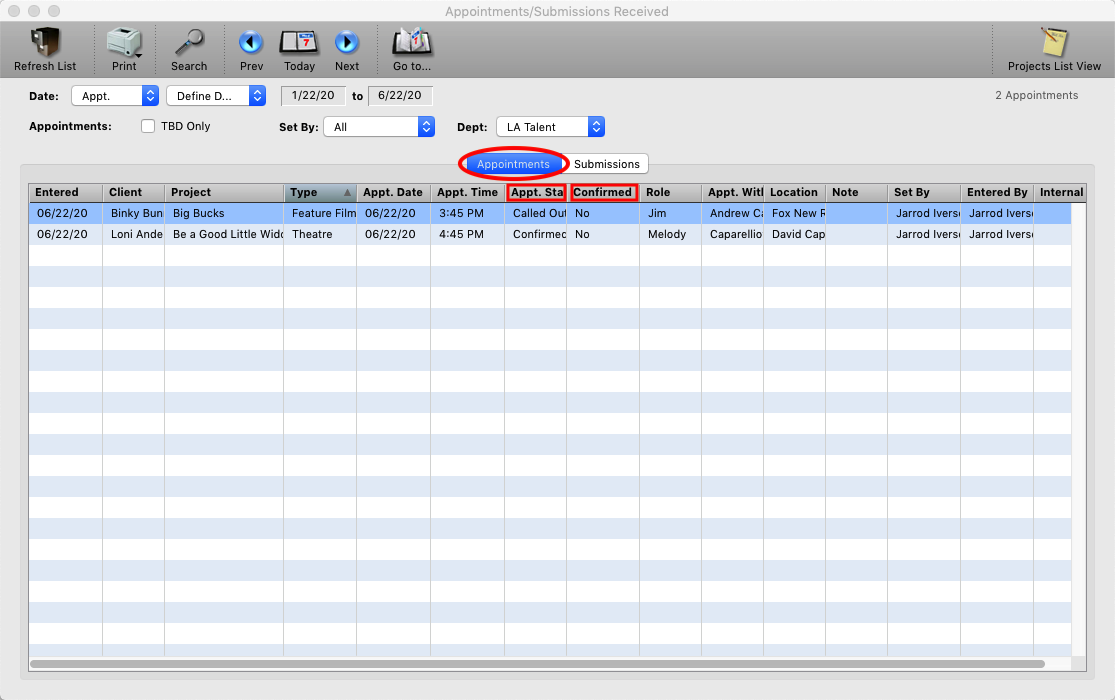
Appointments Received
See a comprehensive list of all appointments in a department for a certain time frame, either by the date they were received or the date of the client’s appointment. Double click on an appointment to view more details from there you can go to the actual appointment on the project.
If you R-Click on an appointment in the list in either the Appt. Status column or Confirmed column, you can update those items for the appointment. You can also view submissions that have been logged into inEntertainment as well.
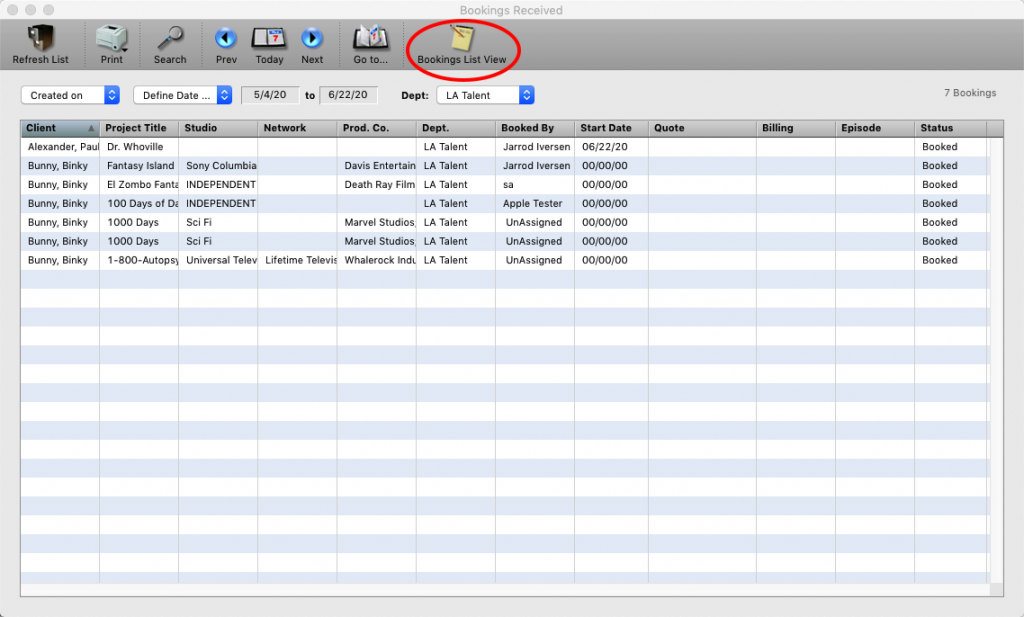
Bookings Received
Allows the user to view all bookings for a given time frame. You have the option to search when bookings was created or when they were last modified, (if you only want to see changes that have been made to existing bookings).
You can also view by specific department, or create a broader list by selecting either commercial bookings or non-commercial bookings.
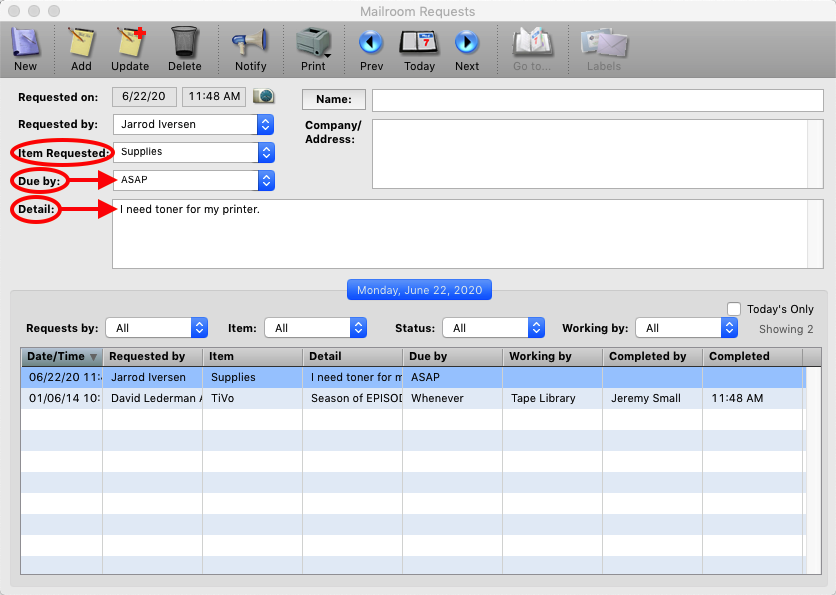
Mailroom Requests
When needing assistance from someone in the mailroom or office manager, you can create a detailed request that will be viewable by anyone that uses your database.
Within this request, you can list what you need done and when you need it completed. We have a detail section so you have the ability to list any instructions or additional notes that may be necessary to complete the assigned task.
Once the request is received, the user can mark that they are working on the task so that you’re aware the request is being completed.
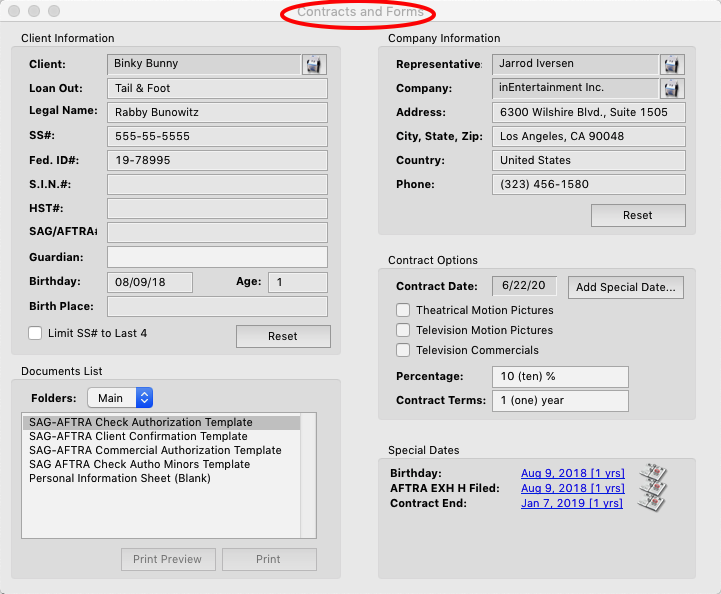
Contracts and Forms
If you have contracts and other forms for your company as MS Word documents, we can turn them into templates to use with inEntertainment. It is possible to group or segregate contracts for different departments.
In the Contracts and Forms window you can also print a blank information sheet for a client to have them fill it out.
Additionally, from this window you can add a special date the client’s address record for when the contract expires.
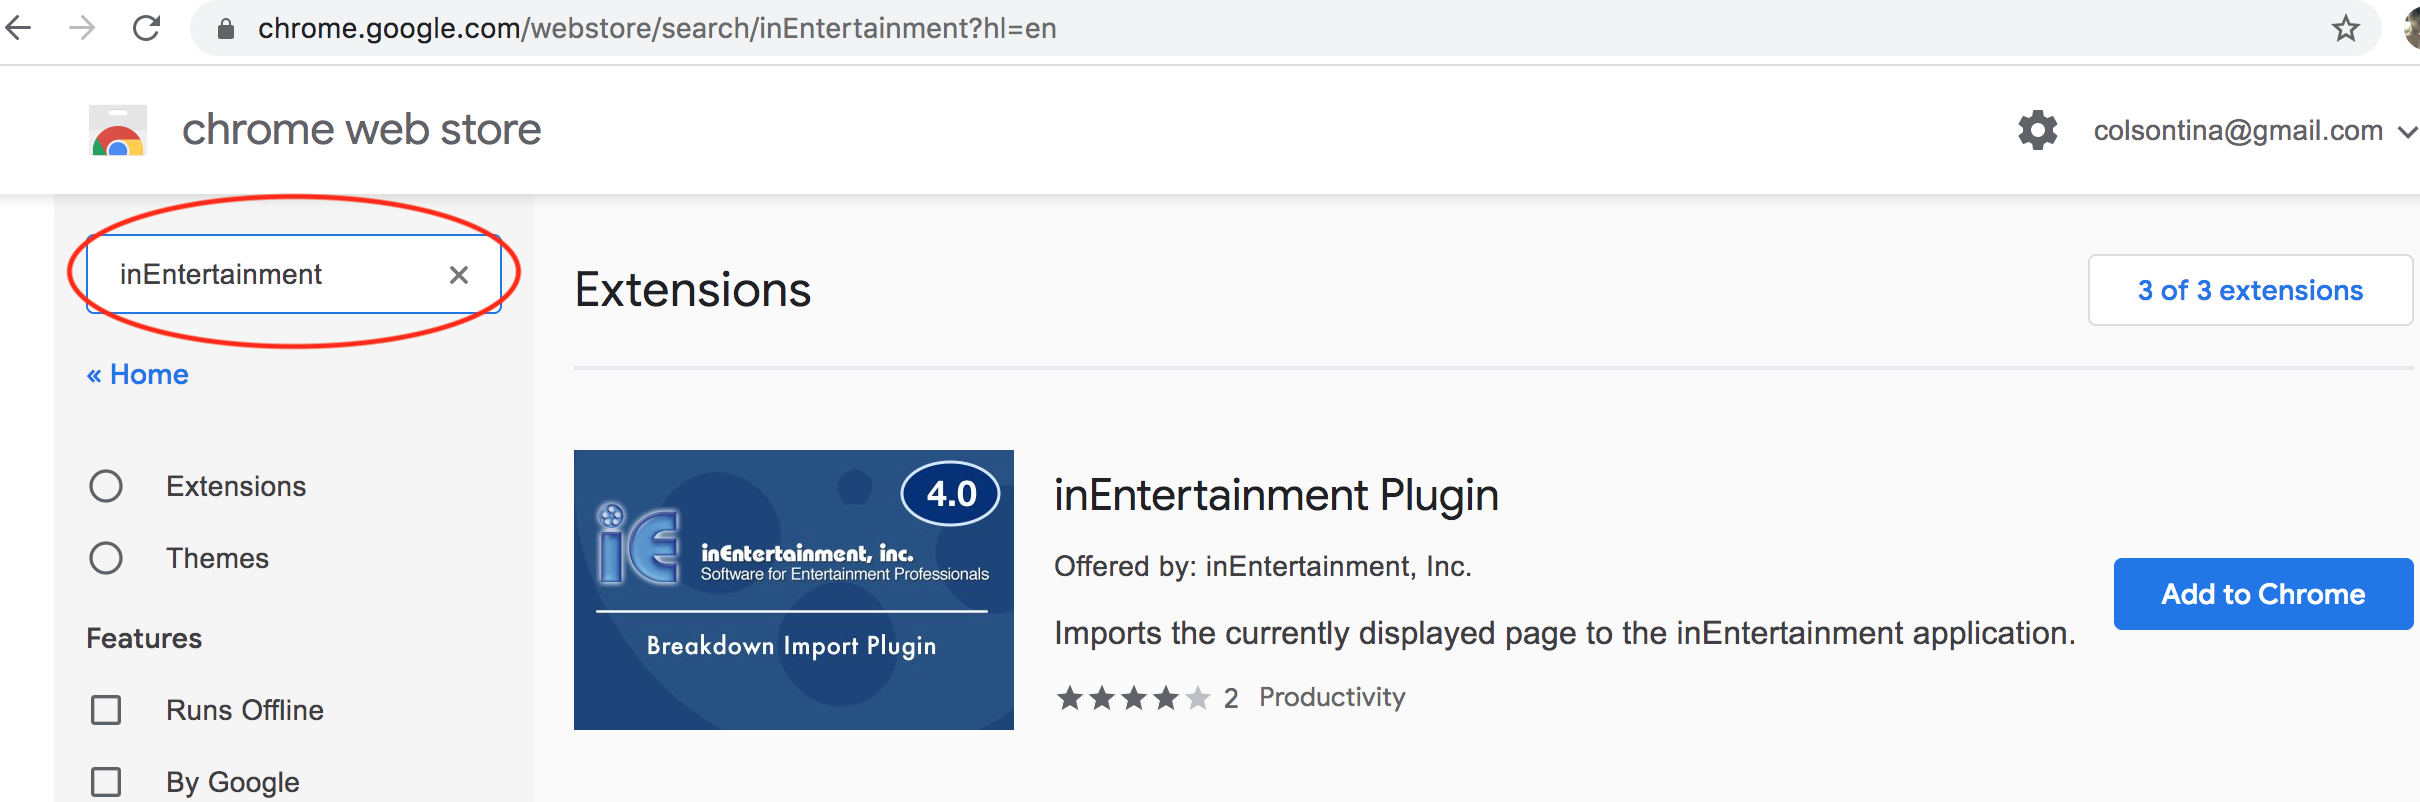
Plugins
Step 1
Search Chrome Web Store Extensions or go to this website: https://chrome.google.com/webstore/category/extensions?hl=en
Locate the search bar and search for inEntertainment. Click on Add to Chrome.
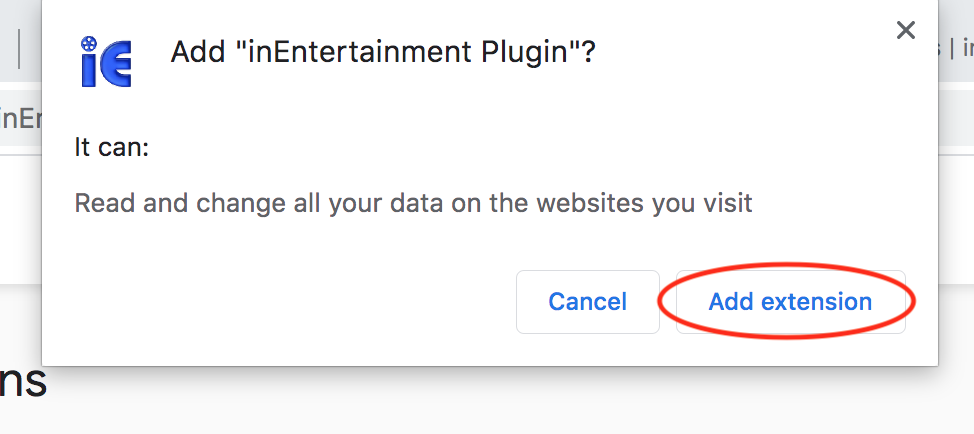
Step 2
Click on Add Extension. You don’t have to Sync it, but you can if you want to.
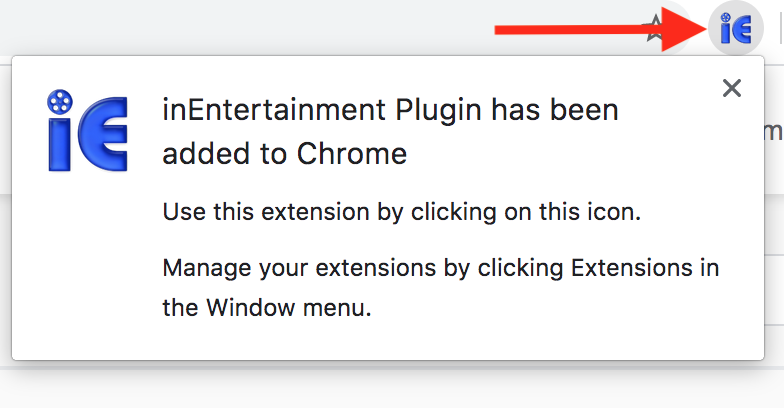
Step 3
The IE plugin should appear to the right of the address bar.

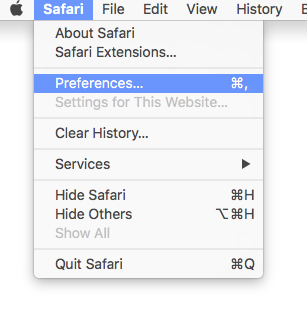
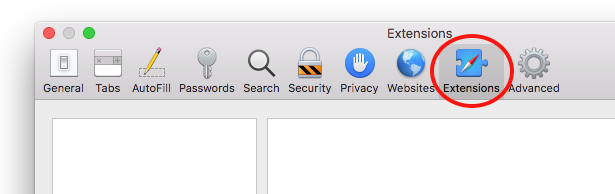
Step 1
Open up your web browser and search for Firefox Extensions or go directly to this website:
https://addons.mozilla.org/en-US/firefox/extensions/
Type in inEntertainment in the search brand hit enter.

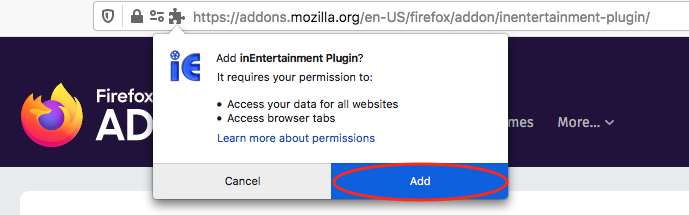
Step 2
Once the results come up, click on the Add to Firefox. You will then receive a prompt making sure you want to add it. Click Add.
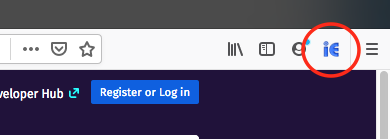
Step 3
You will now see the IE icon in your the tool bar next to your browser.
Projects
Step 1
In the breakdowns people and companies are “titled” the way they have been input by production. Sometimes the breakdown will have a title that won’t have a direct match in iE. In this case a question mark appears and until you resolve this you are unable to proceed.
Change the question mark to the way in which you want it to appear in iE or you can skip this Name and Heading altogether.
In this case you might choose ‘Casting Director’ from the pop up list.
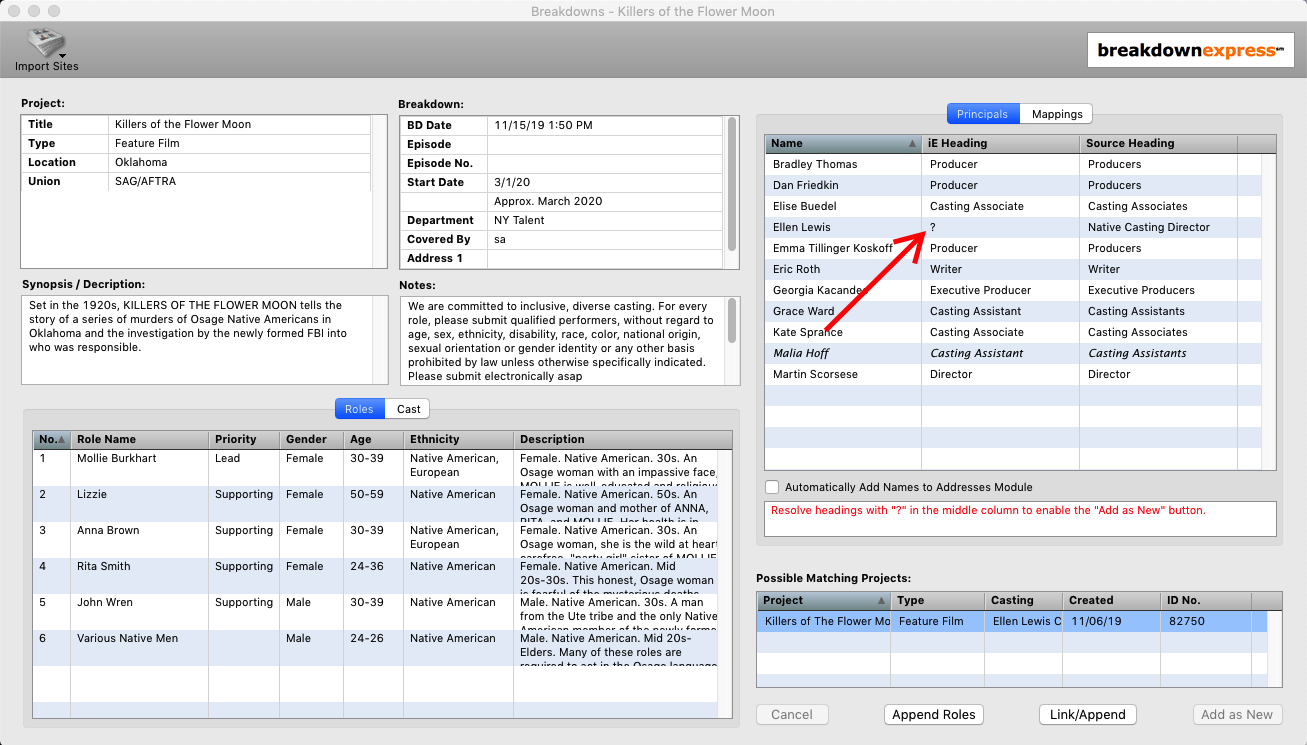
Step 2
If you want to edit an existing mapping, select the ‘Mappings’ tab. In this section you can go through the list of source headings and how they’re mapped in iE. You may have to from time to time clean up this list if something is mapped incorrectly.

Step 3
Step 1
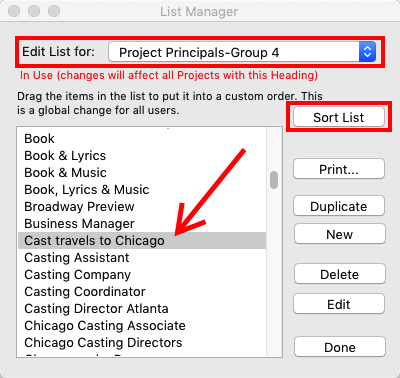
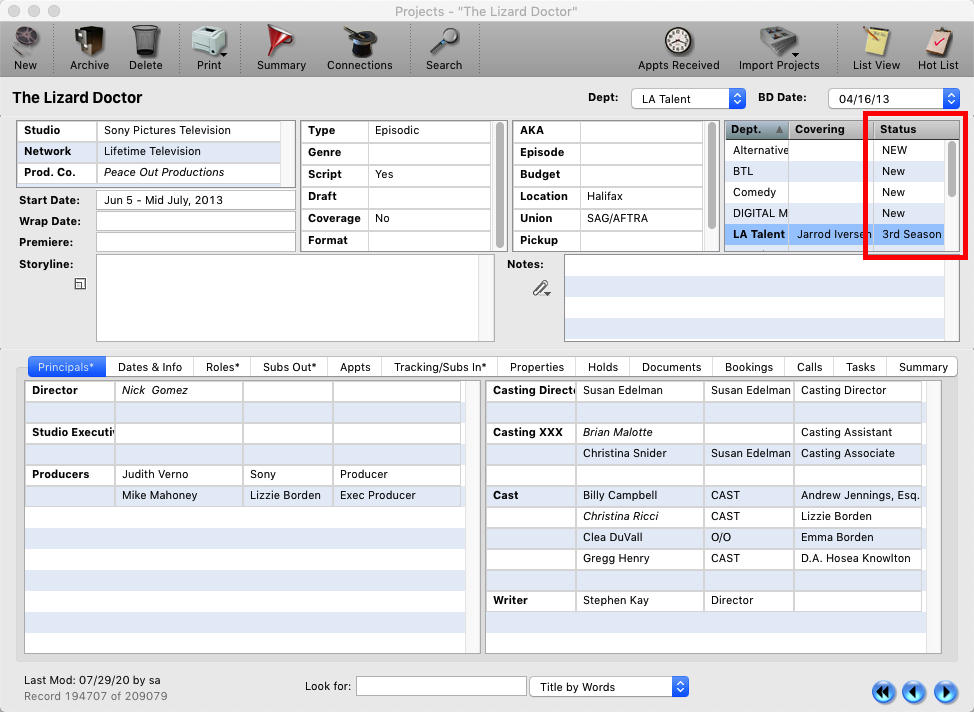
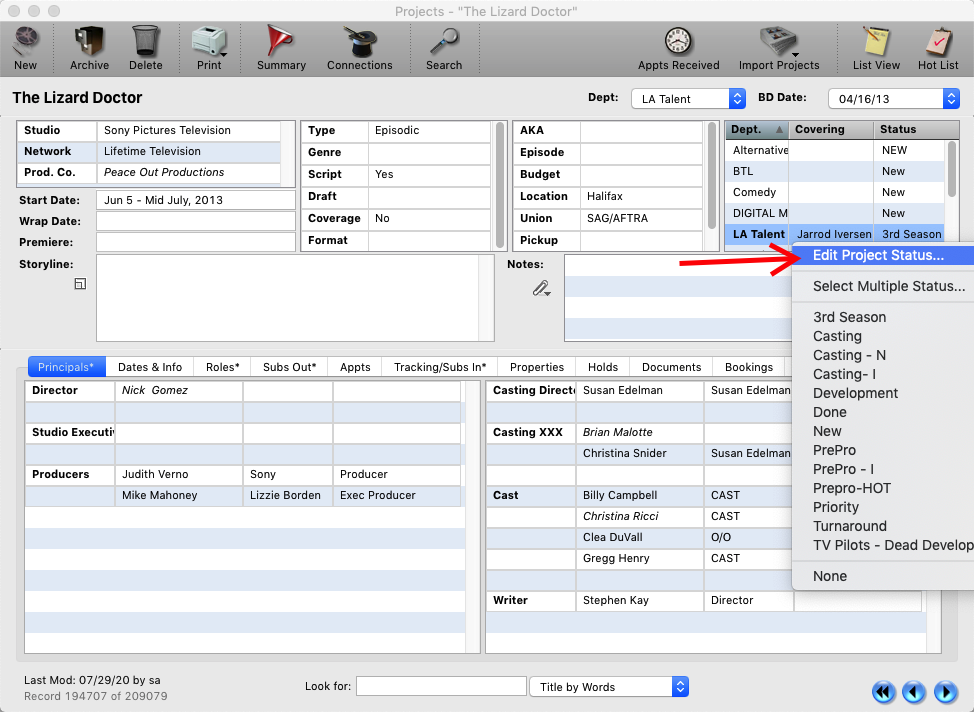
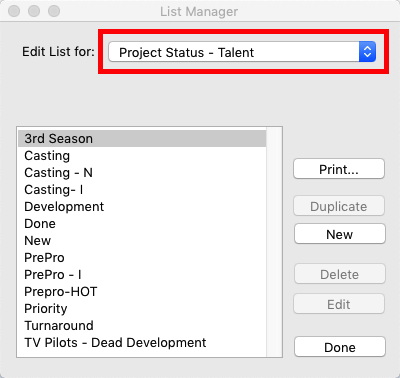
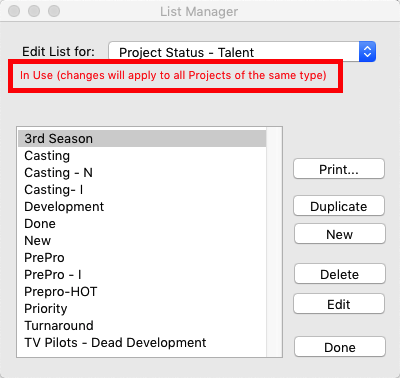
The Status on a Project record should only be used for the current status of the project, i.e. The project is: “New” or it’s “Casting”, in “Preproduction”. Each type of department, (Talent, BTL, Literary) has their own status list.
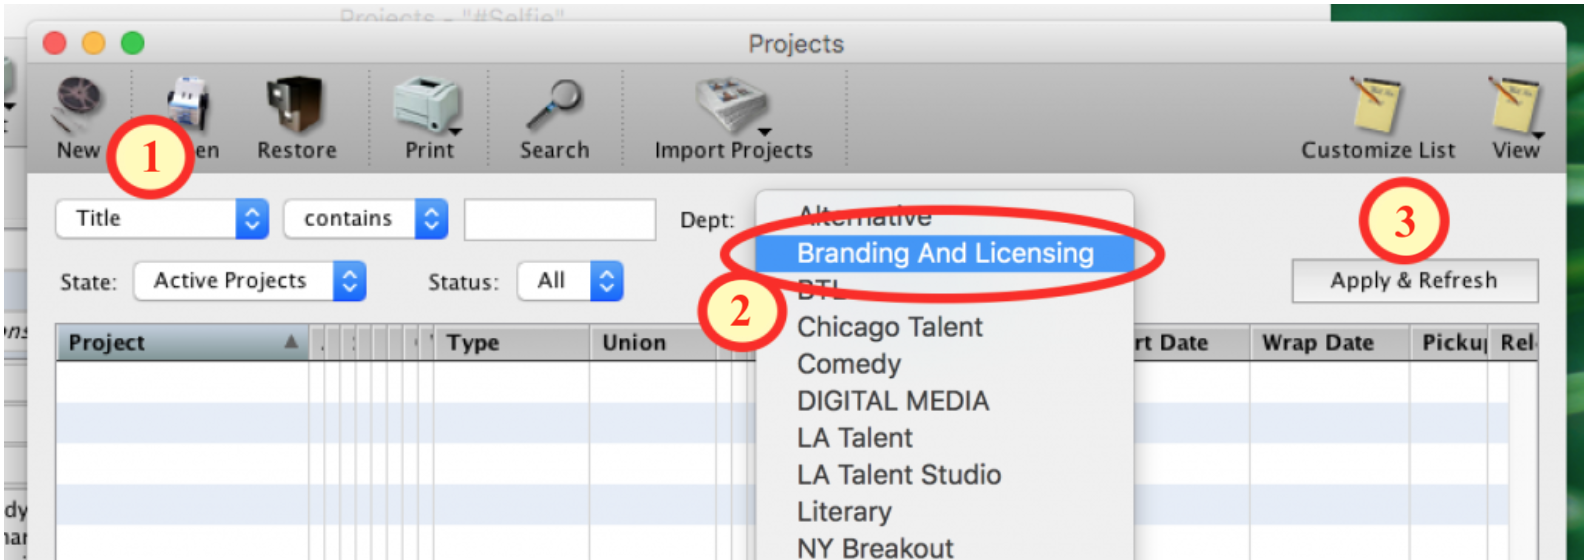
Step 1
Go to the Projects Module > List View.
Step 2
Leave the Title box blank (1) but select the Department you want to clean up the projects for (2). Click the Apply and Refresh button (3).
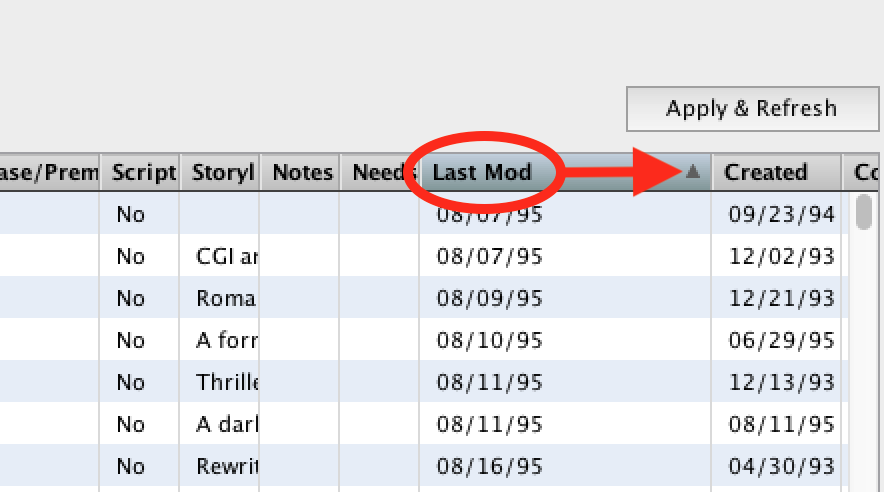
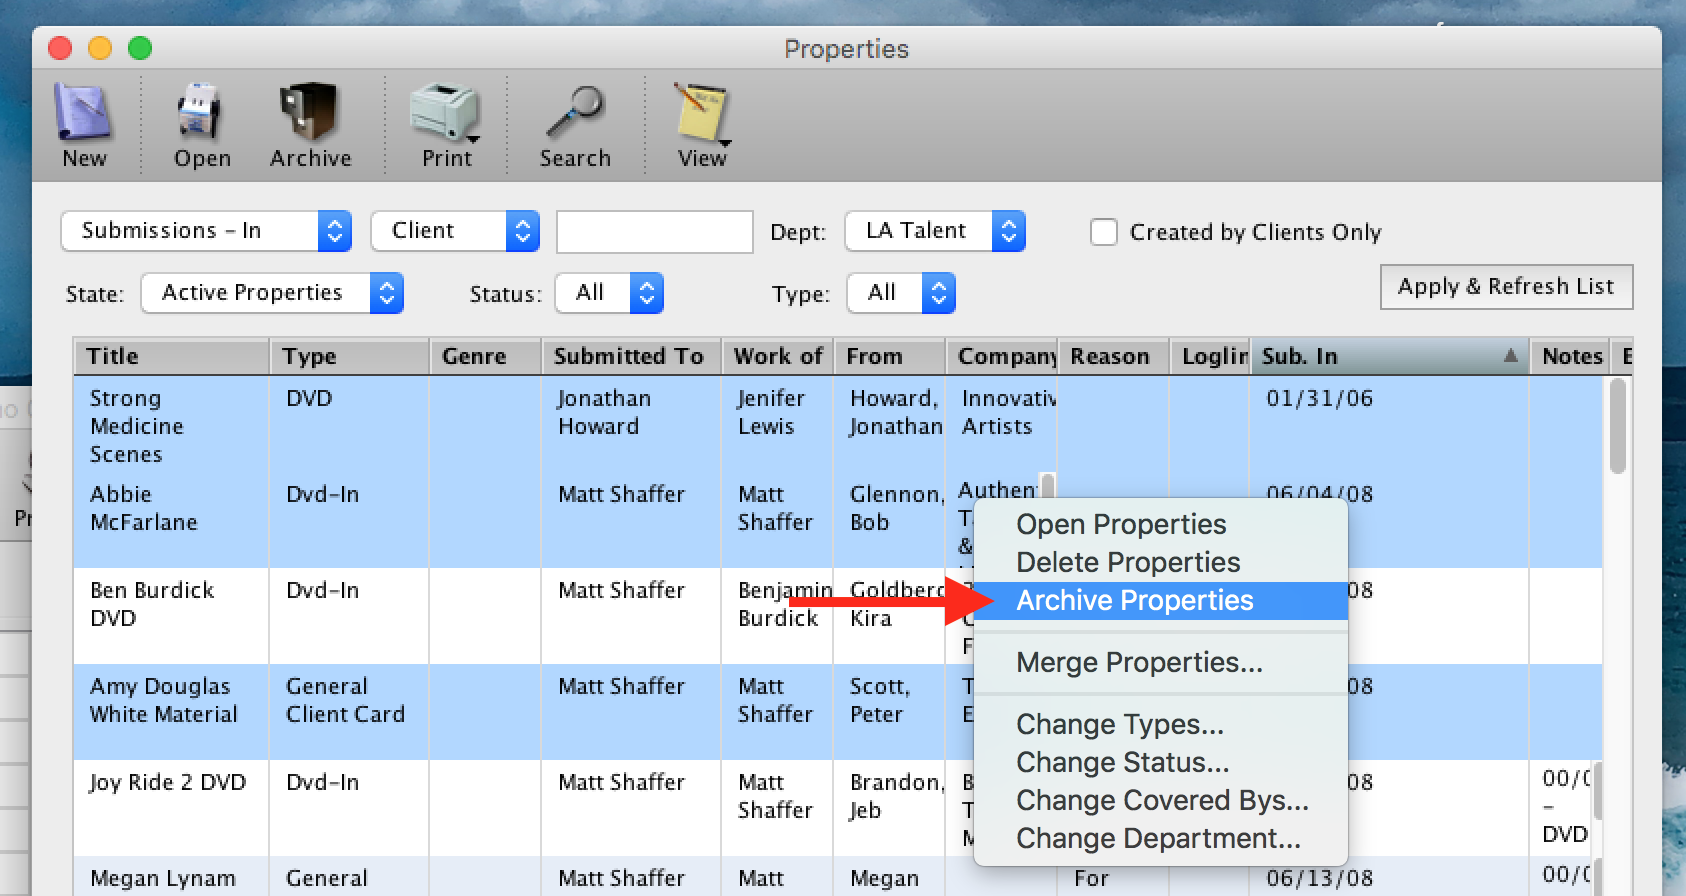
Step 3
Sort the results by the Last Modified column. (Sort it so the black triangle indicator is pointing up. this puts the older projects at the top of the list)
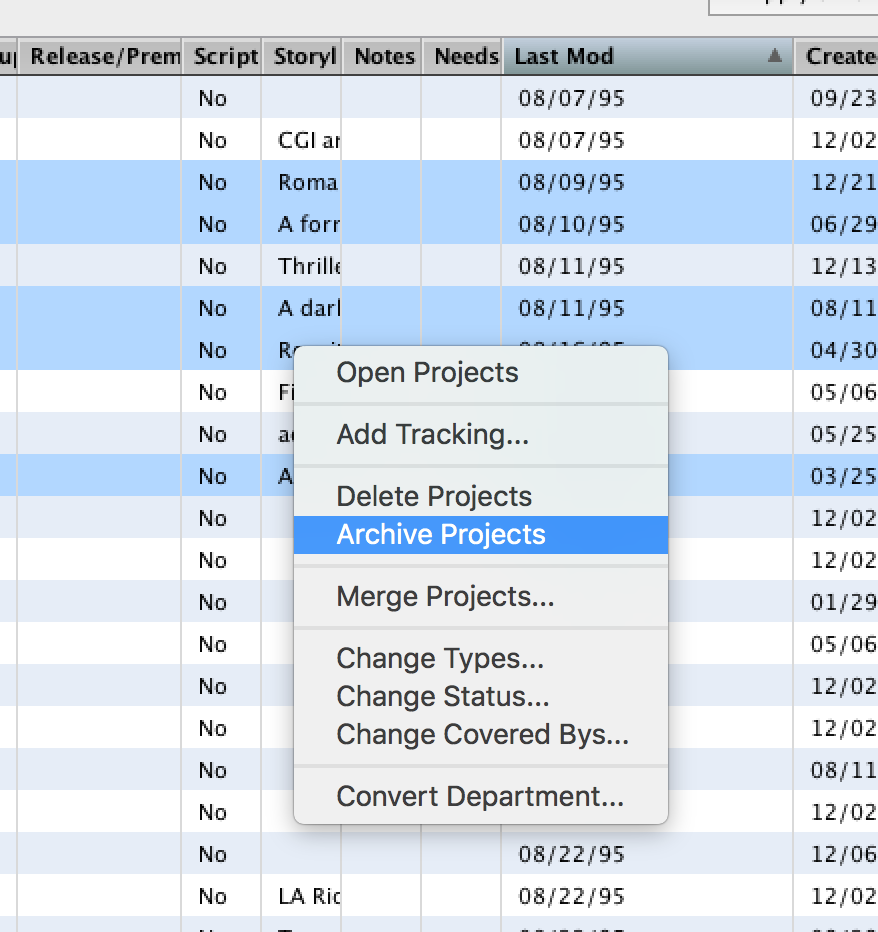
Step 4
Select then R-Click (Control Click) on a project. Select Archive from the Pop-up menu. You can select multiple Projects at one time to archive.
*Note The more projects you have selected the longer the archiving process will take. 10 projects at a time is a good amount.
Step 1
Open the Projects Module.

Step 2
Click on List View.
Step 3
Once in the List View, for the State field, select Archived or Deleted.
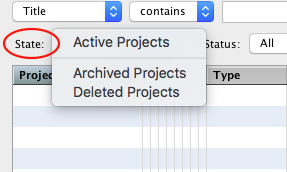
Step 4
Once you have selected the appropriate State (1), type in the name of the project and click on Apply & Refresh.
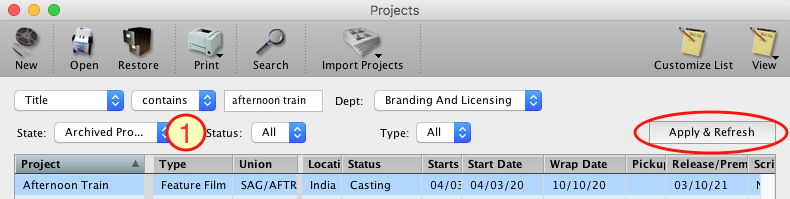
Step 5
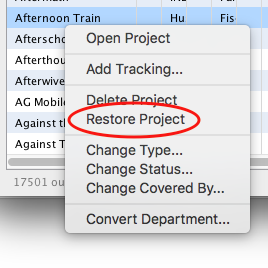
Once the result shows in the list, Right Click on the project and then select Restore Project.
Properties
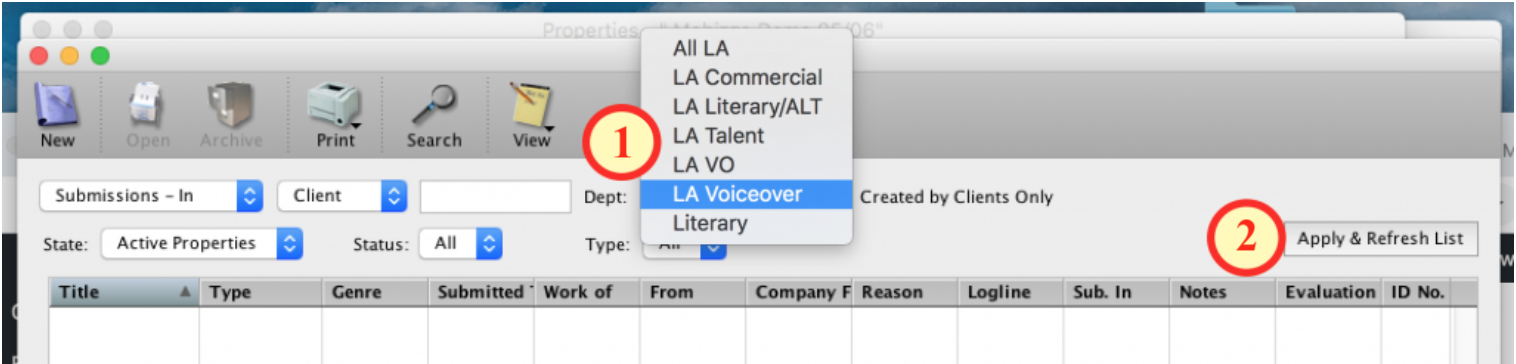
Step 1
Go to the Properties Module > List View.

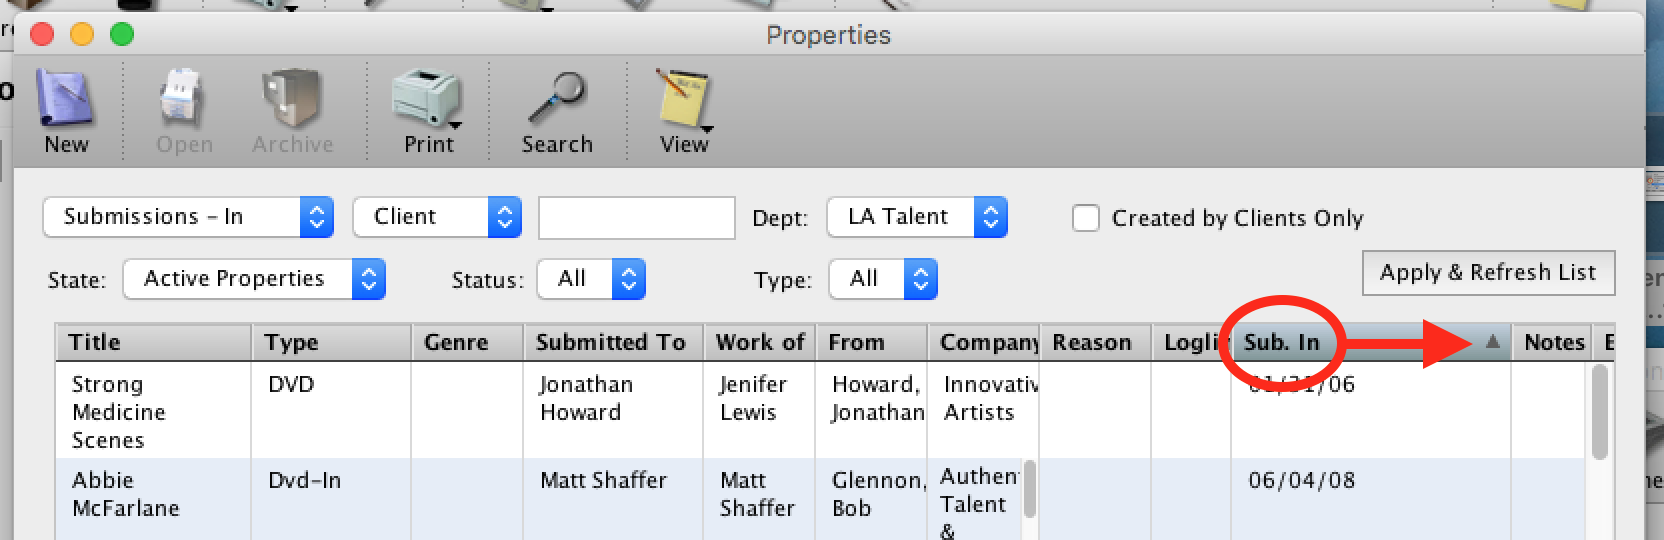
Videos
PLUGIN VIDEOS